

To repair old doorknobs and locks, start by learning a few key parts.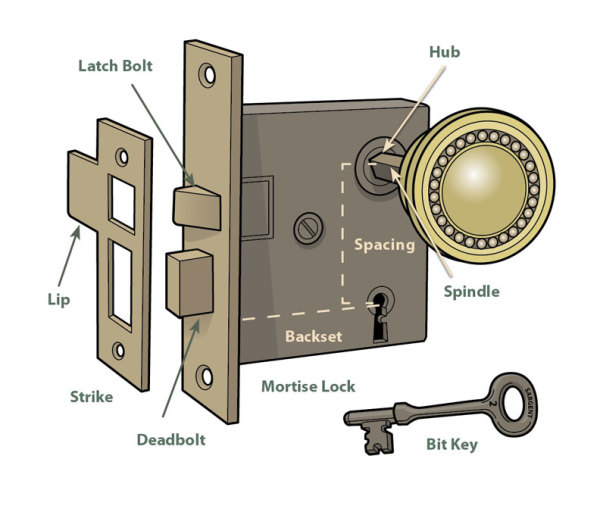
My old house has lots of stuck doorknob mechanisms on both interior and exterior doors. Is there an easy fix?
Bill Rigby: No one gives much thought to doorknobs or their accompanying mechanisms until they stop working. But once you understand a bit about the anatomy of door hardware, you can perform many fixes yourself.
On most door locks, there are two bolts that come through the face. The bolt with the slanted end is called a latch bolt, and it’s activated by turning the knobs; an internal spring retracts it when the door closes. The slant on the latch bolt rides up the lip of the strike (located on the door jamb) until the bolt falls into a hole in the strike. It provides minimal security designed simply to keep the door shut. If there’s a second rectangular bolt, it’s the deadbolt, which must be extended and retracted manually by turning a key or thumb turn, and offers a bit more security.
If you have a door problem, the lock may not always be to blame. When houses settle, the strike may no longer align with the bolts, or the hinges may have come loose, resulting in a door that won’t stay closed. Also check for paint buildup—many locks and hinges can be hindered by coats of paint.
If bolts no longer work and the paint’s not at fault, remove the lock and investigate further. Remove the knobs by undoing the small screw on the side of the knob shank (don’t lose it!). Once the screw is removed, the knob will either pull off or unscrew from the spindle (the 5⁄16″ square iron rod connecting the two knobs). The other knob can remain on the spindle, but as you push the spindle through the door, spacer washers may fall out—save these, too. If there is a thumb turn plate, remove that, too.
With the knobs out, now is the time to remove the two screws from the lock’s face. You may need a heat gun to warm and release any paint. If it won’t release easily, insert the spindle or a screwdriver through the knob hub, and rock it gently to ease the lock out of the mortise. Open the lock by removing the screw(s) holding the cover in place, then snap a picture or two or make a sketch of what you see to help with reassembly. Look for broken parts anywhere in the lock. These may be small, but they are critical; set them aside. Any misshapen or broken parts may need to be repaired or replaced.
Once opened, the lock reveals springs that may need repair.
You’ll also need to measure and record details of the knob hub (the casting with the square hole that holds the spindle), the spacing (the vertical distance from the center of the hub to the center of the round part of the keyhole), and the backset (the horizontal distance from the center of the round part of the keyhole to the face of the lock or door edge). Most locks came with various backsets and spacings, so these measurements are critical for getting the right internal parts.
Most doorknob problems start with a broken spring. (The remaining problems stem from someone fixing the lock incorrectly, installing the wrong spring, or installing it improperly.) Springs break because they are fatigued or the lock was never lubricated.
It’s possible to get some spring stock from a hardware store and make new springs yourself. An antique hardware specialist can make you new springs for about $20, or may have a supply of parts to replace broken ones. You can have the lock straightened, cleaned, and lubricated, too. For an additional fee, the lock face can be restored to its original finish. If you need parts, you’ll need some important information. Search for a maker’s name or a number cast into the body of the lock; a three- or four-digit number refers to a catalog number. (A number on the face usually refers to a key.) That and your picture of the open lock should be enough for a professional to analyze the problem.
Once the lock’s parts are all in working order, apply a little lightweight grease on the hub’s ears and medium lubricating oil on any other moving parts. Get the oil from any hardware store—don’t use WD-40, as it is not a lubricant. Use oil sparingly, and don’t lubricate the deadbolt, as oil here tends to transfer to the key, and you don’t want an oily key in your pocket. Graphite has always been a favorite of locksmiths for smaller moving parts, although it won’t prevent rusting like oil does. Pop the cover on and try the knob and key; the lock should be working.
Before reinstalling the lock, take the opportunity to clean up the door edge, knobs, and escutcheons. Then press the lock back into the mortise and replace the screws. Next, install the knobs—alignment is key; the spindle must remain perpendicular to the door face for maximum lifespan of the whole assembly.
Then install the knobs and replace the spacer washers. Make sure everything fits tightly—loose knobs wear out the escutcheons, loose escutcheons wear out the hubs, and worn hubs won’t work the latch bolts. Finally, reset the strike so the holes line up with the bolts, adjusting the strike mortise in the jamb if necessary.
Online Exclusive: Need new doorknobs? Check out our guide to 6 classic styles.


