

As Nate Skiles examined the ornamental broken pediment on a Philadelphia row house last renovated around 1900, rotted wood came away in his hand. The three-dimensional finial at the center was caked with layers of paint, but it wasn’t hard to see that it too was in rough shape. The entire pediment had been exposed to full sun for at least a century, and water from a nearby gutter poured over it whenever it rained. Everything had been wet for ages. Although Skiles specializes in restoring historic shutters as the owner of Main Line Shutters, he agreed to take on the pediment and other decorative elements on the façade, knowing it would entail hours of labor to retain as much original material as possible.
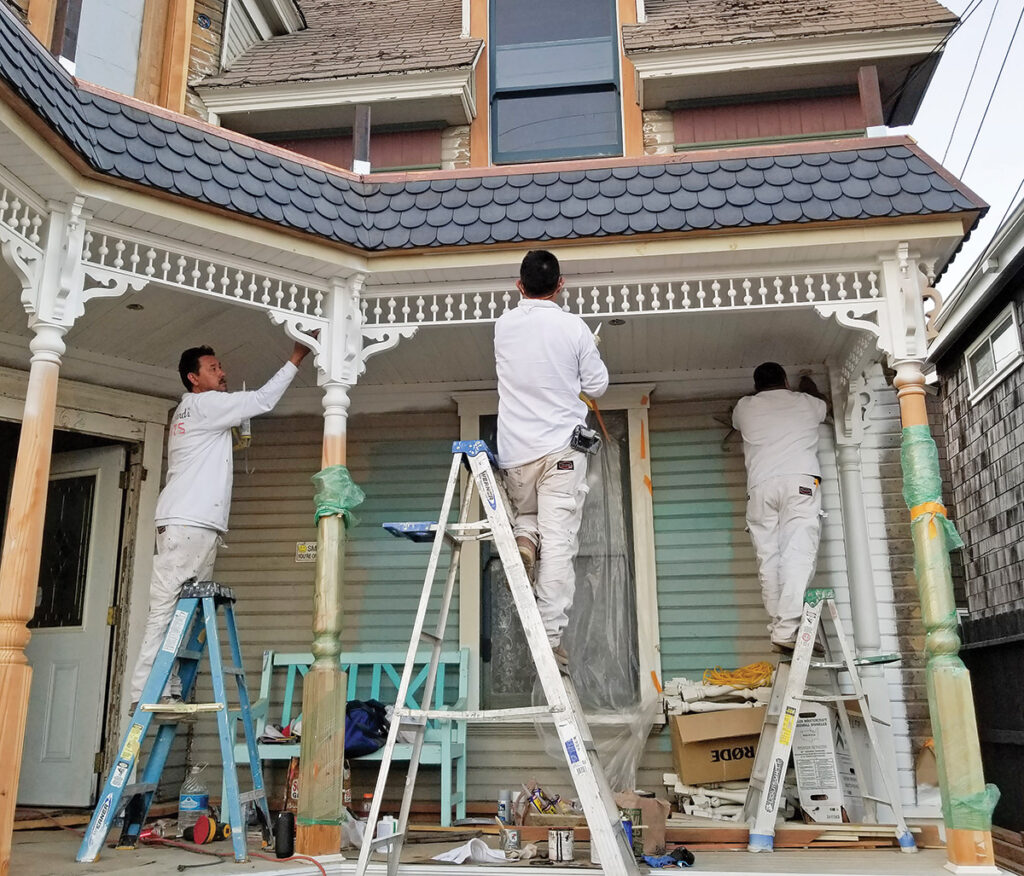
In a Los Angeles neighborhood 3,000 miles away, the front porch and upper porch gallery on Gina Bellous’ 1895 Queen Anne were in dire condition. Bellous hired skilled carpenters to rebuild the failing porch but reserved a laborious project for herself: the repair and reconditioning of 41 original balusters that remained.
While Skiles brought a tradesman’s skills and expertise to the pediment project, Bellous restored her balusters with a DIY sensibility. Both restorers used two-part epoxies to make repairs to decorative elements that are major style markers for each house. In both cases, progress was slow and required both experimentation and patience to bring these historic wood treasures back to life.
Repairing the Pediment
The broken-pedimented entry on a 19th-century brick row house likely dates to an early-20th-century style update. Surprisingly, most of the original wood in the pediment was intact, even the raked and flat sections that form the triangle. To restore the assembly, Skiles removed it from the front of the house and worked on the major components independently.
He began by allowing the pediment to dry out for weeks, helped along by injections of acetone through tiny pilot holes drilled into the wood. With the pediment removed, Skiles made some repairs to the brick that was behind it. The door lacked a lintel (the original steel one had been removed in the ca. 1900 remodel), so he added a new one shaped from a piece of 150-year-old wood. The new lintel not only supports the rows of brick over the door, but also provides a large fastening surface for the frieze and top end of the pediment.
Once the wood in the main part of the pediment was suitably dry, Skiles firmed up areas of soft wood by dripping in liquid epoxy consolidant, using an Abatron product called LiquidWood. Dripped or injected into the wood, the consolidant strengthens and repairs wood as it cures. To apply, he drilled 1/8″ holes in multiple locations, then squeezed in the viscous resin. When the wood could hold no more liquid and after the epoxy had cured, he began applying WoodEpox, a counterpart to LiquidWood, which is kneaded together in equal parts to form a pliable filler that feels a little like Play-Doh. Skiles applied the paste filler liberally, by hand, then shaped formed-up areas after it hardened, using a variety of techniques. Some were invented along the way, like using brads (small nails) as miniature rebar to hold epoxy filler on the undersides of projecting elements.
After sculpting filled areas until the profiles roughly matched the lines of the original pediment, Skiles removed excess material with a pull saw. Then he slowly brought back the exact profiles using hand tools. He started with rasps and chisels, then went to curved files. and finally to profile sanding pads, which have a moulded shape. Working slowly and steadily allowed him to arrive at the correct profile without having removed too much material.
To get into tight spaces, Skiles sometimes routed a profile onto a block of wood and used it as a sanding block. Another of his techniques is to double-fold sandpaper over the end of a three-inch plastic putty knife, to get into tight corners without carving a groove into the wood.
The finial was rebuilt separately. After it had dried out, it came apart in three pieces. Cracked and crazed in places, the entire piece was firmed up with liquid epoxy, then fully covered with epoxy paste filler. Skiles used epoxy filler to overfill end-grain damage, then gradually shaped the three-dimensional finial with curved files and profile sanding pads. He used softer foam pads and dense rubber radius backers on cove details.
He reattached the back piece of the finial to the front with wood glue, clamps, and a few hidden screws. The small cap piece on top of the finial was literally set in place with more epoxy—the cherry on top.
Step By Step Pediment Repair
Skiles removed the pediment and surround from a 19th-century brick row house, then worked on each element—frieze, pediment proper, finial, and pilasters—separately. The pediment and finial needed the most labor.
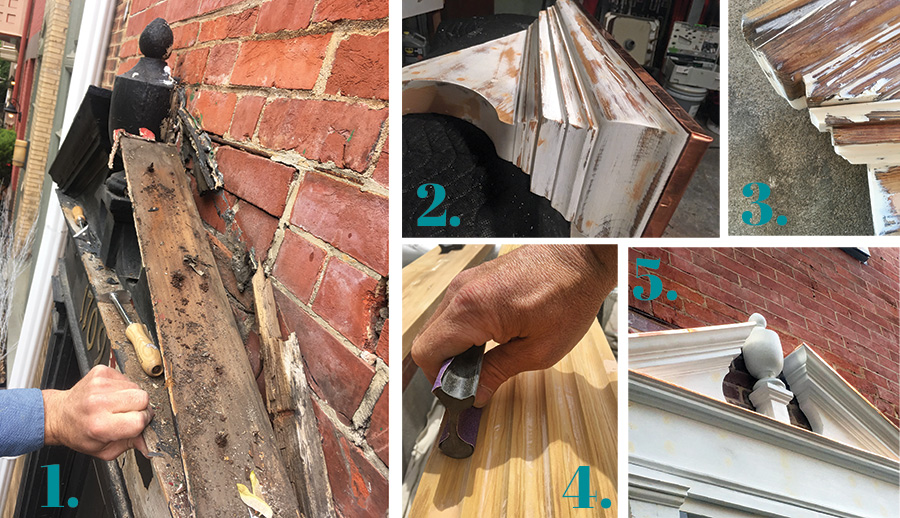
1. The early-20th-century pediment on a brick row house was pulling away from the façade. The wood around fasteners had rotted away.
2. After extensive reinforcement with liquid epoxy, craftsman Nate Skiles formed, sculpted, and cut and sanded missing and damaged areas using epoxy filler.
3. Skiles filled in areas of missing wood, then cut, chiseled, rasped, and sanded away excess material
to arrive at the correct moulding profiles.
4. Profile sanding pads enabled Skiles to finely sand contoured shapes, as in this fluted pilaster
below the pediment.
5. The completed pediment in place, after priming.
Rebuilding the Finial
The finial was the most challenging part of the pediment to repair. Although it looked solid from the street, the paint-caked finial was in such rough shape that it delaminated as it dried out.
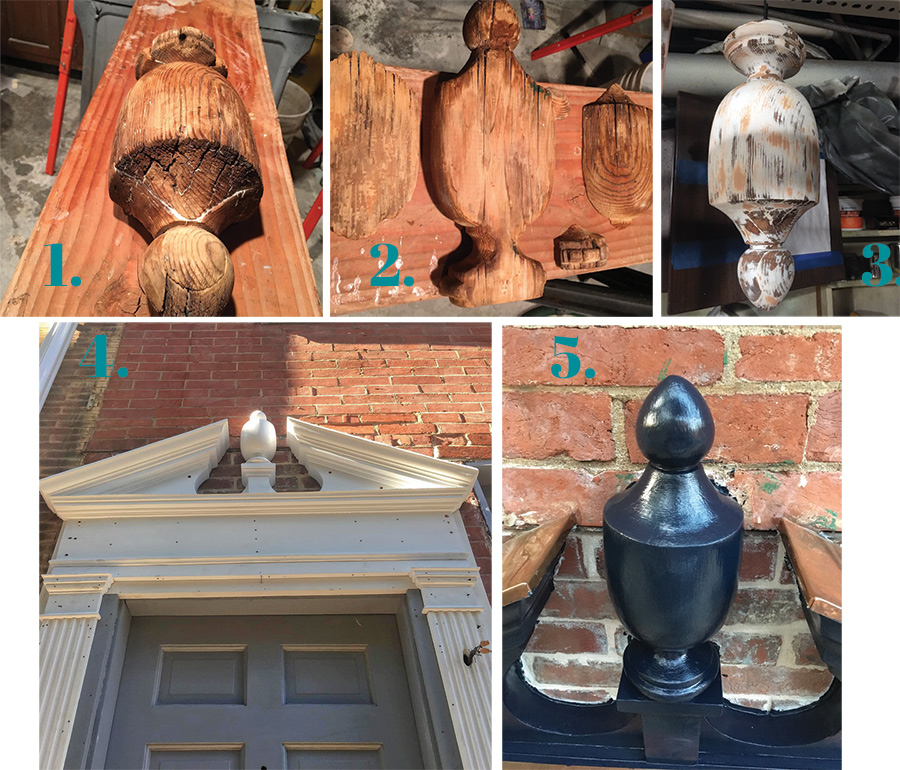
1. The finial ultimately came apart in three pieces, requiring Nate Skiles to use ingenuity to repair it.
2. To hold it together while he worked, Skiles made a jig to cradle the curved front, then glued, clamped, and
added screws from the flat back side.
3. The finial back to its original shape. After an initial priming, any remaining small crevices were filled in with standard wood filler.
4. The pediment, its frieze, and the finial back in place on the house, ready for paint.
5. A closeup of the finial after its last finish coat. Skiles attached copper caps to the raked top of the pediment and sealed them wherever they met the brick surface.

Restoring Historic Wood Balusters
Homeowner Gina Bellous was advised to throw away the remaining balusters on her Queen Anne porch and have new ones milled. They looked like trash to others; Bellous knew they were hand-turned 125 years ago from old-growth lumber and were part of the history of the house.
Some were in good shape, but others were split, had dry-rotted ends, or were missing chunks of wood. Stripping the many layers of failing paint required two applications of chemical stripper. As she worked, she was horrified to discover some balusters had been badly repaired with hot glue. “Glue is not something you use to put wood together, especially on a railing.”
The next step was to strengthen the wood internally. She placed six to eight balusters in a 5-gallon bucket to hold them upright while she applied liquid epoxy to strengthen the wood internally. To keep the consolidant more-or-less in place, she used strips of 3″ wide painter’s tape to form a barrier around the ends.
After the first application of liquid epoxy soaked in, she discovered that some balusters were leaking. Dabbing bits of epoxy filler on openings along the sides helped keep the consolidant in place. It took two or three pours before the wood stopped absorbing consolidant.
With the wood already feeling much heavier, Bellous mixed up batches of WoodEpox, an epoxy paste filler that’s mixed together in equal parts to form a pliable compound. To help the material bond in areas of newly exposed wood, she brushed on a little of the liquid epoxy, as well as some denatured alcohol, before filling in areas of missing wood. She pressed the compound firmly in place, overfilling slightly, and kept adding compound until no more would fit. To help form the square shape at the ends of the balusters, she applied flat slips of wood at the corners to create the 90-degree angle. Additionally, she overfilled the bottom ends, giving her extra material so that the baluster could be planed and sanded down to the correct height.
The final step before priming and painting was to sand each baluster so that the ends were square and of the same height, and turned areas were smooth and in proportion to the rest of the set. Like Skiles, she used a variety of sanding tools and techniques, depending on whether the surface was flat or curved.
A total of 41 porch balusters were among few surviving elements on the front porch of the 1895 Queen Anne. Although owner Gina Bellous contracted an expert woodturner to mill other missing elements, she tackled baluster restoration herself.

1. & 2. The last inch or so at the bottom of this baluster was dry rotted. After repair with two types of epoxy, it’s square and sound.
3. No need to drill holes here: crevices in the baluster ends quickly soaked up resinous epoxy. Bellous taped around the ends (painter’s tape was more successful) to keep the consolidant in place.
4. Bellous used small strips of wood to return each baluster end more-or-less to its square shape while the epoxy was still soft. Achieving the correct shape and proportions required extensive tooling and sanding.
5. The white spots on repaired balusters show where wood was missing and replaced with epoxy filler.
Making New Gingerbread

Gina Bellous was able to save and restore the existing porch balusters, but those from the upper gallery had been gone for at least 30 years. (In a picture Gina found of the house, taken in the 1980s, the railing had been replaced by a series of oddly shaped, poorly spaced balusters, also gone missing.) Bellous found a custom woodturner, Abaroot Woodturning, and had them mill new balusters for the upper porch. Based on the one survivor, they also hand-cut brackets, which hold newly milled spandrels in place.

Left: Scott Root of Abaroot Woodturning used salvaged wood to re-create the top of a post for the 1895 house, then hand-cut brackets. Spandrels came from Vintage Woodworks. Right: One of the restored posts, with new brackets and the spandrel in place, on the finished porch.
Using Epoxies to Repair Wood
Epoxies are a class of synthetic, thermosetting polymers used in adhesives, consolidants, plastics, fillers, molding compounds, and coatings. Epoxies have many different formulations and uses, along with different working and curing times. They are formed by mixing two separate components—typically from two separate containers marked A and B—immediately before use.
Epoxies used to rehabilitate wood are made up of resin and hardener. After being mixed at a one-to-one ratio, a chemical reaction changes the resin into a gel and then a solid, allowing the material to be shaped and formed. Once cured, it’s as solid as the wood it replaced.

1. Scrape, don’t scar 2. Repair with epoxy (never autobody filler) 3. Achieve “paintlessness”
4. Prime and sand 100 times 5. Then paint and sand some more. 6. Achieve beautiful finish
—Nate Skiles of Main Line Shutters
Consolidant
This is an epoxy resin in viscous, liquid form that can be dripped, poured, injected, or brushed onto damaged wood. Porous wood readily absorbs it like a sponge. Because it is a liquid, consolidant can penetrate to the threshold of sound wood, returning a damaged area to a significant percentage of its former strength as it cures
Paste Filler
A combination of resins and additives that together make a gap-filling paste, these are formulated to adhere well to consolidated wood (consolidants and paste fillers usually are engineered to work together) and can be shaped before fully cured. Filled areas can be cut, planed, chiseled, and sanded just like wood.
Tools for Detailing Wood

Grasp a Rasp
The 8″ half-round rasp quickly removes wood or filler and can tackle tasks like rough-shaping epoxy repairs or beveling corners. Made of machine-cut steel, the rasp has a lightly varnished 4″ beech handle:$11.50. Bundle with flat and round rasps: $28.60. Garrett Wade, (800) 221-2942, garrettwade.com
Sanding Blocks
These double-ended contour sanding blocks are ideal for sanding concave and convex shapes on moulding, edging, fluting, and more without distorting or diminishing the crispness of the profile. In six sizes, they’re made of flexible rubber that’s easy on the hands; $14.99. Rockler, (800) 279-4441, rockler.com
Paint & Urethane Stripper
By now a classic product, Blue Bear Soy Gel paint and urethane stripper makes short work of removing heavily caked-on paints and other stubborn coatings from wood, masonry, metal, etc. Made from American-grown soybeans, it’s nontoxic and biodegradable. Quart size: $22.99. Franmar, (800) 538-5069, franmar.com

Flush-Cut Saw
The Japanese flush-cut saw has a flexible blade that can be pressed flush to trim excess material without damaging surrounding areas. The 4″ blade cuts on the pull stroke and is a mere .01″ thick. It’s $22.60. Lee Valley Tools, (800) 871-8158, leevalley.com
Get Extra Time with an Epoxy Resin That Hardens Slowly
Pair up 105 Epoxy Resin with 206 Slow Hardener for projects that need more time. Mixed at five parts resin to one part hardener, the epoxy has a 20- to 25-minute pot life and cures to a strong, moisture-resistant solid. As shown: $194.54. West System, (866) 937-8797, westsystem.com
Resources
porch parts/millwork
Abaroot Woodturning
abarootwoodturning.com
Custom wood turning
Adams Architectural Millwork
adamsarch.com
Custom columns, millwork
Aeratis
aeratis.com
Porch decking & ceiling from realistic composites
American Porch
americanporch.com
Components in wood or polyurethane
AZEK
azek.com
Cellular PVC for millwork
Bear Creek Lumber
bearcreeklumber.com
Douglas fir, pine, spruce & mahogany; custom milling
Chadsworth
columns.com
Decorative and structural columns in wood, fiberglass, Polystone
Coppa Woodworking
coppawoodworking.com
Screen doors & porch panels
Coyle Lumber & Millwork
coylelumber.com
Posts & balusters turned to order
Full Circa
fullcirca.com
Exterior/interior historic restoration
Mad River Woodworks
madriverwoodworks.com
Victorian-era balustrades, columns, porch millwork
McCoy Milwork
mccoymillwork.com
Douglas fir porch rails, flooring & ceilings
Main Line Shutters
facebook.com/mainlineshutters
Historically accurate shutter, millwork & hardware restoration
Old Capitol Custom Millwork
oldcapitolcm.com
Authentic period windows, doors, shutters & millwork
TimberBuild
timberbuild.com
Porch brackets, caps, finials, etc. in solid wood
Vintage Woodworks
vintagewoodworks.com
Porch parts wood & synthetic
Worthington
worthingtonmillwork.com
Architectural columns & components
prep/repair
Abatron
abatron.com
Epoxies
American Building Restoration Products
abrp.com
Cleaners, washes, polishes, enhancers for wood etc.
Franmar
franmar.com
Blue Bear Soy Gel paint strippers & more
Rockler
rockler.com
Molded sanding pads, shaping tools & more
Scherer Bros. Lumber Co.
schererbros.com
Custom mouldings & knives
Tremont Nail
tremontnail.com
Steel cut & hot-dip galvanized nails
Vintage Woodworks
vintagewoodworks.com
Victorian-era porch parts & trim
West System
westsystem.com
Marine epoxies for wood restoration
Zar
zar.com
Wood filler for patching


