

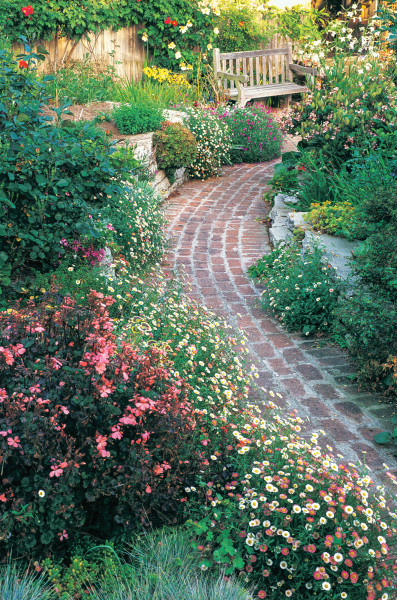
A brick path winds through a garden secured by raised stone planting beds and a welcoming, slat-backed wood bench.
Jerry Pavia
Farmer and quarry owner Johanna Andersen–Pratt tells a funny story about a long-ago dairy farmer who wanted some of the natural flat stone he’d seen on a neighbor’s property. So the farmer paid the owner $16 to harvest a load of stone and deliver it to his barn, where he laid it on the floor.
Apparently he’d gotten tired of standing in knee-deep mud to milk his cows.
Whether you have in mind raised stone beds for plantings, walls for water conservation or erosion control, a fountain to create a cooling breeze in summer, or you simply want to cross the yard from the driveway to the house without getting your feet wet, hardscape materials are the way to go.
Stone, brick, and other durable landscaping materials can transform a plain patch of yard into a place you’ll want to spend time in, whether it’s high summer or a clear winter day. For the most authentic look, use time-tested materials relevant to the age of your house: brick or locally quarried stone for paths, steps, or walls around a home built in 1820, for example—or concrete or brick used in an imaginative zigzag walk for a 1950s Ranch house.
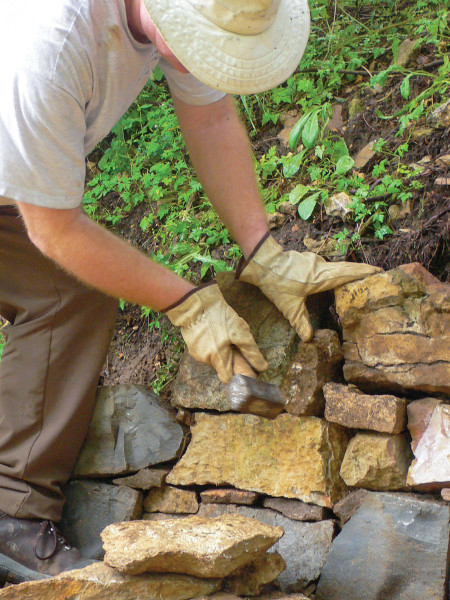
Dry-laying a stone wall requires an ability to see and work in three dimensions.
Mary Ellen Polson
Understanding Materials
Like the farmer who bought flat stones from his neighbor, locally available materials, from natural stone to brick pavers and railroad ties, are often the best and most cost-effective resources for a hardscape project. Be sure to get detailed installation instructions from the supplier before beginning any project, or hire an experienced professional to do the work. No matter how beautiful the installation, it won’t look good for long without a proper foundation.
natural stone Varying from slate and bluestone in the Northeast to sandstone and limestone in the West, natural stone often makes the best selection for a hardscape project. The most authentic looking stones are likely to come from your immediate area, especially large features like boulders as well as flagging and other stones for paths, walks, and walls.
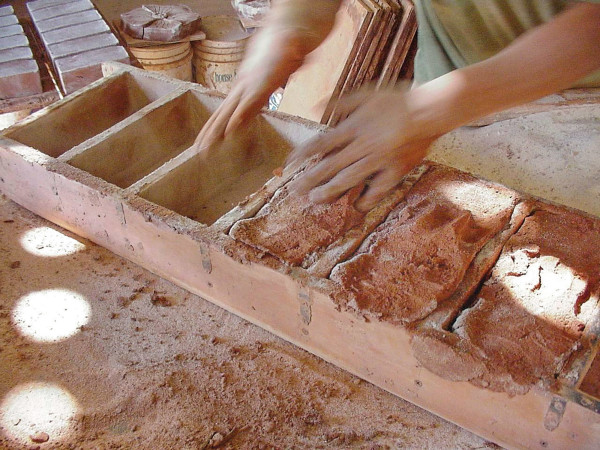
Brick pavers are still hand moulded at Old Carolina Brick.
Flagstones have been used to create stepping stones and paths for centuries. The term flagstone can be applied to almost any natural landscaping stone that’s flat and hard. The best are split from dense metamorphic rock with uniform internal layers and a surface texture that provides traction. Schist, bluestone, slate, and metamorphosed sandstone and limestone all make excellent flagging materials. The thicker the slab, the longer it will last—in some cases, more than a century, even under constant use.
Flagstones are usually 1″ to 3″ thick and are either cut to size in various rectangular shapes (dimensional flagging) or cut, chipped, or broken into irregular shapes (natural flagging). Depending on where the stone is quarried, flagstone can range in color from pale buff to rich blue to greenish-blue or even lilac. There are also variegated flagstones, and flagstone mixes of subtle or strikingly complementary color combinations.
Dimensional flagstones can vary in size from as small as 6″ x 6″ to 3′ x 4′ or larger. Varying the sizes in the pattern (using multiples of each size, both squares and rectangles) creates interesting rhythmic patterns, especially for large expanses of flagging, such as a terrace.
For a more formal look in wall construction, consider snapped ashlar. These brick-shaped stones stack with tight joints that can either be dry-laid or mortared in place.
Brick
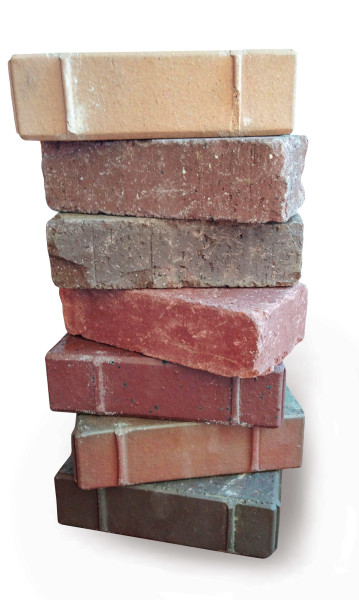
Paving bricks from Pine Hall Brick come in a wide variety of colors.
Because brick is made from naturally available clays, it’s been a historical material for landscaping since Colonial days. While you can use vintage brick in landscaping projects, be aware than brick is fired for different degrees of hardness, depending on the intended purpose. Better choices include hard-fired vintage brick and brick pavers.
The best are still handmade in moulds. Handmade paving brick is less compressed than regular construction brick and contains small air pockets. The air pockets allow moisture to pass through the brick—or even freeze and thaw repeatedly—without cracking the paver.
Bricks vary in color, depending on the kind of sand and clay used to make them. Coal-fired brick, the technique that resulted in the delightful clinker bricks of the Arts & Crafts era, often gives unusual color variations not found in commercial brick. Available through specialty retailers, these “accidents of the kiln” are irregular and lumpy and often luridly colored in shades of purple, terra cotta, and black.
Garden Structures
Latticework, arbors, and even pergolas and porch rooms are widely available prebuilt, built-to-order, or as do-it-yourself kits. For best longevity, choose garden structures made of clear Western red cedar, redwood, or tropical woods like ipe. Using rust-resistant fasteners is critical, too—look for galvanized or stainless-steel fasteners, even for a trellis. Insist on high-quality joinery and construction details for arbors and pergolas.
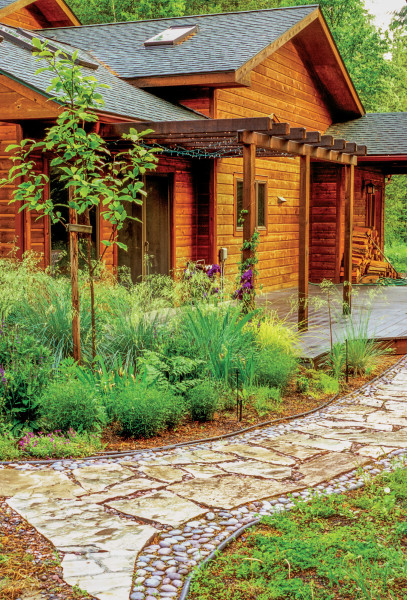
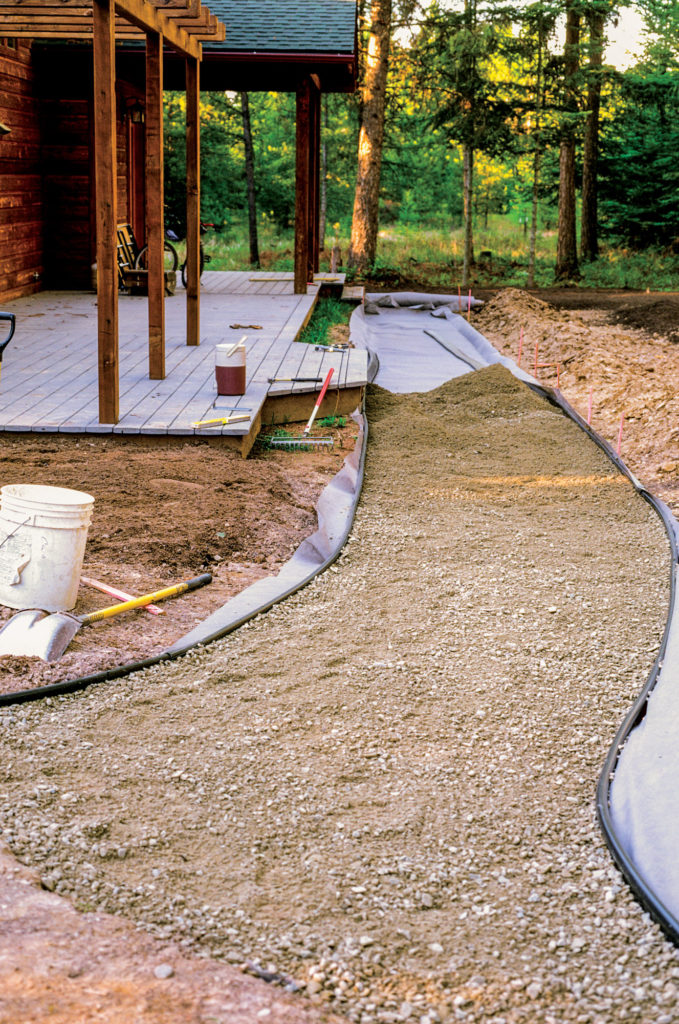
Building a Flagstone Path
Creating a flagstone path is relatively simple.
Jerry Pavia
Creating a flagstone path is relatively simple. Plan on devoting at least a weekend to the project.
1. Lay out the path by placing wood stakes from the beginning to its natural terminus (from the driveway to a porch or deck, for instance). The approach should be wider from its source and narrow to a consistent width as it curves to its destination.
2. Dig the path to a consistent depth of about 6”. Using a tamper, screed, or vibrating compactor, compact and level the dirt. Once the surface is level, lay a commercial grade of weed cloth along the path, tipping up at the edges of the path. The weed cloth isn’t essential, but it does help prevent the propagation of weeds.
3. Install plastic landscape edging into the weed cloth. Then spread a 2″ level of moist (not wet) crushed gravel on the bed. Gravel is sold by weight and size. (Stones averaging under ” in size are often recommended, but we used “.) Compact the gravel. Spread a second, 2” layer of moist gravel and compact this. The path is now ready for the stone.

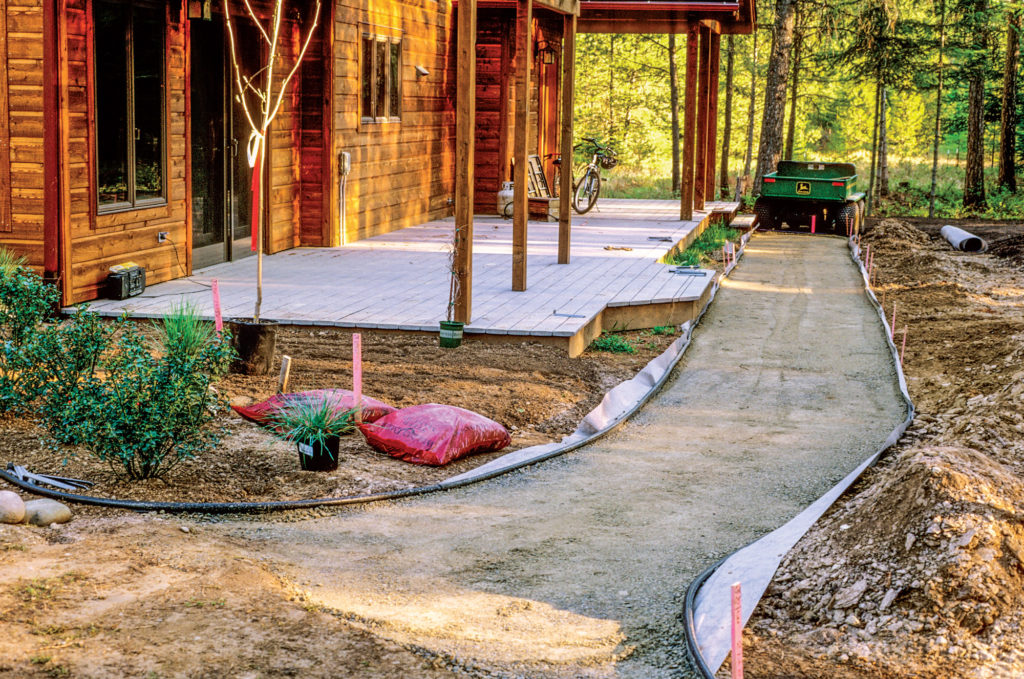
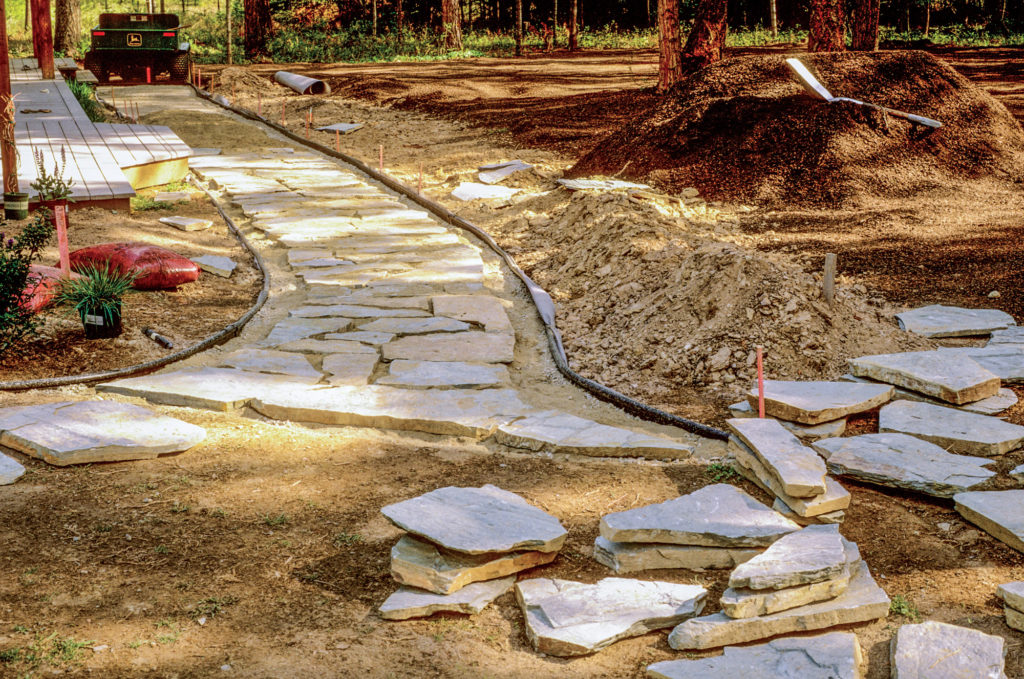
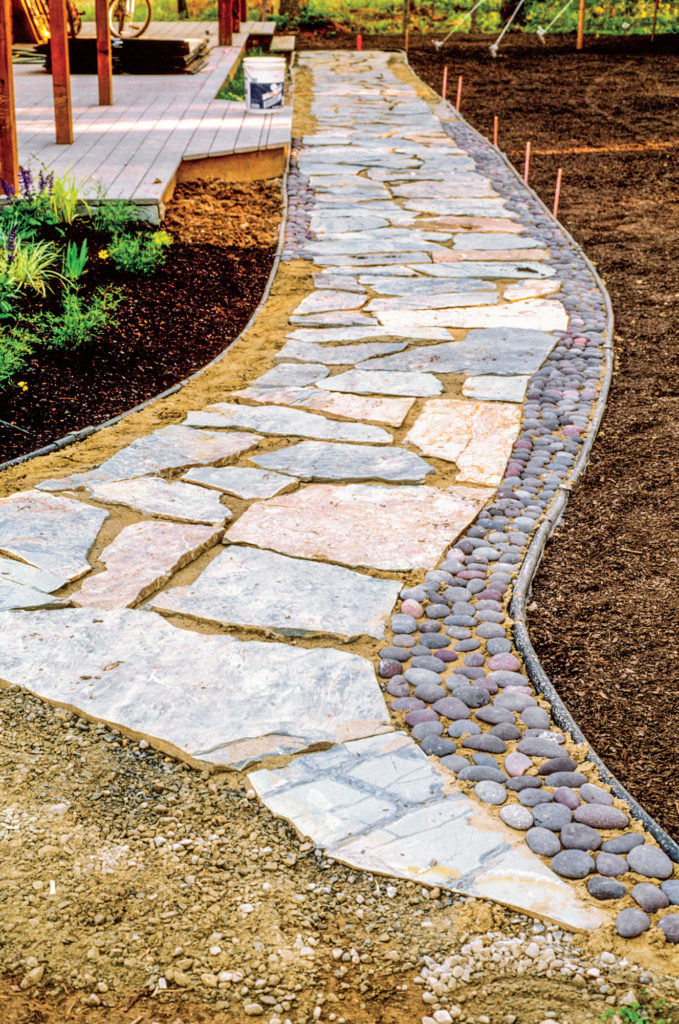
4. Spread stones around the area for easy selection. Save some of your better stones for placement at strategic spots such as near steps or the beginning of the path. Lay stones so each is fully supported: this often requires lifting the stone and either adding more crushed stone or removing some material, then resetting the stone using a hand trowel, sometimes many times. Test the stones by jumping on top of each—no stone should wiggle. Use a level to keep the tops of the stones on an even plane, then continue laying stone down the path, keeping the outer edges of stone fairly even.
5. Lay the decorative edging stones and embed them using a wooden or rubber hammer so you don’t mar the stones. We used a different decorative rock and embedded it into the gaps between the flagstones. This binds the path together and should hold up with no maintenance for many years. —Jerry Pavia & Allen Rose
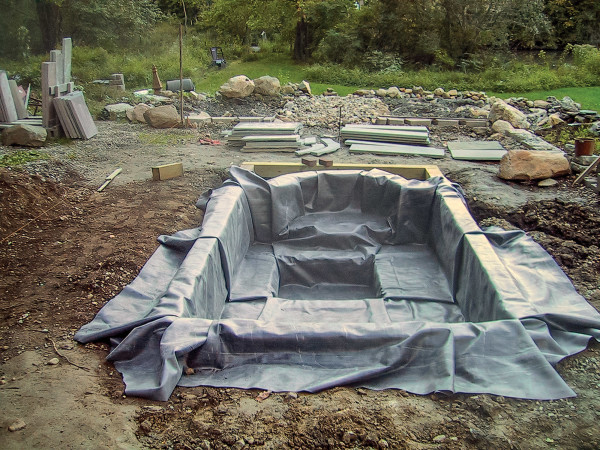
A Grand Path to Water
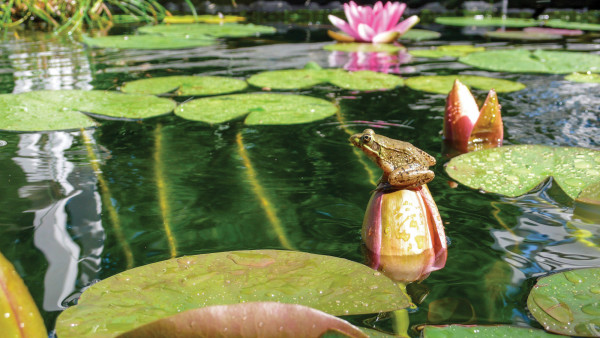
Within sight of the bronze “Frog King” fountain (below), a real frog rests on a closed lily bud in the pond hand-built by Jill Chase and Bill Ticineto.
When the backyard slopes down to water, it’s a given that a path always led that way. When Jill Chase and Bill Ticineto eliminated an existing driveway in the backyard of their 1920s Connecticut home, they also developed a garden plan that created an intuitive progression from house to natural pond.
Not content with one water feature, they began by designing a small rectangular pond with a fountain, placing it just below the house, where it could be seen to best advantage from the second-floor windows. Accented with a vintage frog fountain, the pond is classically sited on an axis, linking it with the lower yard in a subtle progression that moves from formality to relaxed naturalism. Just below the new pond, bordered by a grassy lawn, is a small flagstone patio with facing benches. Below that, the lawn gives way to a footpath that wends its way through an increasingly wild landscape to the old pond.
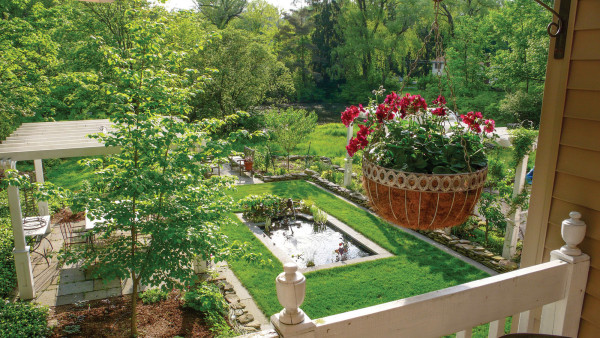
From an upstairs window, the owners can look over the frog pond, pergola-shaded patios, and a path leading to the natural pond below the house.
Bill Ticineto
While there was no evidence that there had ever been a fountain in the backyard, the couple discovered some railroad ties that were perfect for the framework of their planned 6′ x 9′ excavation. After marking off the rectangular outline with spray paint, they began to dig, in some cases through rock.
The fountain was outfitted with a small pump; a larger pump connected to the filter is sunk in the bottom of the pool. Clean water re-enters the pond at the far end. Each pump is on a separate switch so they can be controlled separately.
Just behind the fountain—dubbed the “Frog King”—there is a bog area where overflow from the pond goes when it rains, helping keep the water level constant. The area is outlined in bluestone, laid in the same arched pattern used in design of one pergola. The couple planted the pool area with the shade-loving, large-leaf ligularia as well as grasses that conceal the electrical lines and filter unit.
Building the Pond
A pergola adds a classical element.
Bill Ticineto
Framing the Shape
The 6′ x 9′ rectangular pond is framed with a mix of found railroad ties, pressure-treated lumber, and cedar timbers. The designers included a deep well near the center for the koi, who like a deep place to get away from such predators as raccoons and herons. In the winter, frogs hibernate there. The depression also hides the underwater circulating pump.
Lay down a heavy felt liner.
Bill Ticineto
Lining the Pond
After filling the bottom with about 4″ of sand, Bill and Jill put down a heavy felt liner, followed by a heavy rubber pond liner. The sand and felt protect the liner from punctures, prolonging its life.
Tucking in the Liners
Both the felt and waterproof rubber liners were carefully laid in, then tucked and folded around corners and contours, like folding hospital corners on a bed. Bill and Jill allowed for overage so that the liners completely covered the framework, then trimmed off excess material. Bluestone coping was laid on top, anchoring everything in place. Filling the pond with water further flattened out the liner.
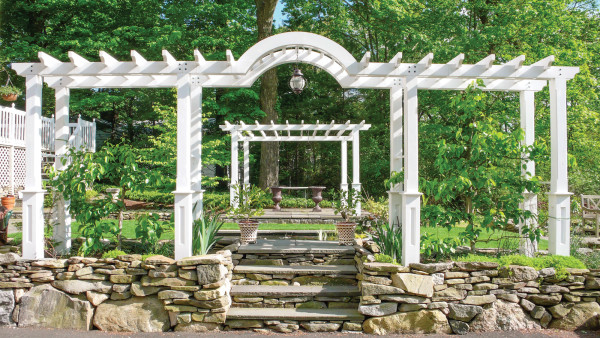
Adding Classical Elements
To complete the formal framework, Jill Chase and Bill Ticineto collaborated on the design for a grand pergola with an arched center and a second one on the other side of the pond. The arch shape also appears at one end of the pond.
Shop Tour: Ashfield Stone
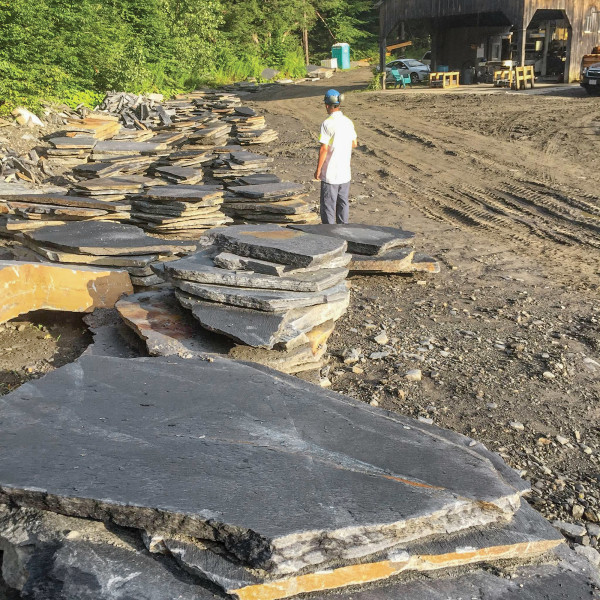
Large slabs of naturally occurring schist at the Ashfield Stone quarry.
Courtesy Ashfield Stone
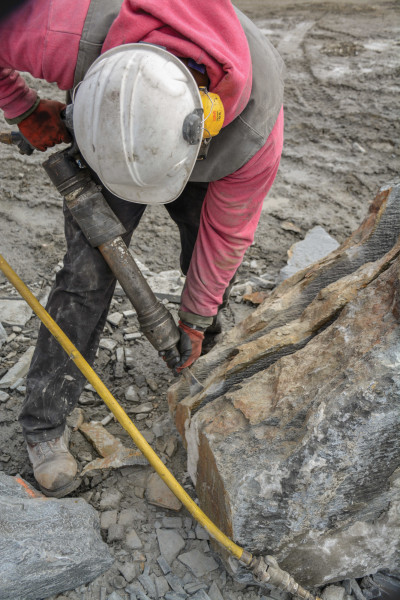 Step 1
Step 1 Bryce Ribken uses a pneumatic splitting hammer to cut small depressions at intervals along seam lines in the stone.
Courtesy Ashfield Stone
On a recent visit to Ashfield Stone, I got a geology lesson as well a chance to see how the versatile stone harvested here is split, shaped, and finished into a surprisingly broad array of products.
When Jerry Pratt and Johanna Andersen–Pratt bought land in in the Massachusetts Berkshires in the 1980s, they were surprised to learn that the property was loaded with a particularly dense form of 400-million-year-old schist. Schist is a layered metamorphic stone that splits along seams between darker and lighter deposits, making it ideal for landscaping.
Johanna was initially skeptical that anything could be done with the stone until a mason came by and admired a pile of stone she and Jerry had recently dug up. “He said, ‘this is really nice rock’, Johanna explains. “‘You should sell it. As a matter of fact, if you’ll load that pile of rocks on my truck. I’ll give you 20 bucks for it.’ So we did and he gave me the 20 bucks and I thought, maybe we can do this.”
 Step 2
Step 2 As he applies pressure and listens, the stone starts to split along sedimentary seams.
Courtesy Ashfield Stone
For years, Ashfield sold only landscaping stone. Then Jerry took a sample to a fabricator and had it polished. The results were jaw-dropping. Ashfield now quarries and markets three lines of polished stone for countertops, sinks, and cladding: Quicksilver, Galaxy, and Crowsfoot, an unusual stone with ice-like patterns and ruby-like bursts of color. Ranging from light to dark grey, the first two stones “have the same aesthetic as soapstone, but are denser and harder,” Johanna says.
Everything is quarried locally and, with the exception of landscape stone, fabricated in Ashfield’s state-of-the-art shop. All landscaping stone is fabricated in the quarry, which is open only in the summer months. To demonstrate the basic splitting technique, operations manager Bryce Ribken picked up a pneumatic splitting hammer and began to cut small slots in a large chunk of stone in the muddy yard outside the shop.
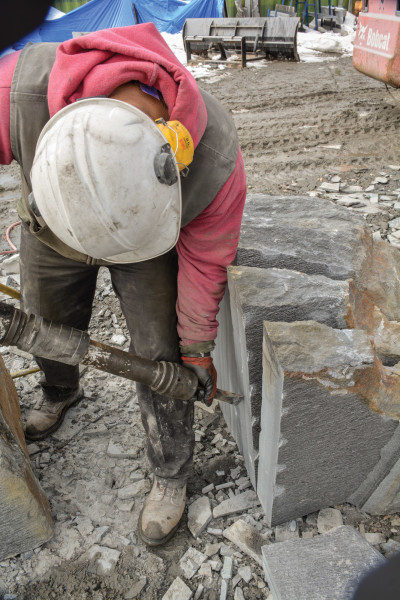
 Step 3
Step 3 The stone splits in clean, level layers: perfect for landscape stone.
Courtesy Ashfield Stone
Imperceptibly at first, the stone began to open between the dark and light seams. The hammer makes a percussive noise that starts to sound hollow as the seams open. After some deeper tapping with the hammer, the layers of stone literally split away from each other, creating a clean, even surface with what’s known as “glacier scoured edges.”
Landscape stone also includes what Andersen–Pratt calls “snapped stone” or snapped ashlar, ideal for producing brick-shaped stone for stacked walls, or for cladding columns or fireplaces. It’s made using a guillotine saw at the quarry; workers slide large 3′ x 4′ pieces of flagstone along rollers. “Then this big press comes down and pushes, pushes, pushes, and snaps it. Then we move the stone over 4″, and repeat the pushing process until the stone snaps.”
It probably won’t come as a surprise that Johanna Andersen–Pratt is an advocate of using natural stone in the landscape. “It settles in with an old house,” she says. “It looks like it’s been there forever—right after it’s been installed.”


