

Beautiful but frail, the 115-year-old verandah was beginning to come apart. Columns and capitals were damaged, spindles and railings needed attention, and the porch flooring—originally laid in a herringbone pattern at each rounded corner—was beyond repair.
Once master woodworker Sidney Furst and his team stripped off the old deck, however, they were surprised to find mostly solid 2×12 support joists beneath it. The previous restorer had even signed his work, noting the date of repair: 1986.
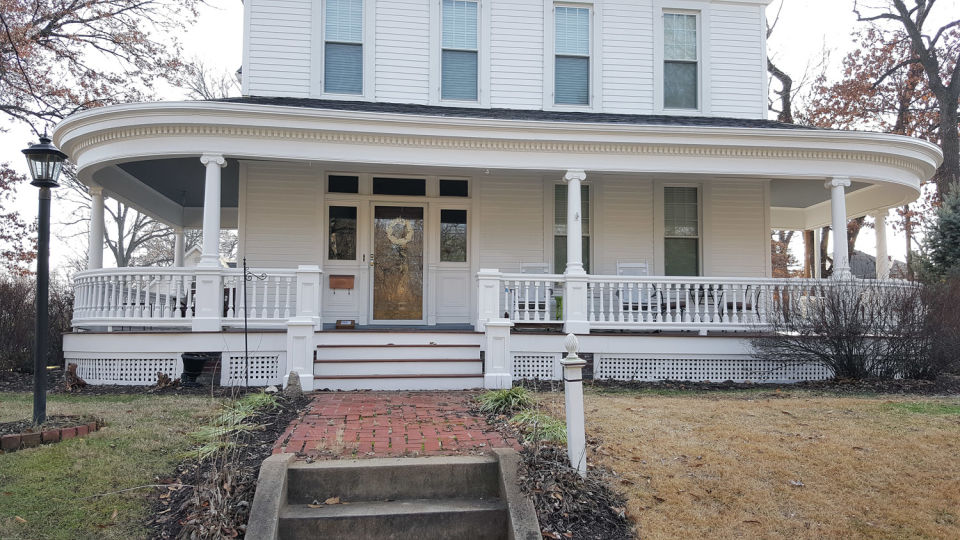
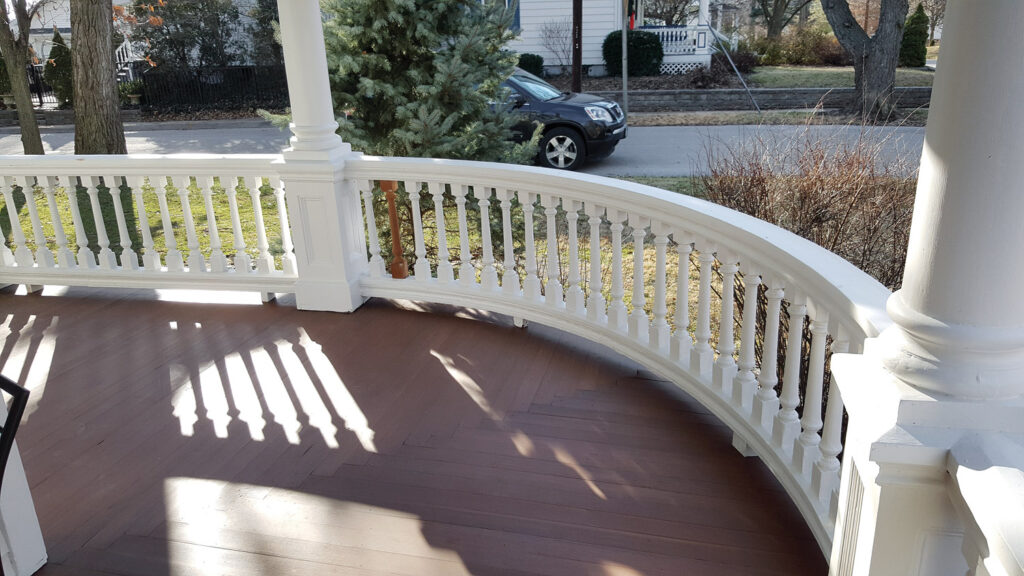
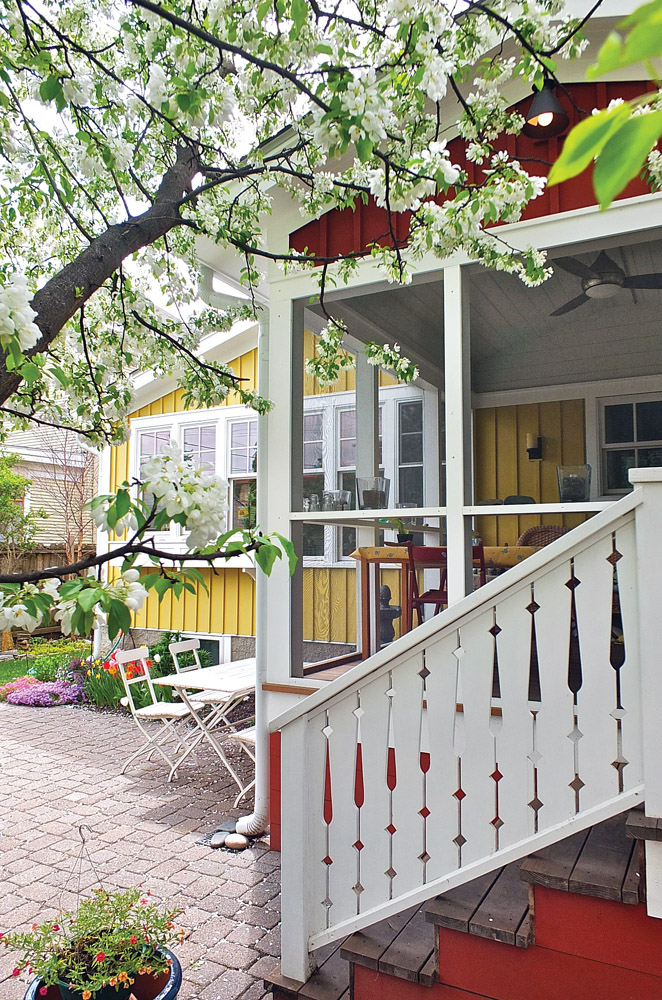
Wrapping around two corners of the house, the deck and balustrades of this 115-year-old verandah were rebuilt about four years ago and remain in pristine condition. (Photo courtesy: Furst Woodworking)
That the porch had survived more than 30 years since the previous restoration shows how durable porches can be when they’re kept up—and how vulnerable they are when not. “Rebuilds are not cheap,” says Furst, a fourth-generation cabinetmaker and restorer who lives near St. Louis, Missouri. “To do them right takes a lot of time and effort. If the porch is kept in good repair, you’ll get a lot more [years of] use out of it.”
Maintenance is of the utmost importance, Sidney Furst admonishes. The most vulnerable areas on the porch, and the quickest to show signs of wear and tear: the porch floor (deck) and the balustrade (comprising balusters, top and bottom rails, and fasteners). “Make sure the porch deck drains properly, and keep the porch
painted to keep moisture out.”
Read Deck Paint vs. Stain
Porch Floors
minor repairs Peeling paint, cracking, splitting, cupping, and rot appear first on the exposed ends of porch floorboards, where they’re fully exposed to the weather. Over time, even the tiniest paint cracks allow water to penetrate, causing paint to peel and exposing the wood.
To prevent damage, paint or stain floorboards every other year at minimum. Paint stair treads and other heavily traveled areas more often. Make sure the wood is sound, then scrape off any loose paint before priming and repainting.
While a single damaged board may not sound like an emergency, “rip it out and replace it immediately,” urges Furst. One failing board can be the first link in chain that leads to more damage.
To determine if a board is spongy, probe it gently with an awl to see whether it’s beyond repair. Remove the damaged section or the entire board with a reciprocating saw, then examine the structural framing underneath. Any suspect joists should be sistered (doubled up with similar lumber) or replaced.
Choose wood of the same width and species, and cut the new tongue-and-groove board to length. (Not all porch decks are laid in tongue & groove, but it’s the best bet.) If the repair requires only a partial board, make sure the board is long enough to center on the next joist over. Prime the replacement board on all sides (Furst uses a mix of paint thinner and Thompson’s WaterSeal) before blind-nailing it into place. Follow up with a couple of coats of paint—or better yet stain, which penetrates and protects the wood and won’t peel like paint.
Step by Step Porch Repair
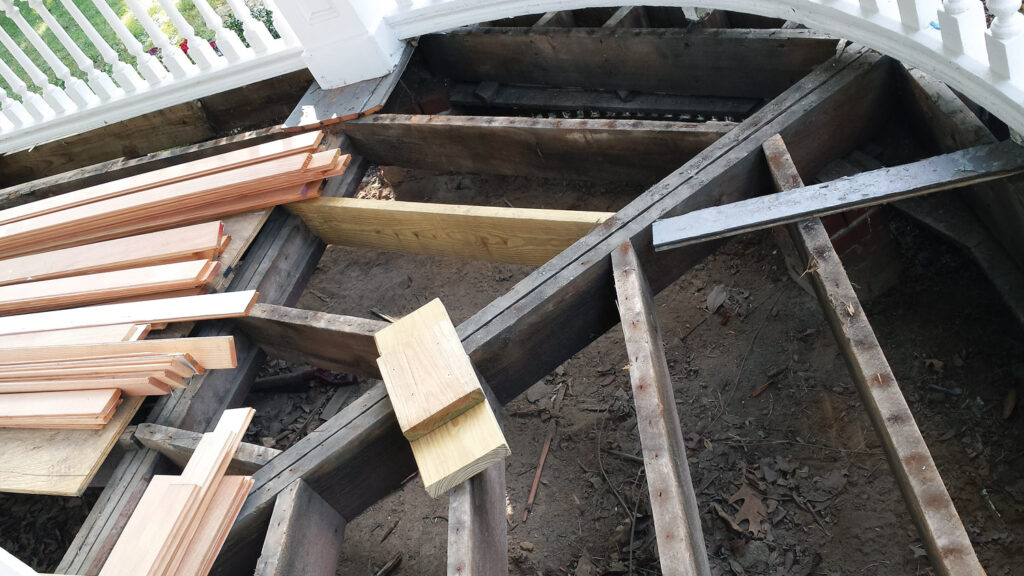
- When contractor Sidney Furst peeled back the failed porch deck, he was surprised to discover the understructure was sound and needed only minor repairs. Flooring under the column has been left intact to support it.
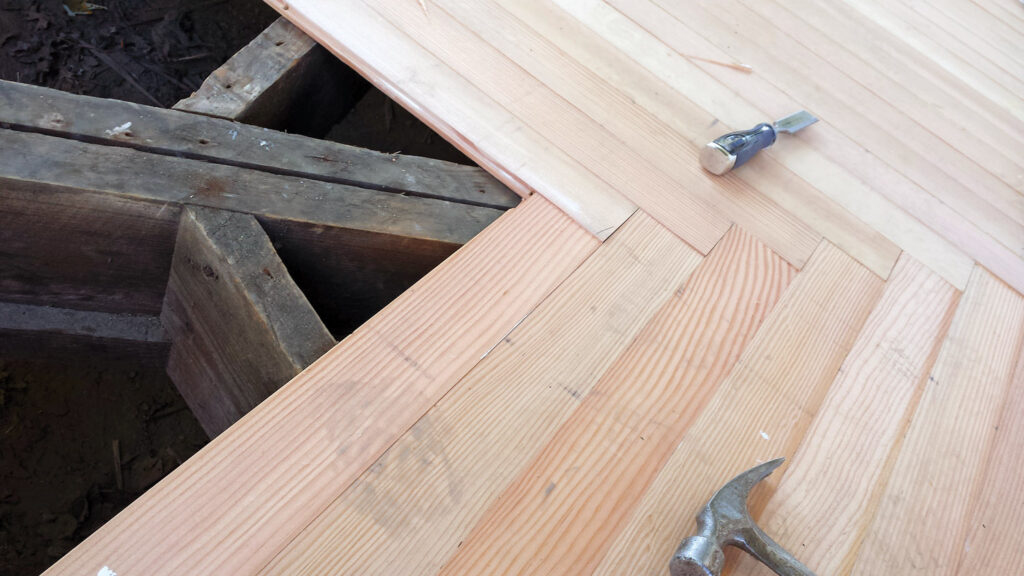
2. Furst laid the new flooring in the porch’s two radiused corners in a herringbone pattern, which steps the joints between mating boards.
3. The herringbone corner is elegant in appearance, but more importantly, the pattern eliminates a straight, diagonal seam that would be more vulnerable to failure.
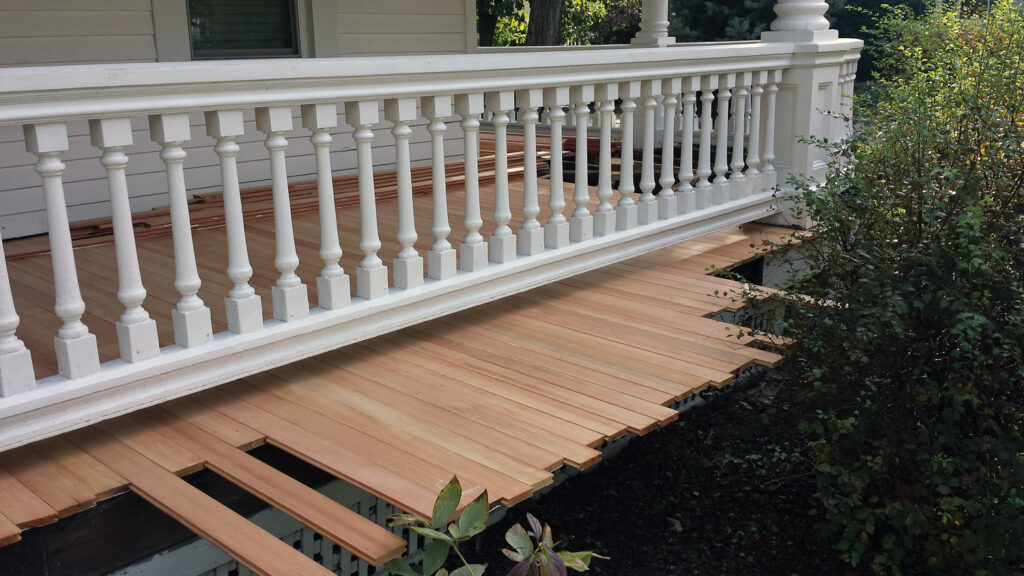
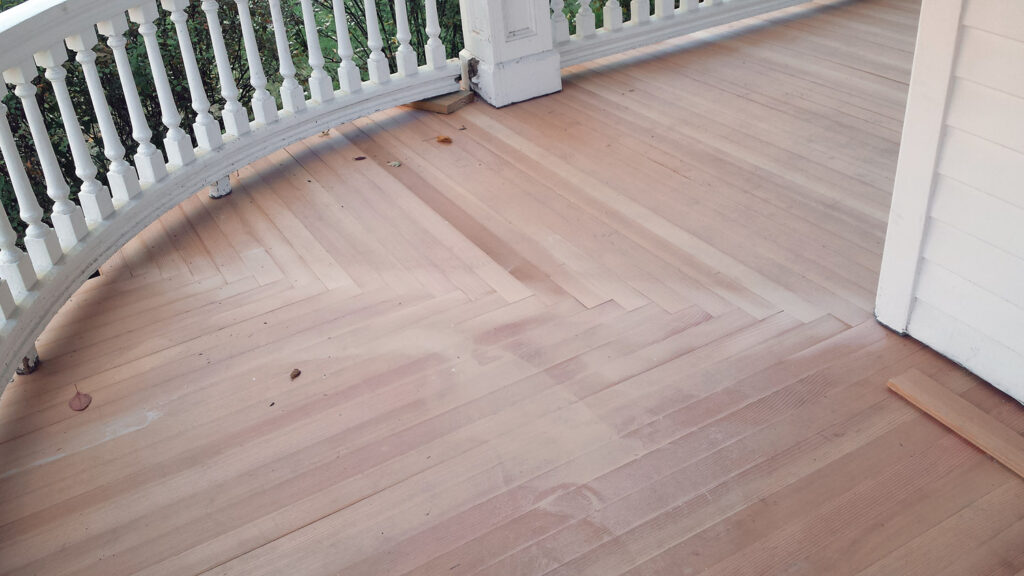
4. Using tongue-and-groove boards that reach the full depth of the porch gives the flooring greater longevity. The restoration team trimmed the edges with a circular saw, then treated the ends to multiple coats of primer and sealer before final staining.
5. Furst Woodworking custom-milled replacements for balusters that were too far gone to repair, as well as making new porch columns. The primed and sealed brown baluster just lacks a top coat of paint.
Slope and sweep
Moisture is the enemy of the tight paint seal that’s so hard to maintain. If water ponds in spots after a rain, that may indicate the porch no longer slopes properly. A porch with tongue-and-grove flooring should slope between 1/8” and ¼” per linear foot (closer to 1/8” per foot for deeper porches). Avoid laying or placing anything on the porch that can trap moisture, such as a planter without a footed saucer or tray. Floor mats and rugs, even waterproof ones, can also trap moisture. If you use a rug, move or relocate it frequently, exposing the boards to sunlight and fresh air.
Replacing the deck
If portions or all of the flooring needs to be replaced, the work will likely touch structural posts or columns. Before removing the wood beneath these supports, carefully stabilize them in place or install stout temporary supports to keep the roof stable.
Replace the deck with wood of the highest quality available. Choose a rot-resistant species such as Douglas fir, cedar, cypress, ipe, mahogany, or another tropical wood, or alternatively, a quality PVC product formulated especially for porch floors (see Shop Tour). New flooring should match the original in thickness, width, shape, and texture.
Lay boards running perpendicular to the house. Furst orders boards that are 8′ and 12′ long to run the full depth of the porch. Where there are changes of direction, cut the boards where they meet along the diagonal. Of the two common patterns, miter and herringbone, Furst chose the latter because a 1930s photo showed it was original to the house. “You don’t want a straight-line seam.”
Furst primed each board on both surfaces and every hidden part, and followed up with two coats of Thompson’s Water- Seal. The floor was allowed to cure and dry before the final coat of stain.
The Concrete Porch Deck
In warm, sunny locales from Savannah to Santa Cruz, the porch floor of choice isn’t wood, but scored concrete. While concrete doesn’t rot, it comes with its own set of problems over time: pockmarks, holes, cracks large and small.
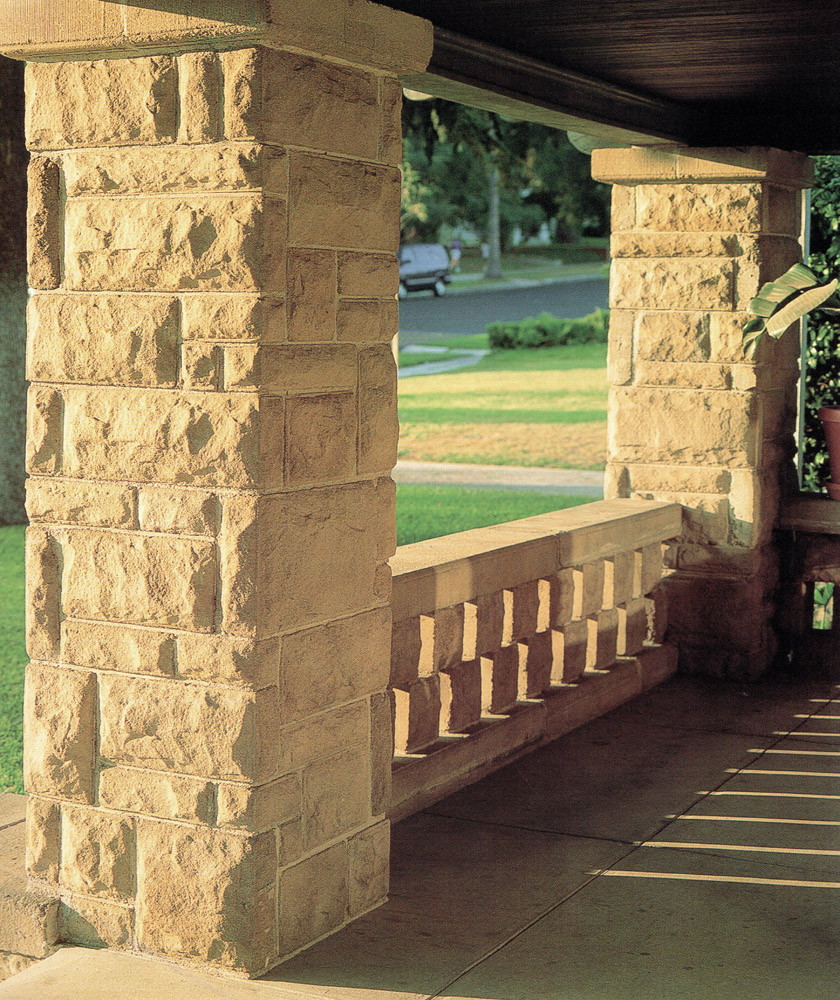
Concrete porches were especially popular in California and the Southwest in the 1910s and ’20s. Squares were usually 30″ x 30″ or 36″ x 36″. Some were formed up as separate pours; others were scored after pouring. (Photo: Linda Svendsen Archive)
Small cracks, pitting, and holes can be repaired with a variety of patching materials. One specially formulated for concrete is Abocrete, a liquid epoxy that can be used to fill voids, or to completely resurface the porch. (The epoxy can be tinted to match the original concrete color, and sand can be added to prevent slip hazards.) The solvent-free material applies with a brush or paint roller and cures in one to five hours. Before beginning any repair, however, sweep and thoroughly clean the porch surface with a heavy-duty cleaner and a bristle brush. Allow to dry. Apply one to two coats, and remember to include those classic score lines, too!
Pro Tip: Before assembling mating parts of a balustrade, prime or seal the hidden sides of all joints. For rails spanning more than 8′, place one or two small, painted support blocks between the bottom rail and the porch floor.
Balustrades

Sometimes balustrades are turned on a lathe. (Photo courtesy Western Spindle)
Consisting of top and bottom rails and the connecting vertical balusters or spindles, balustrades typically outline the perimeter of the porch and are exposed to weather. Balustrades built from dense, old-growth wood can survive for well over 120 years. That’s why it’s always preferable to repair an old-growth balustrade and its component parts than to replace it.
There are three general types of balusters: a simple square or rectangular shape; a flat, pattern-sawn support, such as a board with a decorative edge or cutout; and a three-dimensional, turned shape. Balusters fail sooner than the supporting rails, and are more likely to have been replaced.
minor repairs If the balusters or railings are loose, examine points of attachment for rusted fasteners, split wood, or decay. If the fasteners have failed but the wood is sound, remove the attachments, along with any peeling or alligatored paint. (Test for lead first; if you find it, follow lead paint protocols to remove it.) For balusters nailed or screwed in place, reattach them using hot-dipped galvanized or stainless-steel nails or screws, setting the heads below the surface and filling in with wood filler or epoxy.
Where wood is decayed, remove it and refill voids using a two-part epoxy such as those made by Abatron or West System. Allow the patched wood to cure, then sand smooth, taking care that it mates perfectly with adjoining parts. Prime all elements before reattaching, then seal and paint.
Common balusters are often simple, square spindles. (Photo: Gross & Daley)
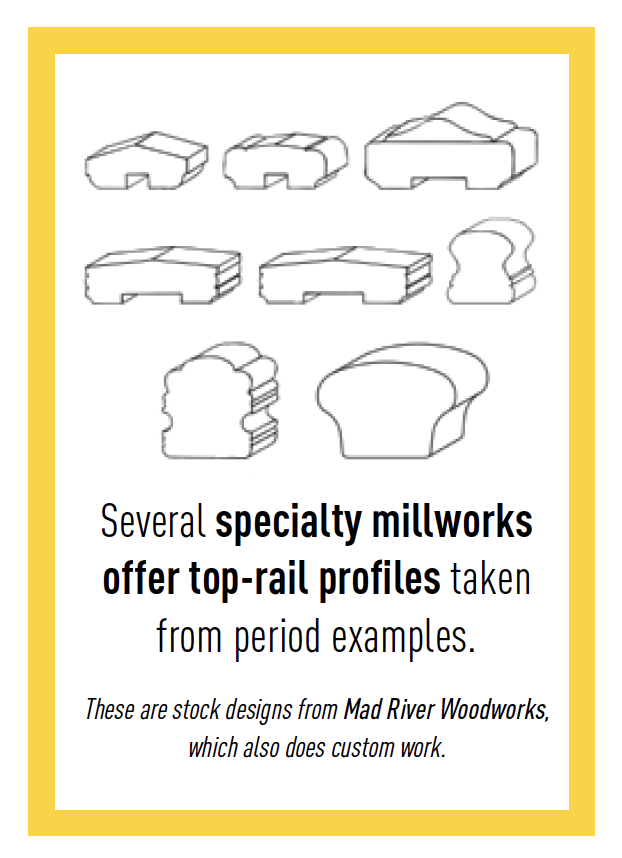
remilling When balusters or railings are missing or too far gone, it may be possible to find new ones from a specialty supplier, or have them custom-mill new parts to match. A mill may already have the correct profile; otherwise, the mill may need to make new knives to make an authentic replica.
Determine the size and shape of a missing baluster by examining or temporarily removing an existing baluster to use as a sample. Remove any heavy paint buildup to establish original dimensions. Scrape and clean joints and repair deteriorated areas with exterior wood filler or epoxy. Match profiles, depth, and thickness as closely as possible; cut new pieces from wood of comparable or better quality.
Include about ½” of overage on both ends of the baluster. Measure from the bottom surface of the top rail to the top surface of the bottom rail. Lay out joints for the new piece with a pencil, using a sliding bevel to transfer any angles. Then trim the baluster to fit with a handsaw and test-fit it. Trim as needed with a hand plane or wood file. Seal the ends and any exposed end-grain with a high-grade primer or epoxy. Apply a paintable, water-repellent coating on all exposed surfaces. Prime the baluster and then fasten it into place with hot-dipped galvanized or stainless-steel nails. Set the heads below the surface and back fill with wood filler or epoxy. Seal the joints and fastener holes and paint the baluster.
Historically, porch deck boards were milled from Douglas fir, cedar, or other rot-resistant wood. Once planed and sanded, boards were a standard 7/8″ thick.
Now to the rails. It’s all but impossible to find wood of the quality used in a century-old rail, so save as much of the original as possible, even if ends are rotted. Bottom rails tend to fail first; top rails usually have a beveled top to shed water. Before removing a section of balustrade for repair, note how rails are fastened to posts at either end: mortised, braced, or simply nailed or screwed? Save hardware and reuse it, or use stainless-steel screws, countersunk and filled.
epoxy repairs A rail with damaged ends or soft spots may be repaired with epoxies. In areas with punky wood, drill small holes at intervals, and drip a liquid two-part epoxy into the holes. This method allows the epoxy to seep into the fiber of the wood, filling voids and strengthening the wood. For rails rotted an inch or two at the ends, extend them by applying a two-part epoxy mixed to the consistency of peanut butter. Apply, then wrap the ends with sheet metal to hold the rough shape. Add layers as needed. Once cured, hand plane, chisel, and sand the repair to match the correct rail profile.
remilling If you must replace a rail, check specialty millworks to see if they carry (or can mill) rails with the same profile. They may need to glue up stock to get the required thickness. Make sure the lumber is glued up horizontally; a vertical seam eventually permits water to seep in.
reassembly If you use flat corner braces, be sure they’re large enough to offer good support, but not so large they show. Cut a mortise for the brace in the end grain of the railing so the rail will fit flush against the post. Attach the upright part of the brace to the post. Lower the rail onto the brace and secure from below.
See a Shop Tour with Aeritas


