

Photographs by: Gross & Daley
Running plaster mouldings requires sliding a tool fitted with a knife over fresh plaster in multiple passes. Once you’ve got the hang of it, the undulating shapes and recesses of the cornice should form quickly. 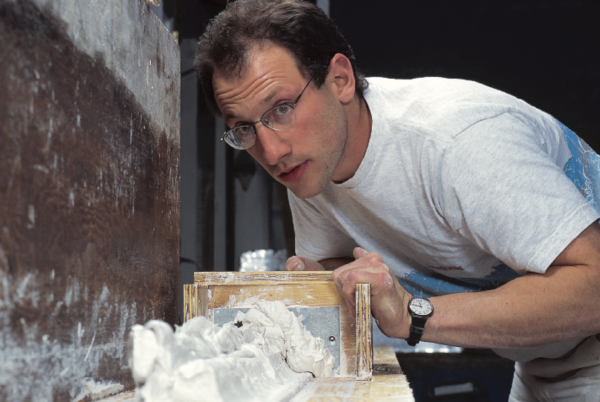
High ceilings and well-proportioned rooms cry out for ornamental treatment. Before elaborate woodwork became widespread through innovations in millwork in the late 19th century, ornamental plasterwork was part of the decorative package for many high-style homes. Georgian, Federal, Greek Revival and Neo-Grec, Second Empire, and Neoclassical houses were not considered finished without decorative cornices, medallions, mouldings, and enrichments sculpted in plaster. Over time, many of these ornamental treasures have fallen into disrepair or been lost altogether. Re-creating miss- ing plaster ornament can be a challenge, but you have options: today’s possibilities for replacement include real plaster, age-old composition ornament, and more modern resin- and urethane-based enrichments.
Plaster is an ideal medium for decorative work because it can take fine detail. It is also versatile: plaster can be formed into ornate, multi-layered ceiling medallions, intricate friezes replete with scrolls and swags, or long runs of coved cornice work. Plaster can be cast, shaped, carved, sculpted, sanded, or cut. Easily installed, it can be glued, nailed, or simply attached to a surface with more plaster. Plaster also doesn’t shrink or warp.
Ornamental plaster does require a certain amount of craftsmanship to make and install because working time is limited and there is no set recipe for achieving a desired consistency for the wet plaster.
There are two main categories for ornamental plaster: cast work and run work. Cast ornament is formed by pouring wet plaster of the right consistency into a mould. Ornamental plaster for cast ornament is simply a mixture of finely ground gypsum and water. The gypsum powder must be very fresh to interact properly with water and cure to a uniformly hard surface. Once the plaster sets, the mould is removed. Additional cast pieces may then be applied to the base ornament as enrichments, enhancing the dimensionality of the piece.
Delicate plasterwork in the Adamesque style in the Nathaniel Russell House in Charleston, S.C.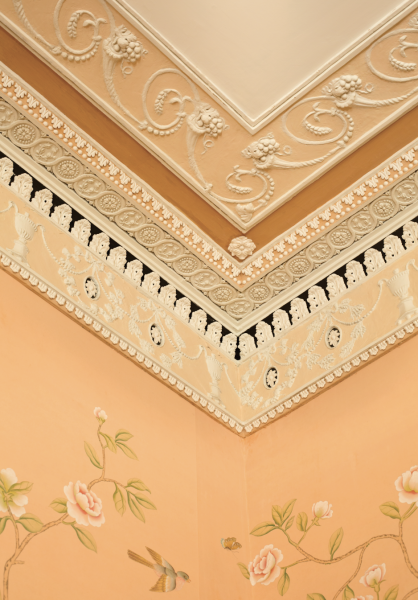
Running ornament involves creating a profile by pushing a forming tool over plaster while it’s still wet, then repeating the process until the correct proportions and details are reached. The two methods for creating runs of plaster include running the plaster in place on a wall or ceiling and running it on a bench for later installation.
An intricate acanthus leaf cornice from Foster Reeve & Associates demonstrates that the art of hand-carved and –cast plaster ornament is alive and well.
Re-creating elaborate cornices for one or more rooms— especially when run in place—is most likely a job for a professional plasterer with years of experience. Repairing a small section of cove moulding or cornice, however, is a good introduction to this ageless craft, especially if the work can be done with one or more helpers.
The first step in making running ornament is to create an open box-like tool called, fittingly enough, a mould. Custom made for each project, a mould is composed of two pieces of sturdy 3⁄4″ plywood, one mounted perpendicular to the other, and strengthened with an L-shaped brace and a diagonal handle on the back side. The at piece is called the slipper, and the vertical piece the horse (see “Knife and Mould,” opposite page). The horse is fitted with the knife: a metal template cut with the pro le of the moulding to be created. Once fully assembled, the mould is passed over the plaster multiple times to form the finished profile in finest detail.
An intricate acanthus leaf cornice from Foster Reeve & Associates demonstrates that the art of hand-carved and –cast plaster ornament is alive and well.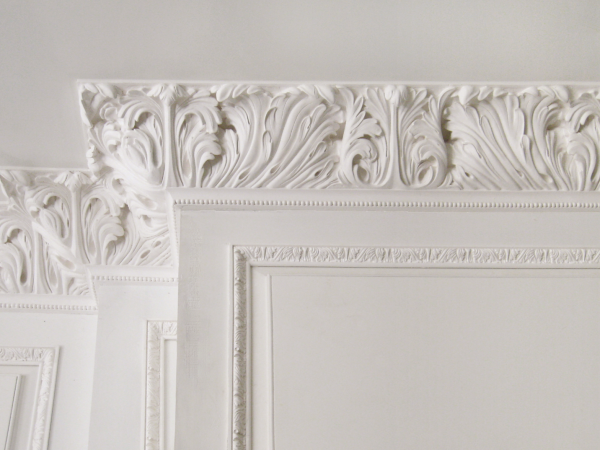
Running the Moulding Set up a long smooth work surface, such as an old Formica countertop, as a bench (professionals use long marble or stone slabs). The top surface and the table edge must be perfectly straight, as any irregularities will be transferred to the moulding.
To help the completed runs separate easily once complete, apply a layer of common vegetable oil to the surface of the bench. Set up the mould and do a dry run along the bench. The knife should move smoothly across it without chattering or binding.
As soon as the plaster is ready, pour a line of plaster at least as long as the moulding along the bench. To strengthen it and make the finished run easier to handle, lay down some loose fiberglass strands for reinforcement.
Now make the first run. Push the mould along the full length of the line of plaster, slowly but steadily, without stopping. The wet plaster will ooze and roll over itself in front of the knife, while the moulding is beginning to form behind the knife. Keep the mould flat to the surface and against the edge of the table; the tool should slide along without any real effort.
A barrel-vaulted ceiling that resembles fine plasterwork is actually trimmed with a mixture of wood mouldings and composition or wood rosettes, all from Driwood Mouldings.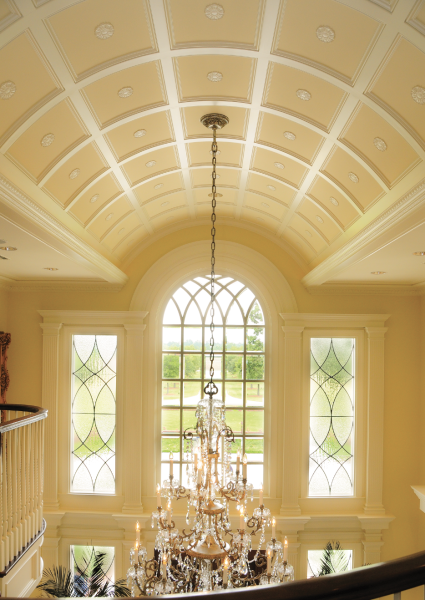
After the first run, remove the mould and clean it of excess plaster, especially around the knife. Move the mould back to the beginning and apply more plaster along the length of the emerg- ing ornament. Run the mould in the same track each time.
Examine the mould after each run to make sure plaster isn’t building up on the slipper and the horse, throwing the runs o course. Clean the horse behind the knife, too, to prevent plaster from hardening there. Be on the lookout for small pebbles of hardened plaster; they can get dragged across the surface, which will leave long gouges.
As you continue to build up the moulding, adding fresh plaster each time, the profile will begin to form right before your eyes. The repeated action of the mould accelerates the setting up of the plaster. Since plaster swells slightly as it sets, run the mould over the profile every few minutes to ensure that the piece doesn’t get too big for the mould to pass over it.
Once about 80 percent of the profile is formed, gaps or pocks may appear in the surface. Dab plaster directly onto them and run over those areas with the mould. As the unfilled areas get smaller, have your assistant mix up a new, somewhat watery batch of plaster. Brush this onto the surface to remove any bubbles or irregularities.
A ceiling looks like it is lavished with plaster, but the enrichments are actually J.P. Weaver’s Petitsin, a form of composition ornament. Courtesy JP Weaver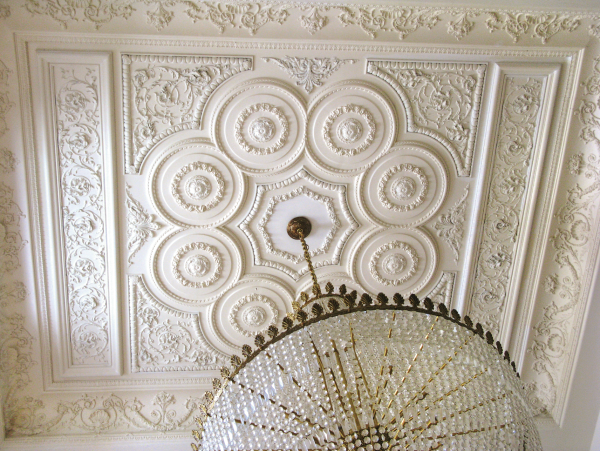
To finish, brush on a very watery mix of plaster. At this point, the knife should be scraping o a fine powder as it passes along the nearly complete moulding. Keep the surface wet at this stage by splattering it with water from a brush. Adding water allows the last scrapings to form a milky film that fills in all the minute holes and gives the surface a polished, shiny appearance.
When finished, let the moulding rest for about 30 minutes. Plaster heats as it cures; allow it to get hot and cool down. To remove it from the bench, first, trim away any plaster edges left around the moulding. Using a thin blade under the edges, gently pry the moulding up. Be careful not to stress the moulding—it won’t be fully cured for several hours—and avoid chipping or gouging the surface. Cut off the ragged ends and if necessary, cut the piece into convenient lengths for later installation. Let the pieces stand on a drying rack overnight to dry completely.


