

A bronze gas fixture of cavorting cherubs, circa 1890, has been electrified to light a stairway. Wiring was concealed by threading it through the hollow newel post underneath. (Photo: William Wright)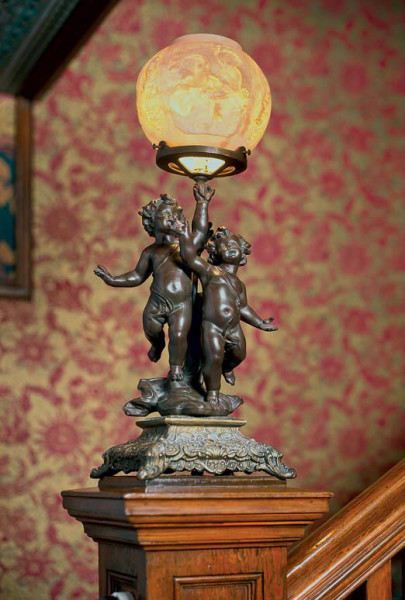
Gas lighting was one of the major industries of the 19th century. First used for street lamps, by the mid-1800s, gas had replaced kerosene as the preferred source of lighting, as it was more economical and provided a more reliable, even source of light.
Gas lighting became the third largest industry in the country, behind railroads and mining. Produced in municipal “gashouses” as a by-product of bituminous coal heated in airtight chambers, gas was driven off the coal, collected and purified, and then piped into homes and commercial buildings in nearly every city in the country. Gas was used to illuminate chandeliers, wall sconces (called “brackets”) and “portables,” which were table lamps that drew their gas from a flexible tube attached to an overhead light.
But the era of gas lighting was to be short-lived, lasting just half a century. The invention of the light bulb in 1879 signaled the beginning of the end. As gas was initially cheaper and more reliable than electricity, transitional gas-and-electric combination fixtures were made at first (typically, the electric lights pointed down and the gas jets up).
A lovely Grecian maiden “portable” table lamp has a rubber hose that funnels the gas from a chandelier overhead. (Photo: Erik Kvalsvik)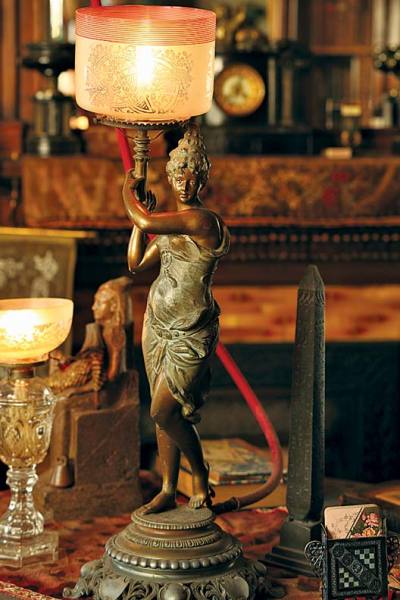
The introduction in 1908 of the durable, inexpensive tungsten filament light bulb, which is still in use today, was the final blow that recategorized gas lighting as old-fashioned and out of date, and relegated the energy source to secondary roles like the basement furnace and kitchen stove.
Now with the rise of period home restoration, those old gas chandeliers and sconces are being rediscovered and restored. They can be found anywhere from vintage lighting dealers to local salvage companies, where simple gas fixtures can still be purchased at a reasonable price, usually under a few hundred dollars.
Clean It Up
If you’re thinking of installing a vintage gas fixture in your home, the first step is to make sure it’s in good working order. Start by cleaning it thoroughly—a straightforward process, but one that takes a bit of patience and the right materials.
Go easy on intact finishes.
If you’re lucky enough to find a fixture that has never been electrified and still has its original patina intact, gas lighting guru Paul Ivazes of Quality Lighting in Grass Valley, California, recommends using an all-purpose cleaner such as Simple Green, which removes dirt and grime but won’t disturb the original finish of the aged brass. Before starting, it’s important to completely disassemble the chandelier, which helps avoid leaving any excess soapy residue on the metal.
An ornate, gilded bronze gas chandelier has been restored to its original glory, complete with flickering flames. (Photo: Erik Kvalsvik)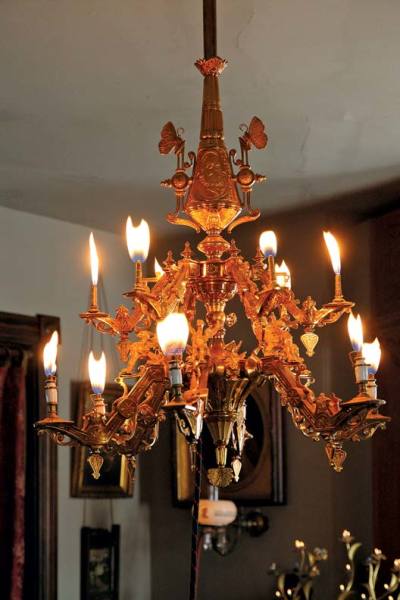
Touch up spotty dirt.
If the finish is in good shape but just needs a touch-up in a few spots, Paul suggests wetting a cotton swab with denatured alcohol and gently rubbing the soiled areas.
Remove stubborn paint splatters.
Old splatters from sloppy ceiling paint jobs are a common problem. Paul uses Green’s Liquid Paint Remover to remove any paint, lacquer, or varnish without disturbing the original color of the metal underneath. Often, a chandelier that’s been completely painted over is the easiest to restore, as paint can protect the original finish; once it’s removed, the metal can shine like new.
If the fixture is spelter—an alloy of zinc made as a cheaper substitute for more substantial brass—and has a decorative painted finish, complete stripping and refinishing is often the only solution, as the underlying patina and color usually can’t be salvaged. To tell if the piece is spelter, lightly scratch the surface in an unobtrusive spot—spelter will look silver or white underneath.
Rewiring Tips
After cleaning, you’ll need to wire the fixture for electricity. (If you’re bent on authentic gas, be sure to check your local building codes, as today many cities don’t permit open-flame gas interior lighting).
Wiring a gas fixture can be tricky, as gas chandeliers were designed for thin streams of gas, not thick, cumbersome electrical wire. Threading an electrical cord through a narrow gas arm can be difficult; you’ll need a steady hand and a good dose of perseverance.
A small, beaded chain attached to the wire can be used to help pull it through the arm. (Photo: Paul Ivazes/Qualitylighting.net)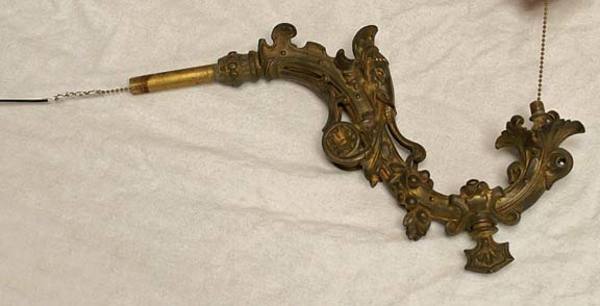
Blast a shot of compressed air through the entire gas line to make sure the path is clean and free of debris and burrs.
Freeze the gas valves shut so they don’t turn and cut the wire; a drop of Loctite 680 on the gas valve stem effectively stops the valve cock from turning.
Use the correct wire—18-gauge stranded wire works best. Paul rubs it with a dry bar of Ivory soap to help lubricate its passage, then attaches the end to a small beaded chain to help pull it down the narrow channel of the chandelier arm. If the passageway is too small, sometimes the only solution is to run the wire unobtrusively along the outside of the arm.


