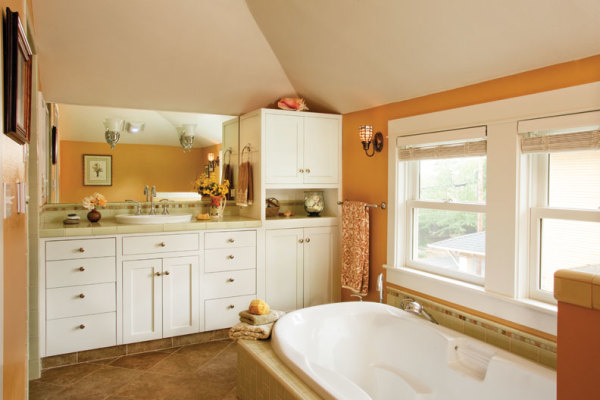
The sunken bathtub has no jets, but a heater circulates the water at a steady 105 degrees for a luxurious bathing experience.
Photos by Philip Clayton-Thompson
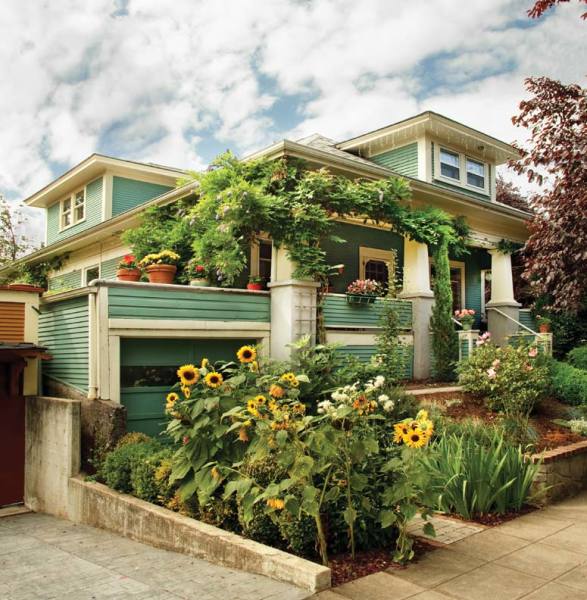
From the day Kathy Wolff and Tony Dal Molin walked through their 1905 Craftsman in Portland, Oregon, seven years ago, they knew its charm outweighed its shortcomings—including a second story with no master closet and only a tiny bathroom precariously located at the top of the staircase.
“There was only a 5′ pony wall where the roof sloped up, so this closet bathroom with its bifold door, small toilet, and little sink didn’t have enough headroom to stand,” says Tony.
“When you went in and out of the door, you had to step back onto the stairs,” adds Kathy. “I was always afraid I was going to topple down them in the middle of the night!”
It took four years of making do before the couple decided to expand. Adding a dormer would give them space for both a master closet and bath with a large tub, shower, and a pair of double-hung windows that would replicate those on the house’s two existing dormers. They spent months methodically planning the addition—studying building codes, measuring the roof slope, calculating the upstairs square footage, and analyzing the size and style of the existing dormers.
Dormer Design
Tony and Kathy consulted an architect who recommended a shed roof, which has a shallow, sloping roof with no hips or gables.
“A shed roof buys you a lot of space inside, but it would compromise the classic bungalow exterior,” explains Tony. “We wanted it fully hipped and in the same proportions as the originals.”
After spending months mulling it over, Tony, an electrical and software engineer, hit upon a solution by altering the existing 8/12 roof pitch to 6.5/12 in a series of AutoCAD drawings he created for the project, which replicated the look of the existing dormers while still allowing for the necessary inside wall height.
After further examining the crawl spaces over the eaves, Tony discovered, to his surprise, that the downstairs ceilings had been dropped at some point from 10′ to 8′. With an extra 2′ to work with, Kathy suggested dropping the tub into the gained area to fit it beneath a pair of regular double-hung windows. Tony’s drawings determined that if the tub and shower were dropped 9″, the requisite ¼”-per-foot drain slope needed to tie it into the original sink’s drainpipe could still be maintained.
“After we’d had the brilliant idea to drop the tub,” says Kathy, “we thought, ‘Why don’t we drop the shower as well to provide headroom, a built-in bench, and a skylight?’”
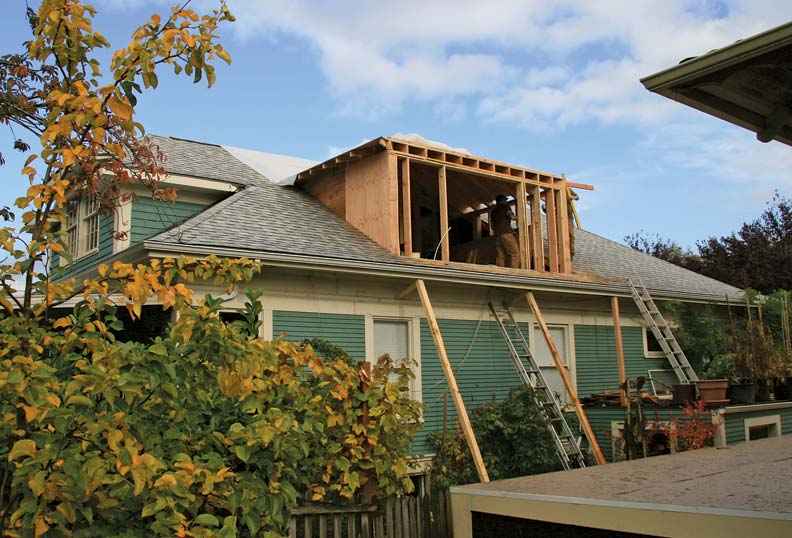
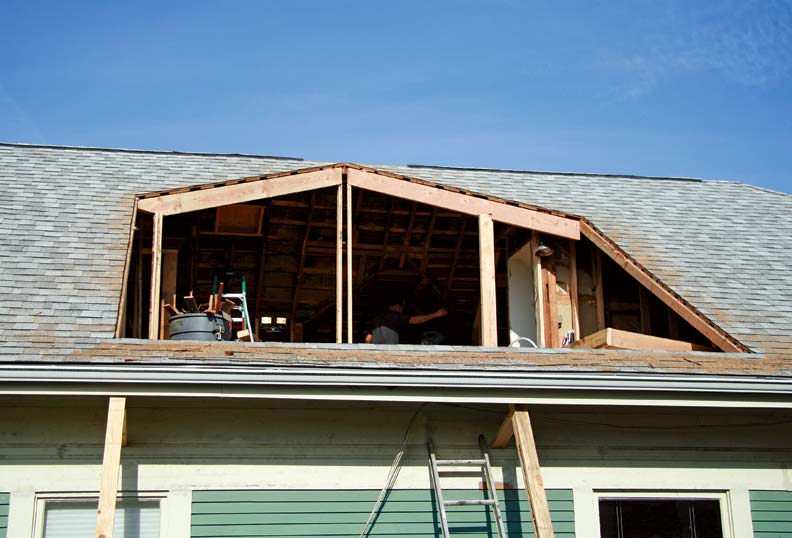
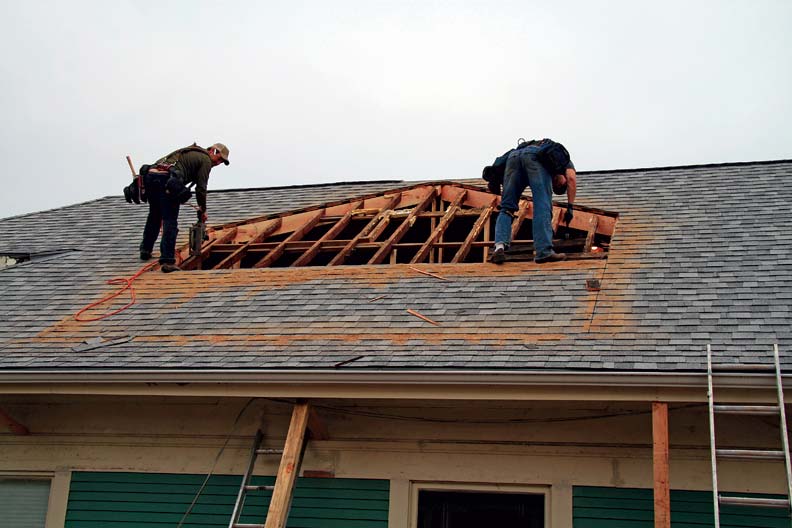
Yet even with 3D CAD drawings, Tony, who became the project’s general contractor, couldn’t see how it would all work until the roof, walls, and flooring had been removed to make way for the dormer.
“We just couldn’t figure it all out until we opened up the roof,” he says. In the end, they decided that two skylights in the bathroom would be overkill, so they moved one to the top of the landing.
Making Cuts
Kathy had located a talented remodeler to tackle the project: Chad Clark of Clark’s Carpentry, who brought along his associate, Luke Higgins, and subcontractor Nick Zins of Zins Restoration Co.
“I came in after Tony and the architect had chatted,” recalls Chad. “Tony had drawn up his plans to drop the floor in the bathroom, and I looked at the feasibility of the project, which was very complicated.”
One flaw, he recalls, was that no one had thoroughly addressed how to carry the load of the large tub. “A structural engineer recommended resting it on an outside wall,” says Chad, “but it needed to be supported all the way to the foundation.”
“The architect suggested putting posts down in the middle of our basement family room, which was pretty distressing,” Kathy recalls.
In the end, Chad and Nick discovered the best load-bearing solution when dismantling the house. “We saw the windows were properly framed with king studs, jack studs, and adequately sized headers,” says Chad. “So we knew we could make the house more structurally sound by posting off the king and jack studs, and transferring the additional dormer load to the foundation.”
The structural engineer advised them on the dimensions necessary to carry the weight of the interior supporting walls to the foundation. They used laminated veneer lumber (LVL) beams—engineered beams with more load-bearing capacity that are less likely to warp than solid wood.
In total, eight beams were added to offer support for the dormer walls. One 5½” x 16″ LVL flooring beam travels 15′ from the edge of the stairwell to the rear of the house. It also serves as support for the newly constructed central staircase, which was rebuilt to correct a decades-old problem. “When the front door was fully open, it would collide with the staircase,” says Kathy.
Another problematic interior doorway also was moved, and two additional load-bearing posts were placed in the wall where the door once stood. A third post was placed within the mudroom’s walls, after tearing out built-in cabinets added by the previous owner and then replacing them.
“Once we had all the beams in,” says Chad, “building the dormer was easy. It was the structural work that was the engineering feat.”
Dormer Checklist
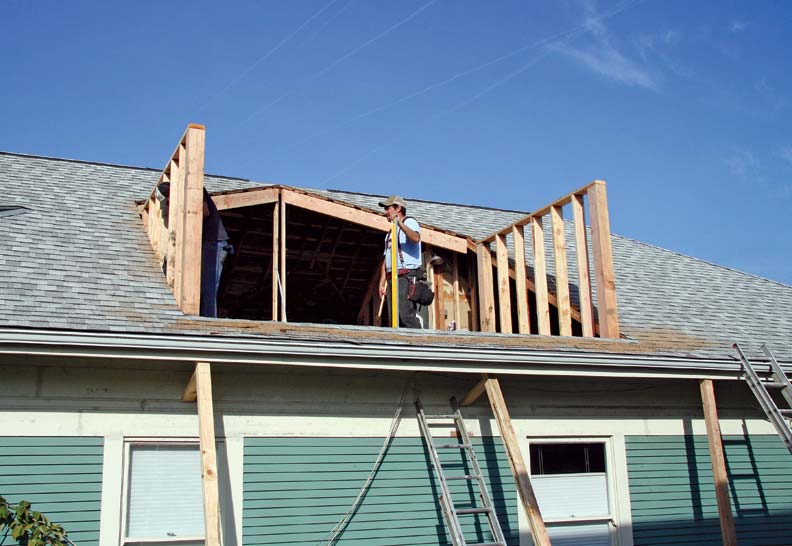
The new dormer (at left) nearly replicates the existing one (at right) on Tony and Kathy’s 1905 Craftsman house.
If you’re thinking of adding a dormer, bring this checklist to any discussions with your general contractor and/or architect to determine the feasibility of the project for your home.
Determine which dormer style best fits your home’s architectural style: gable, hipped, or shed. Arched-top, eyebrow, barrel, and segmented dormers are more complex and costly to construct.
Sketch out the location you envision for the dormer.
Measure the height of upper-story walls and ceilings to determine the project’s parameters. If a dormer already exists, have your architect create CAD drawings that will indicate whether you can match the roof’s pitch in the new location and still maintain the inside wall height.
Locate load-bearing walls. Can they withstand the weight of any heavy fixtures? Will any other construction be required to support them?
Research local codes such as emergency egress. Pull any necessary permits.
Determine the size, architectural style, and number of windows, which generally account for three quarters of the dormer wall.
Consider the type of insulation and ventilation required.
Think through construction timing: Choose a dry time of year, since your roof will have a hole cut out of it for several days.
Hire a good roofer. Use galvanized metal roof flashing where the new roof and walls intersect with the existing roof.
Under Cover
Having Tony as the general contractor made the process much easier, says Chad. “Whenever we had an issue, all I had to do was run downstairs to consult with him.”
Tony did all the electrical work and made some horrific discoveries along the way, including several “sketchy” generations of wiring. “The one that scared the heck out of me was the sight of newspaper used as insulation around cloth and tar wiring with a nail pounded between the two conductors,” he says.
Tony also was able to step in on the project when Nick’s wife had a baby while the team was completing the interior framing. With everything preassembled except for the roof rafters, Chad and Luke cut away the roof, Tony took Nick’s place, and the men were able to tilt up the walls, frame the roof, and sheath it in just two days—barely beating a torrential rainfall.
The vaulted ceiling created unusual framing issues, since everything was coming from a central point. Tony calculated the length of the rafters for the bird’s-mouth cuts, where the rafter rests on the top plate.
To keep the addition cool during the heat of summer, Tony found three 15″-diameter Quiet Cool whole house fans that pull the air up and send it out a ridge vent in the cap of the roof. “They’re ten times quieter than a typical whole house fan,” says Tony, who oversaw the installation of the fans, using rigid insulation and fabric tucked around them, against which they shot foam insulation. The couple hoped to be back upstairs by Thanksgiving, but Christmas came and went before the drywall was completed. The tile installation took two and a half months because the crew was overbooked and was jockeying between jobs. In the end, Kathy did the painting herself.
“We moved back into the bedroom near the end of March,” says Kathy. “But two weeks after it was done, the work was all a distant memory.”