

The new layout placed the vintage stove and original kitchen dresser side-by-side.
In August 2007 I ripped out my kitchen. That hadn’t really been my intent, but longtime OHJ readers are aware of the dreaded Mushroom Factor—the unintended consequences that crop up on old-house projects. I only meant to get rid of the failing countertop tile, whose V-cap edging broke off every time someone leaned on it, and replace it with some cheap white tile as a temporary fix. Yeah, right. Removing the tile revealed serious rot in the plywood underlayment around the sink. Then I looked at the sink and thought, “I hate that this sink is on an angle,” so I took it out, too. Then I removed the peninsula and the rest of the lower cabinets, leaving only the original kitchen dresser. Thus began my unplanned kitchen remodel.
I thought it would be easy—after all, I literally wrote the book on the subject: Bungalow Kitchens, which tackled the dilemma of trying to fit modern technology into a historic kitchen, making distinctions between obsessive restoration and compromise solutions. I tend to come down on the obsessive side of things, especially here at my bunga-mansion (the Jesse Matteson House in Oakland, California), since it’s such an important and nearly intact historic house.
On the other hand, I really didn’t want the separate hot and cold faucets the sink would have had in 1905. Nor was I giving up my dishwasher or my frost-free refrigerator. When I restored the other bungalows I’d owned, I generally compromised in the kitchens—didn’t hide the dishwasher or the modern refrigerator, just made sure that the cabinets, hardware, flooring, and other details were right. But now, since I was staying in this house, I finally had a chance to do an Obsessive Restoration. That meant real conflict between historic authenticity and modern convenience—and between what I wanted and what the house required.
Planning Conundrum
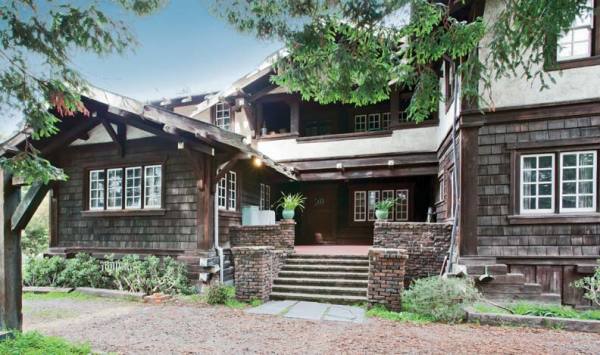
The 1905 Jesse Matteson House.
The layout was the first problem: Five doors and two sets of windows left little wall space, the chimney stuck out two feet into the room, and the original kitchen dresser was in the corner along the sink wall, making it impossible to put anything on the adjacent wall. I believe the original owners kept the icebox in the basement, because there is nowhere in the kitchen one would fit, nor do I have a service porch. That left the refrigerator positioned next to the stove, which was not optimal. I moved the fridge around, tried different layouts with tape on the floor, and asked everyone who came over for ideas. Years passed.
In the meantime, I had managed to rip out the hideous fake-brick vinyl floor tile—the kind with dirt photographically printed on the “bricks” and “mortar” so it never looked clean. Under the subfloor, I found the remains of linoleum felt—clearly linoleum had been the original covering. I picked out a Marmoleum pattern called Rembrandt Palette. (Nine colors, all earth tones, will not show dirt. That’s what I like in a floor!)
Compromise: Countertops
I had originally planned to use 1″ hex tile on the counter. But then my friend Russ called and offered me the leftover soapstone from his kitchen. They were large pieces, enough for the countertop on the sink side. But they wouldn’t have used stone in 1905. It Would Be Wrong. But it was also, you know, free. I argued with myself for a month, but in the end thrift overcame compulsiveness, and I took the soapstone.
I was hoping that when I ripped out the 1970s cabinets, there would be ghosts on the beadboard showing the outline of the original sink, but there were no real clues. I finally settled on a 20″ x 30″ undermount sink with a side drain. Next to that I put something I’d wanted for a long time—a 12″ deep, 16″ x 20″ sink whose sole purpose is to hold the dish drainer below the level of the counter.
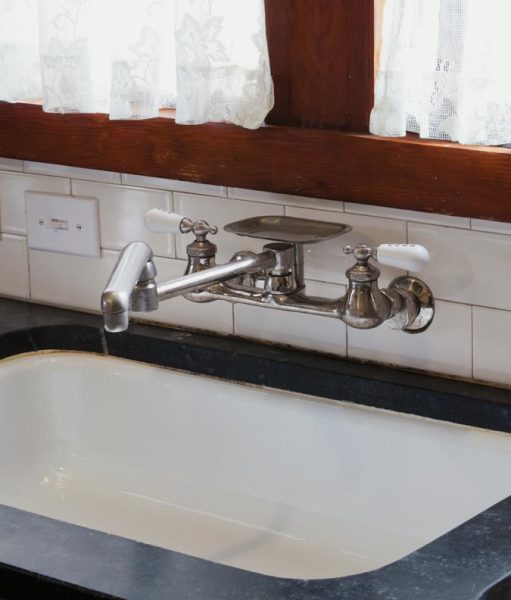
The wall-mounted bridge faucet was procured after an exhaustive search.
Oops! Backsplash Tile
A friend who is a tilesetter agreed to install my backsplash at no charge. I was hoping to use subway tiles I had left from another house to save a bit of money. But once we figured out the layout and how many we needed, we discovered we were short one tile. Unfortunately, the tile company had gone out of business several years ago. Disappointed, I went off to the tile store to find something else.I took one of the tiles with me because I liked the color. I related my tale of woe to the salesperson, who looked at the tile and asked, “Is that color #112?” I affirmed that it was. “Hold on,” he said, “let me go look in the back.” He returned five minutes later with six surface bullnose subway tiles in color #112!
Then I went shopping for a faucet. I just wanted a nickel-plated wall-mount faucet with porcelain lever handles—how hard could it be? Harder than you’d think. An Internet search turned up lots of faucets, but then I discovered how picky I really am. The handles were too bulbous, too skinny, or they had some silly metal finial on the end, or I didn’t like the typeface used for “hot” and “cold.” I finally picked out a Chicago faucet with an articulated spout and a soapdish. Then I lay awake trying to decide between polished nickel and satin nickel…
I had a sink, a faucet, and a linoleum pattern, but still no layout—then a fortuitous thing happened. I had written a couple of articles about sausage maker Bruce Aidells’ new Greene & Greene-style house. The architects, John Malick and Associates, were so pleased about the publicity that they made me an offer I couldn’t refuse: They would design my kitchen in exchange for a couple of articles on some other projects. When Greg Klein, who designed Aidells’ house, came over to discuss the kitchen, I didn’t tell him my ideas, only my parameters: All the doors and windows had to remain unaltered; I was willing to remove the chimney if necessary; the original cabinet had to stay, though it could be moved.
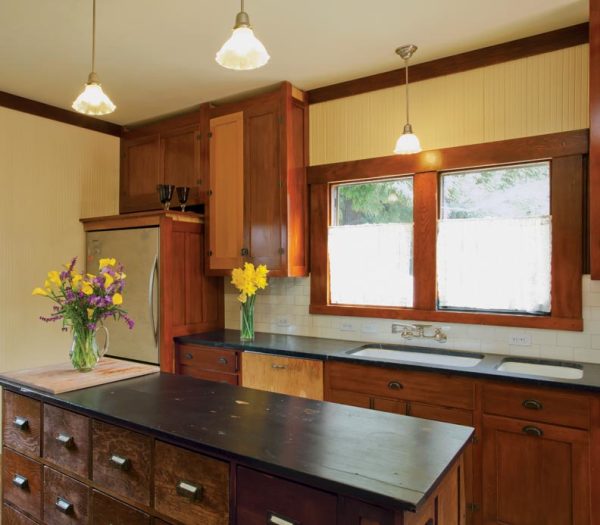
The modern fridge awaits a wooden front panel to make it resemble an icebox.
A few weeks later, he brought over the first set of plans, with an idea that hadn’t occurred to me or anyone else: He proposed removing the chimney, shifting the stove to the left, and moving the original kitchen dresser to that side of the room, where it would just fit between the stove and the doorway to the service stairs. That allowed the fridge to fit in the corner where the original cabinet had been, in a logical place at the end of a run of cabinets. Removing the chimney also left enough room for a table or island in the center. Layout problem solved.
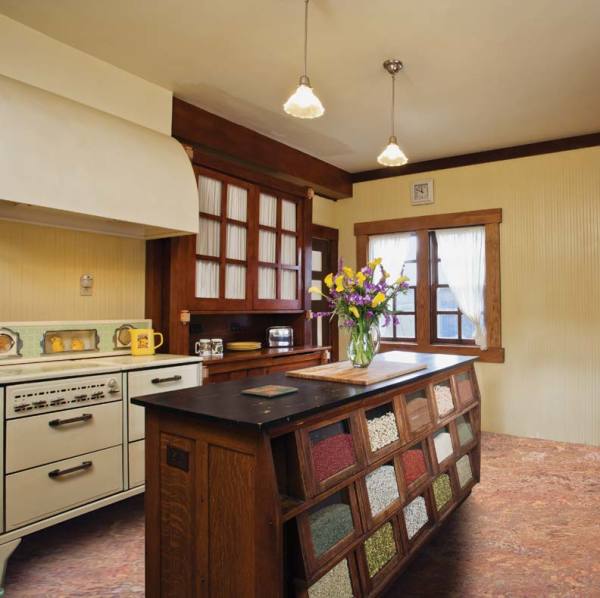
Compromise: Island
I pondered what to do about the island or table that I was going to put in the middle of the kitchen. A table would be more authentic, but an island would have storage space. Then I had a random thought—it would be awesome to have something that looked like it came out of an old grocery store. Shortly thereafter, I found an oak candy counter at an antique show. It was fate.
Free Range
Even before I became a kitchen expert, antique stoves kept appearing in my life, so I’d already snagged a lovely yellow and green Spark stove from the ’30s. (A stove from 1905 is a bit too primitive, even for me. Plus, Spark stoves were manufactured locally.) The stove was going to need a hood, so I bought a Vent-a-Hood insert, which is the only insert that’s not stainless steel—I settled for off-white. Using an insert allowed me to design a curved plaster hood above the stove.
Compromise: Refrigerator
In order for the island to work, I needed a shallow fridge (24″ deep), which put me in the land of expensive refrigerators. I had already rejected the idea of a reproduction icebox—I finally admitted that I actually like glass shelves, door storage, icemakers, and all the other stuff that comes inside modern refrigerators. I still wanted it to look like an icebox, though, so I designed a false wooden front.

The unpainted Douglas fir cabinets brought up a struggle between the author’s desires and period authenticity.
All the wood in my kitchen was originally painted—cabinets, beadboard, and trim—as it often was in bungalow kitchens. All 10 of the other bungalows I owned had sported painted kitchen cabinets, but I always harbored a fantasy that someday when I had a keeper house, I would have beautiful fir cabinets, finished with orange shellac so they looked like they’d been dipped in molasses.
I argued with myself about this for a long time—probably the entire eight years since I bought the house. Restoration isn’t supposed to be about your fantasies—it’s supposed to be about what the house wants. And frankly, painting everything would have been not just the Obsessive Restoration thing to do, but also cheaper and easier. But in the end, I couldn’t bring myself to do it. I ended up needing a combination of heat gunning, paint stripping, dental tools, and sanding to get the paint off the trim and kitchen dresser.
Oops! Cabinet Doors
The new cabinets are made of vertical-grain Douglas fir, just like the original dresser. I opted for plain face-framed cabinets with inset Shaker doors. To save money, the doors and drawer fronts were ordered from a company that builds doors—but that’s where things went wrong. Normally on a frame-and-panel door, the vertical stiles run from top to bottom, and the horizontal rails fit in between. My interpretation of “rails run through stiles” was that the tenon of the rails would fit into a mortise in the stiles. The door company’s interpretation (probably the correct one) was that the rails went from edge to edge, with the stiles in between. So now I have a bunch of doors that don’t look right, that I can’t afford to replace. I’m going to use them, even though they will annoy me on a daily basis. (The lesson here is to pay attention and make sure you understand what you’re ordering. You can also take heart from knowing that even a famous kitchen book author can screw up this badly.)
Light Work
For lighting, I bought four nickel-plated pendant lights—one for over the sink, two above the island, and one next to the basement door. They have ruffled Holophane shades—too twitty for my taste, but they match most of the house’s original fixtures. (Apparently the ruffling actually serves some purpose in scattering the light.)
On to hardware. Luckily, a couple of pieces of the original hardware remained, so I know I need butterfly hinges, cupboard turns, and bin pulls in an antique copper finish. One can get these nearly anywhere, unless you’re someone like me who insists on having matching slotted (not Phillips) screws.
Thus it is that I find myself five years into the project and still not finished. I know it will be done eventually. I know it won’t be as 1905 as I might have liked. I made compromises that I might not have made if I were rolling in money. But it will be a whole lot better than what was there, and I hope that in 50 years, no one will say, “What was she thinking?”
Online Exclusive: Read more of Jane Powell’s wisdom in our special online archive.


