


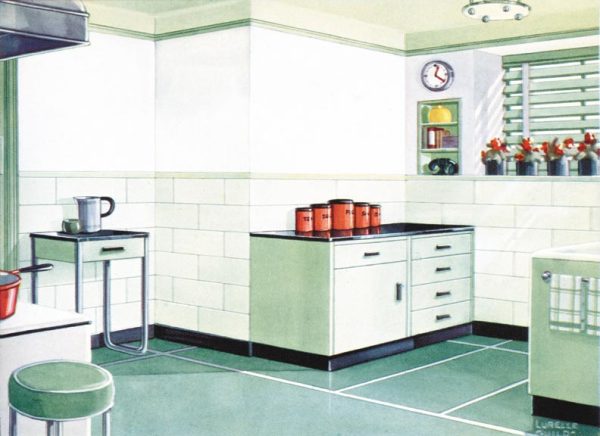
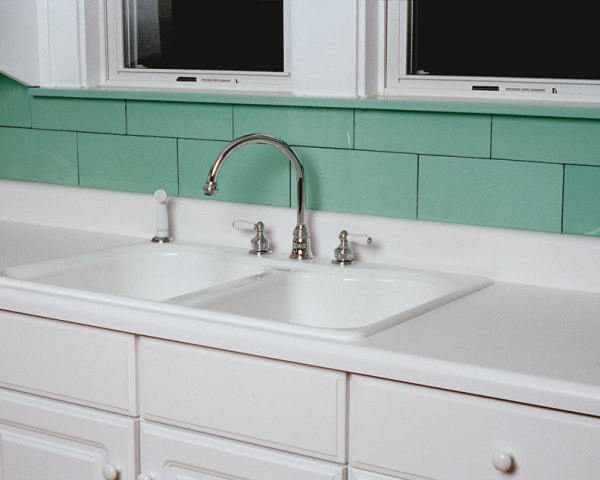
The author helped owners of this St. Louis kitchen with a total remodel. Structural glass kitchens of pale green were thought to be soothing to the eyes. (Photo: Randy Juster)
Sipping a big cup of coffee at your kitchen table on Saturday morning, perhaps you look around and conclude that your walls definitely need a good cleaning and some cracked tiles could use repairing. Maybe you think it’s such an unworkable, impossible nightmare that you don’t know how to begin.
Be of good cheer; you’re not alone. You’re one of a long line of Vitrolite or Carrara kitchen owners (the material’s best known brand names) facing insensitive contractors who want to “rip the stuff out and start from scratch.” Hold your ground. If the charm of the glass wasn’t the reason you bought your house, you’ve probably come to love the stuff because it’s so easy to clean and so graceful with its smooth, wavy reflective quality.
People Who Live in Glass Kitchens
In the early 20th century, many wonderful kitchens across American were designed with what was then one of the most modern of materials: structural glass. Technically, the term refers to a variety of architectural glass products, including glass block. It’s most often used, however, to describe opaque, colored glass panels. Even more commonly, people call structural glass by one of its two most popular proprietary names: Vitrolite (made by Libbey-Owens-Ford) or Carrara (made by Pittsburgh Plate Glass).
Introduced in the 1910s, structural glass was prized for its smooth surface, durability, and water and dirt resistance. Initially, it was marketed as a less porous, more easily cleaned alternative to marble for walls, ceilings, and work surfaces. It was also more hygienic than ceramic tile, because it was available in large sheets that decreased the number of hard-to-clean joint lines. Those few that were necessary were extremely thin and almost invisible, usually filled with grout tinted to match the glass.
Pittsburgh Plate Glass assured customers that its jade Carrara would fill “informal guests” with “sheer admiration and envy.” (Illustration: Gordon Bock archives)
Structural glass perfectly suited the new sanitary ethic of the 1910s and ’20s, when domestic scientists and social reformers proclaimed that the ultimate kitchen was a gleaming, light-colored “laboratory.” Its original colors and marble like white, gray, black, beige, and eventually green were perfectly attuned to the new labor-saving technologies and ultraclean aesthetic.
Then in the late 1920s and early 1930s, spurred by Art Deco and other contemporary interior-design movements, kitchens evolved into cheerfully colored rooms for living, not just working. This change paralleled the introduction of a wider variety of structural glass colors and textures. No longer just a substitute for marble, structural glass became an expressive finish that could be etched, inlayed, and patterned. During this period of peak popularity, it was probably most well-known for Art Deco and Art Moderne storefronts, where designers relied on its clean, sleek surfaces and vibrant colors to harmonize with new aluminum framing.
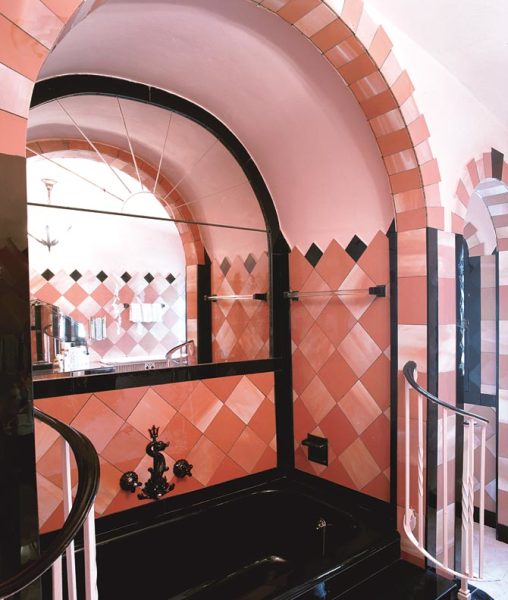
The Art Moderne movement of the 1920s and early ’30s inspired more daring use of color throughout the house. Structural glass tiles were patterned, inlaid, and etched. (Photo: Randy Juster)
In houses, structural glass served as a colorful, lustrous, and hygienic substitute for stone or tile in wainscots, walls, ceilings, shower stalls, countertops, and tabletops. Its residential design cachet comes across best in the era’s most modern of modern houses, George Fred Keck’s “House of Tomorrow” at Chicago’s Century of Progress Exposition of 1933. Large butter-yellow structural glass panels in the bathroom reflected the house’s aura of technological advancement, as they clearly bore no resemblance to marble or stone.
In commercial and institutional use, standard glass panels were available in thicknesses from 1/4″ to 1 1/4″, and sizes up to 10 square feet for exteriors and 15 square feet on interiors. In non-residential bathrooms, laminated-glass panels could be used to form bathroom stall areas up to 25 square feet.
Residential kitchens and baths used much smaller structural glass tiles of 6″ x 12″, 8″ x 12″, and 8″ x 16″ installed in a running-bond pattern. Decorative accent pieces that had been sandblasted and/or painted by the manufacturer or distributor were often installed as trim at the top of wainscoting or at the juncture of wall and ceiling. Greek-key or garland-and-shield patterns on 2″- or 6″-wide strips were common in kitchens. Sadly, structural glass has not been produced in the United States for almost 40 years. The introduction of easier-to-produce float glass in the 1950s spelled the end for structural glass along with other labor-intensive plate-glass technologies. Consequently, it’s important to conserve those pieces we still have. A truly modern material, structural glass graced some of the most beautiful and practical kitchens of the first half of the last century.
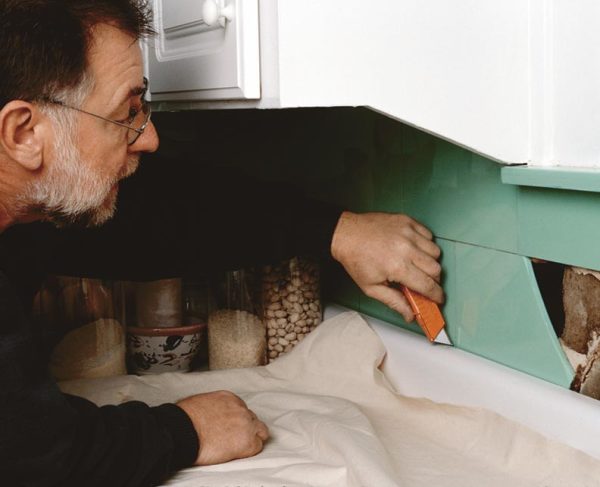
If just a few of your structural glass tiles are broken, you may be able to replace them with undamaged tiles from elsewhere in the kitchen. Here, the author scores grout in order to remove a broken tile. (Photo: Lisa Halley Melching)
Vitrolite and Carrara kitchens respond well to the ministrations of today’s respectful homeowners and craftspeople who have the patience and information to bring the installation back to its original grandeur. Here are techniques I use to restore structural glass kitchens.
Improving the appearance and surface condition of the glass is the least complicated (and therefore the least expensive) course of action a homeowner can choose. If you want to upgrade the look of your kitchen without making any radical changes, evaluate and address these areas.
1. Clean the glass. If you’re like many structural-glass kitchen owners you may never have cleaned your installation. It’s a daunting task, but you’ll be amazed at the gleam and twinkle that results. Do a test in a single, inconspicuous section. Wipe it down with window cleaner or a vinegar-and-water solution. If you like what you see, continue and move on to the joints.
2. Clean the joints. In an old kitchen, a lot of cooking grease accumulates on tile joints. The “grout” is actually glazing compound that is often tinted to match the color of the glass. Try removing the grease by wiping the joints with a rag soaked in paint thinner; it may take several passes.

Before reinstallation, Dunn cleans adhesive remaining on the wall, then repairs and primes the plaster. (Photo: Lisa Halley Melching)
If the joints don’t improve, use the paint thinner to soften the glazing compound. Then score the glazing compound with a utility knife, following the edge of the glass chamfer. Remove as much residue as you can, but don’t get too aggressive because you will chip the edges. Scoring will create a clean space in these skinny joints (there is generally no spacer) where you can then wipe in new latex caulk the color of your choice. Make sure you have softened the glazing compound before you score; otherwise the compound will scallop (chip or flake) the edge of the glass as you remove it.
3. Replace broken tiles. If you have a source of new glass, such as tiles salvaged from elsewhere in the kitchen, it is possible to replace unsightly damaged tiles by working carefully with hand tools. Cracked tiles can usually be removed by softening and cutting the joints, then removing the tile with a suction cup or breaking it out in pieces. Wear gloves and eye protection and remember: this is glass. When you remove the pieces, secure the adjoining undamaged tiles by squeezing adhesive caulk behind their edges.
Renovation and Remodeling
Kitchens are one of the trickiest places to balance historic features with modern convenience. If you are contemplating a kitchen upgrade, ask yourself whether you can add a satisfactory number of fixtures and cabinets without disturbing the glass tile installation that is, removing tiles.
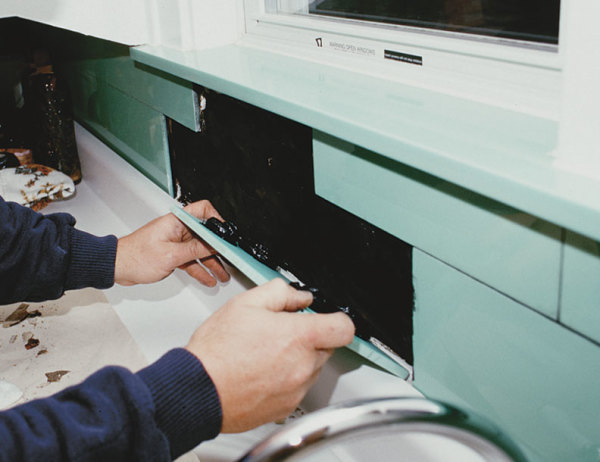
After applying mastic with an electrically heated scoop applicator, Dunn installs the tile on the primed wall. (Photo: Lisa Halley Melching)
For example, consider buying moveable appliances (most obviously dishwashers) or cabinets (such as an antique chiffonier). If you are working with an outside designer (many kitchen cabinet suppliers employ one) be prepared to insist that you want to keep your Vitrolite or Carrara. Convince them that the material is adaptable. In St. Louis we’ve worked beautifully around many types of kitchen designs. The owners got a kitchen with all the modern amenities while keeping the original look.
Watch the dimensions. The first point to remember about installing around structural glass is that the standard dimensions—typically 3/4″ from the glass face to the existing substrate—differ from other building materials. This will vary, though, because the glass tiles were often used to correct uneven or out-of-plumb walls. In fact, this was one of the product’s main selling points, along with being easy to clean and never needing a paint job.
Plan for removing tiles. Put up a cardboard template of your new cabinets along the space where they will be installed, and note the areas where you must fasten them to the wall. You’ll need to remove the glass tiles in these sections so you can replace them with pieces of plywood that are just a bit thinner than the distance from the face of the glass to the substrate. Leave a 2″ space all around the perimeter of the plywood so that when you reinstall glass tiles you can slip them behind the cabinets, making them look like they are original.
You may also have to remove tiles to rework plumbing, venting, and supply lines, or to install new electrical outlets. Kitchens from the 1930s and ’40s—the heyday of structural glass—usually don’t have enough receptacles for today’s appliances.
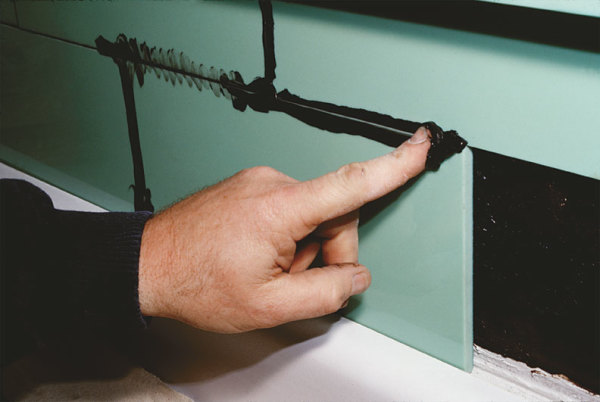
You can wipe grout into the narrow space between structural glass tiles using a finger. (Photo: Lisa Halley Melching)
Record the placement of the tiles on the walls by marking each tile with a code (letters, numbers) and transferring them to a drawing of the installation on a big piece of paper. You might also want to take a photograph before you start disassembling. When you’re ready to replace the tiles you’ll be able to see which pieces go on which wall.
Seek salvage. As you proceed, note where you can possibly salvage tiles—behind new cabinets is an obvious place. During reinstallation, you’ll need all the extra pieces you can afford to leave off now. You may think you have plenty, but some will get broken in the salvage process; others will get broken during cleaning. While the pieces are off, clean the old glue from their backs and any old adhesive from the walls.
Another issue is culling tiles that have “pinked up.” This discoloration appears where windows have allowed ultraviolet light to strike glass on the opposite wall. Keep any such tiles separate. It may be possible to retile that area with undamaged glass, saving the pinked-up tiles for low places where they are less visible and not exposed to additional sunlight.
Consider the counter. There are two different methods for butting countertops to glass-tile walls (where the glass is serving as a backsplash). One is to first install the countertop whether laminate, granite, marble, or another material on the cabinet box, then bring the glass tiles down to the top of the counter. The other is to reinstall the tiles behind the base cabinetry, then install the counter up to the tile. Either way, remove only those tiles that are necessary to install the new cabinets and counters. Note that you can bore holes in Vitrolite or Carrara by using carbide-tipped drill bits, working at slow speeds, and keeping the area of the hole wet.
Unless you whack the glass with a heavy pan, the newly repaired wall should last for many years. (Photo: Lisa Halley Melching)
Keep in mind that when restoring a structural glass kitchen you are working on a puzzle, taking it apart, cleaning and improving the pieces, then putting the puzzle back together. That’s what makes the process challenging and even fun. At the same time you are preserving one of the features that makes your house unique and appealing a conversation piece that is an increasingly rare bit of history.
Vitrolite specialist Timothy Dunn is also a small-town city councilman.


