

Nothing defines an old house like hardwood floors—they’re one of the primary features that draws so many of us to antique homes. Regardless of their age or species, wooden floors give a house warmth, character, beauty, and value. Refinishing your wood floors will bring them back to life. But as every old-house owner has learned, hardwood floors are subject to a great deal of use and abuse. Floors that once gleamed under a flawless coat of clear finish will inevitably become dirty, scratched, stained, and worn. In times past, homeowners would wait until either the finish had nearly worn away or they could no longer stand the sight of the stains and scratches, then would call in the professionals to erase every trace of the old finish with menacing floor sanders.
After the dust had settled, many of these homeowners would soon notice the disparity between their historic house—with its dinged doors, chipped tiles, bruised woodwork and cracked plaster—and their new, seemingly modern wood floors.
After recoating, this room’s formerly scuffed-up hardwood flooring (below) looks good as new. Alexandra Fisher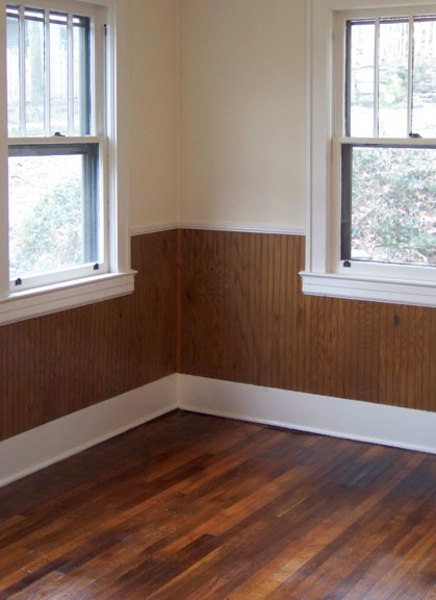
In most cases, complete floor refinishing isn’t warranted, yet something needs to be done—and not just for the sake of appearance. A finish does more than just make wood look beautiful. It also seals and protects the wood’s open pores, which, if left exposed, will absorb water, dirt, and spills and will be more likely to be scratched and dented.
Another solution is recoating: adding a new layer of protection that will adhere to the previous finish. Recoating is easier, safer, and faster than refinishing, but it does have its limitations. Since the fresh coat of finish will be applied on top of rather than in place of the existing finish, it can improve the appearance of the old finish, but it cannot solve any problems within the wood itself.
7 Steps to Recoating Wood Floors
Old floor before refinishing. Alexandra Fisher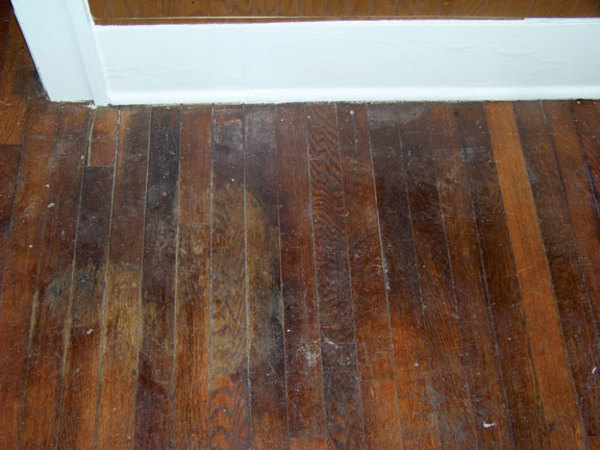
Empty the room
Don’t attempt to convince yourself you can complete this project by moving furniture around the work area. The room needs to be completely empty—and don’t wait until you bring the floor buffer home. You’ll be paying for it by the hour, so empty the room first.
Make any necessary repairs
This is the time to countersink and fill any exposed nail heads, to plug holes left from old television or phone lines, or to touch up any deep scratches with a wood stain or stain marker.
To cover up floorboard nails, use a hammer and a fine point (such as a pencil) to drive the nail 1/8″ below the surface of the board. Fill the resulting hole with wood putty, allow it to dry (a few hours is usually sufficient), and then sand lightly in the direction of the surrounding grain until it is flush with the wood. Alexandra Fisher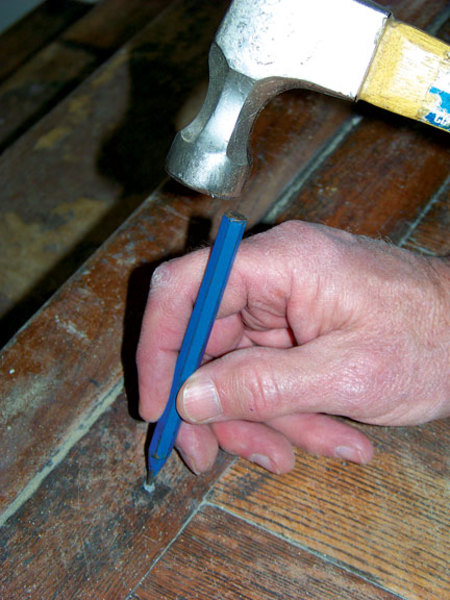
Clean the floor
In order for a new finish to adhere to an existing finish, any contaminants on the existing finish must first be removed—including, but not limited to, ordinary dirt, grime, grease, dust, soap film, cleaning residue, dusting oils or aerosols, furniture or floor polish, and wax.
Don’t clean with hot, soapy water or any homemade recipes. Harsh chemicals can damage the finish on your floor and baseboards, soap will leave a residue, and excessive water will cause the wood to swell. Instead, use a commercial hardwood floor cleaner designed to dissolve contaminants without dissolving the existing finish. Afterward, scrape the finish with your fingernail to determine if the surface is completely clean.
Allow the floor to dry
A floor polisher fitted with a synthetic pad will make quick work of scuffing old coatings. (Always wear a protective mask to guard against dust particles.) Alexandra Fisher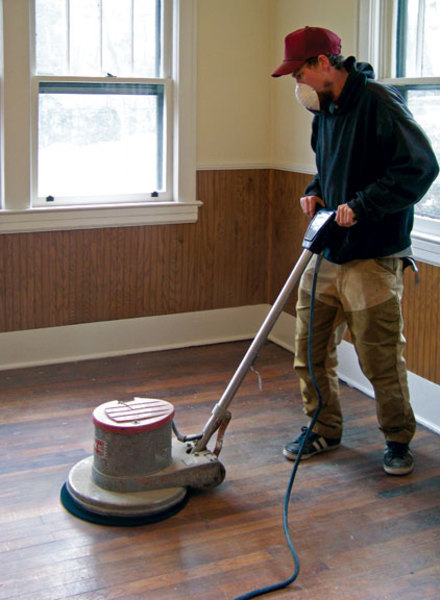
After cleaning, wipe the floor with a soft, dry cloth, and give any remaining hardwood floor cleaner time to evaporate before proceeding. If you are in a hurry, set up a fan to blow air across the floor.
Gently scuff the old finish
Since neither water-based nor oil-based finishes can form a chemical bond with a previous layer of finish, we have to create a mechanical bond between the two finishes by adding thousands of tiny scratches to the existing finish.
Using either a floor polisher and a large synthetic pad, a hand polisher with a synthetic pad, or a palm or orbital sander with 180-grit sandpaper, lightly scuff the surface of the existing finish.
Vacuum the dust
Use the soft bristle attachment on a vacuum to remove the dust created by scuffing. Do not sweep the floor, as a broom or dust mop only pushes the grit into the cracks between the boards.
Using a sponge mop, apply the new finish evenly over the floor, working from the rear corner of the room toward the doorway. Alexandra Fisher
Apply your chosen finish
Choosing the appropriate finish is critical, but regardless of the type of finish you apply, remember that there is a difference between “dry time” and “cure time.” A finish may dry in a matter of minutes, but it will not achieve its maximum hardness until it has had time to cure—typically in about a week.
Once dry, you can walk on the floor in stocking feet, but keep shoes and pets off it for an additional day. If possible, wait three days before bringing in rugs and furniture. And regardless of how long the finish has cured, never slide furniture across a hardwood floor. A worn furniture glide or even a piece of dirt wedged under a chair leg can leave an unsightly scratch in even the strongest finish.
Online Exclusive: Wondering what type of finish is right for your project? Click here for tips on choosing one.
Q: The wood floors in our 1928 Tudor Revival-style house are made from fir. All the doors, windows, and trimwork are also fir. What are some tips for refinishing this wood?
A. Knot-free fir was an attractive all-purpose wood through the first half of the 20th century. In fact, it was once the mainstay of the aircraft industry, as well as common for framing lumber into the 1960s. Although you would pay quite a bit for fir moldings today, in the past it was a standard offering in modest houses, such as Foursquares and bungalows, or in non-public areas such as bedrooms and third-story spaces.
A durable softwood with a warm, pleasing grain pattern—especially when quarter-sawn—fir takes stain well but doesn’t really need it. As with all refinishing projects, if you’re going to stain, you should test it first in an inconspicuous place to see how the wood reacts. (If the staining comes out blotchy, use a stain controller first.)
One of the most common uses of the wood is flooring, especially in the West where Douglas fir is still widely available. Carol Goodwin, of Goodwin Heart Pine in Micanopy, Florida, says fir compares in density with antique heart cypress. “Frank Lloyd Wright used the two interchangeably,” she says.
For finishing softwood floors, Goodwin likes Loba Easy Start, a water-based sealant relatively new to this country that dries quickly and flows on bubble-free. When using penetrating finishes on fir, she says to expect any color changes to occur more quickly than they do with heart pine.


