

Robert Walton of Sylvan Brandt saws through a 14″-thick vintage barn beam. Beams are the source of much of the company’s reclaimed flooring. Jim Polson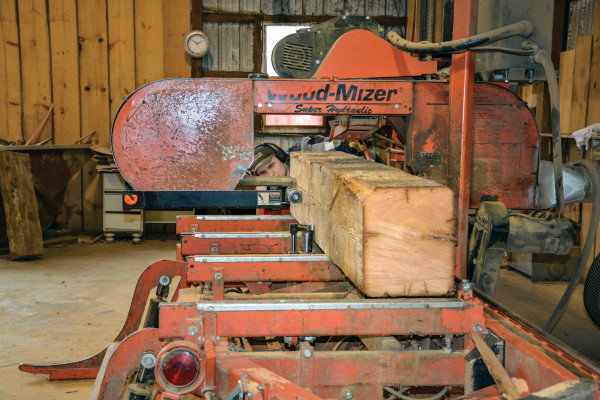
As much as original hardwood floors are prized today, they often pose problems that aren’t easy to solve, from burned or missing floorboards to pet-urine stains. In many cases, the damage can be repaired and evidence of past wrongs can be righted. The solution usually involves elbow grease, some serious sleuthing for the right materials, skilled help, or all of the above.
Damaged floorboards can be seamlessly replaced, for instance, but finding appropriate wood for an old floor may require looking in some unusual places. Time-honored methods include using wood salvaged from the house itself (check attics and basements for leftover boards, or even rip up a few pieces of the attic floor if it’s a match), and seeking out locally salvaged or reclaimed wood.
If your floors are fairly recent by old-house standards or if the repair is a small one, you may be able to feather in newly milled wood
from a local lumberyard.
While ¾”-thick flooring has been standard for centuries, the many variations in wood species, cut, grain, character marks, and fastening methods make it challenging
to match new wood to old.
If you’ve pursued the obvious options without success, the next step may be to go to an antique wood specialist. “Several times a week, clients send us photos of flooring they are trying to match,” says Carol Goodwin, president of the Goodwin Company, which reclaims and mills river-recovered heart pine and cypress. “We ask them to send photos of expanses of the floor so that we can see the type and grain of the wood, knot and heart content, color, and character marks such as nail holes, cracks, and checks.”
Rescued from local storm-damaged old-growth forests, Old Florida heart pine from Goodwin features tangential “cathedral arches” from flat sawing and numerous knots and other character marks.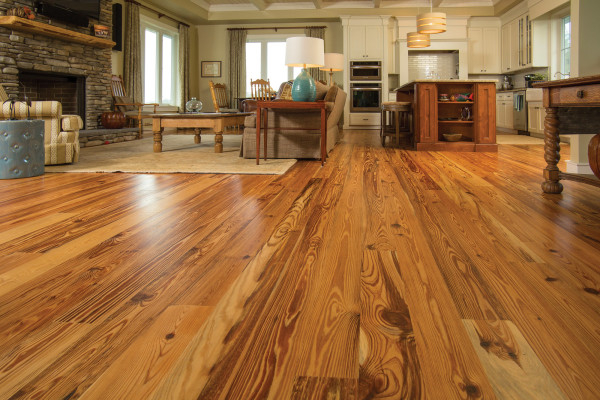
Putting together a packet of replacement wood means identifying wood of the same species, cut, and intangibles like character, she says. The wood should also be milled the same way, such as strip tongue-and-groove flooring or wide plank. Provided the existing floor is heart pine or cypress of similar age and grain to the wood Goodwin typically reclaims and mills, she and her team can usually match it through trial and error. “We end up counting boards—lengths, the grain, here’s one that’s got a knot, here’s one that’s flat-sawn,” and so on, she says. “Then we come up with a mix from two or three different collections.”
That’s all well and good for restorers with heart-pine floors, but finding a source for wide-plank Eastern white pine for a floor in upstate New York, tongue-and-groove white or red oak for one in Ohio, or Douglas fir strip flooring for a house in Seattle will mean seeking out producers of similar wood.
The first step is to identify the wood species in the floor. (Unsure? Show or send samples to a knowledgeable flooring pro.) Most wood flooring is either plain sawn (also called flat sawn) or quarter sawn. Visually, the difference is dramatic: the growth rings on flat-sawn boards appear as a tangential grain—curved lines running up and down the boards, forming “cathedral arches” in the words of more than one flooring expert, creating a repeating pattern of arching grain, layered one on top of the other along the board.
Quarter-sawn wood produces boards with a vertical grain like pin-striping. The denser the original wood, the tighter the pin-striping, which is why it may be important to match the age of the wood.
You might also like wood floor basics: oldhouseonline.com/interiors-and-decor/wood-flooring-q-a
Next, identify how the boards are fitted together. The earliest boards were random-width planks laid tightly against one another with square edges, then either face- or blind-nailed. (Truly early floors are fastened to underlying joists with pegs.) Wide planks may also be cut with interlocking tongue-and-groove joints and blind-nailed.
Flooring laid since the second half of the 19th century is usually tongue-and-groove, milled with projecting tongues on one side and mating grooves on the other. As each board is laid, the tongue slides into the groove on the board already in place on the floor to create a tight joint that can be blind-nailed in place.
Once you’ve identified species, cut, and installation type, examine your floors for additional characteristics, such as an unusual color, the presence of knotholes, or “character” like saw-blade marks or insect and nail holes. If you can afford it, you want to buy wood with similar characteristics.
It’s also important to seek out planks or strips that are similar in length and width to your existing floor. Walk into any house built before 1960 with intact floors and you’ll see strip flooring in lengths from 8′ to 10′. If the house was built before 1850, the boards could be up to 16′ long. Today, a lot of newly milled stock comes in lengths that are much shorter, varying between 5′ and 7′, or even less. The longer the lengths, the more expensive the wood. That goes for widths, too: wide-plank floor widths today typically vary from 5″ to 10″. Compare that to the exceptionally wide boards found in antique homes known as “the King’s wood,” which can be up to 24″ wide—the center boards flat-sawn from an enormous old-growth tree.
When floors are just “slap worn out” (a phrase my father used to apply to old trucks), options include replacement with like wood or a species common in your area. In other circumstances, engineered floors with a top layer of real antique wood will look just as good as solid strip or plank flooring. Seek out versions that are at least 5/8″ thick with a wear layer that can withstand multiple sandings.
Method One. Gordon Bock/OHJ Archives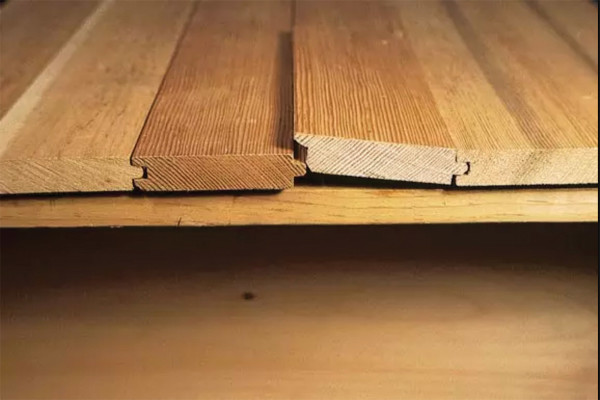
Method One Cut away the bottom shoulder of the groove on the appropriate side of the board. Then slide the tongue on the opposite side of the board into the exposed groove on the mating floorboard.
Method Two. Gordon Bock/OHJ Archives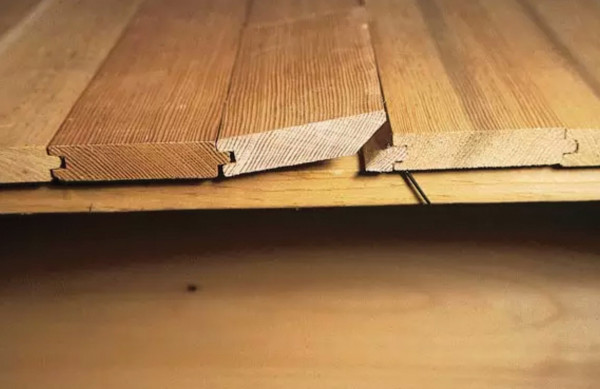
Method Two If the tongue won’t go in, choose a new board and cut the shoulder off the tongue side at a 45-degree angle, taking care to include the tongue. Fit the detached shoulder with its tongue into the groove on the adjacent board. Then nose the rest of the patch board into the mating tongue on the opposite side. You may need to plane the bottom corner of the board to get it to settle in and lie flat. Then either face-nail the board in place with finishing nails, or glue in the new board to the detached shoulder.
Minor Floorboard Repairs
Replacing a few damaged boards with new wood isn’t difficult, but it does require basic skills and a bit of finesse. Plank boards that butt side to side are the easiest to repair, but there are some caveats even with these.
First, note the nailing method used to fasten the planks in place. They’ll either be face-nailed (heads exposed) or blind nailed (concealed between boards and usually driven at an angle). You’ll want to use the same method on the patch.
Next, cut away the damaged area, taking care not to disturb adjacent boards. Then check underneath for support. If there’s no subfloor, make sure the new repair spans at least two joists. If the patch will be highly visible and the floorboards in the rest of the floor are especially long, use a plank that’s several feet long for the patch.
For tongue-and-groove repairs, bore a ¾” hole in the damaged board with a hole saw, taking care not to disturb the subfloor. Next, rip two kerfs down the middle of the board, running from the hole, about ¾” apart. (Set the blade depth so that it’s shy of flooring thickness, usually a standard ¾”).
Pry out the cut section. Then gently pry the remaining sides of the board away from the mating tongues and grooves, taking care not to disturb other boards. Cheating in a new t & g board may require more than one technique, so be sure to have extra replacement stock before you begin.
Feathering In
Newly installed flooring meshes seamlessly with an older floor through the use of carefully matched wood and deep staggering. Once the new floor is stained, it will be difficult to tell where the old floor ends and the new one begins. Courtesy Hatton’s Hardwood Floors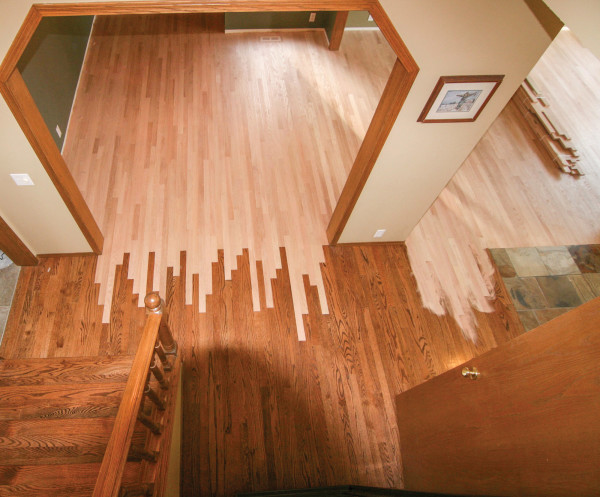
Larger repairs are much more visible than smaller ones, so it’s critical to match average lengths and to stagger the boards randomly. “You want to avoid a lot of ‘H’ joints,” says Carol Goodwin, president of the Goodwin Co. “You don’t want the joints to fall parallel to each other on either side of another board.” If the entire floor will be sanded and finished after the repair, she adds, it should be almost impossible to tell the newly installed wood from the old if it’s done right.
Sylvan Brandt Shop Tour
Dean Brandt and associate Robert Walton examine a floorboard before shipment. Jim Polson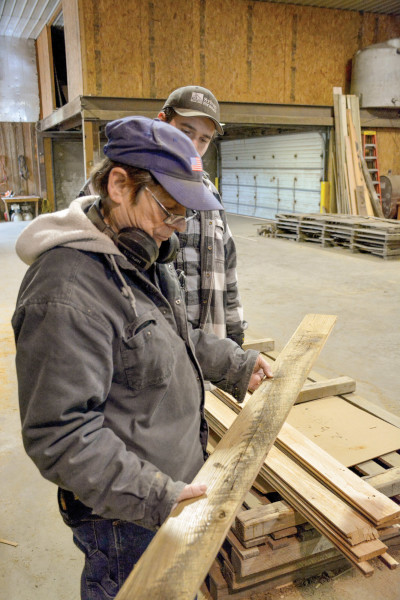
The first thing you learn at Sylvan Brandt, a reclaimed wood specialist in Lititz, Pennsylvania, is that the sawmill never touches new wood. “We call that ‘tree’ wood,” says Dean Brandt, the proprietor and son of the namesake founder. “We don’t use it.”
Sylvan Brandt mills only antique wood reclaimed from old barns, sheds, and other demolished buildings for its unique flooring, beams, and such elements as fireplace mantels. One recent winter day on the shop floor, Brandt and his assistant, Richard Walton, were remilling a lot of salvaged oak for tongue-and-groove flooring using a moulder. The machine both planes the wood and neatly cuts the tongues and grooves at a single pass.
Walton selects a piece of lumber and carefully feeds it into the machine. Although you can peek at the operation through a window in the closed hood, all of the magic happens out of sight: at one point the sides of the board are square, and within a span of 18″—after passing through a series of cutting heads—they’re tongued and grooved.
Robert Walton feeds a board into the moulder. “It takes three-quarters of an inch to make a tongue-and-groove cut,” Brandt says. “So if we want a 4″ board, we have to run the edge at 4 “.” Jim Polson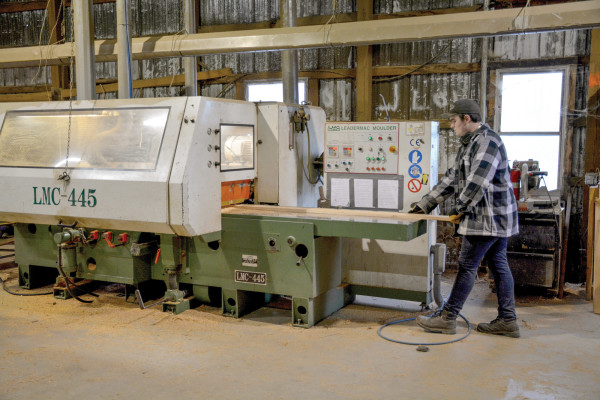
Part of the family business since childhood, Dean Brandt has added a few twists over the years. One trick is the slight, downward lip on the bottom of the groove on his t & g flooring. “You always put the tongue down first, so the next board has trouble getting over the lip. I put a bevel on the bottom of the groove so it slides in easily. Flooring people love it.”
Much of the stock used for milling floors begins with old barn beams, some as large as 12” x 14” and up to 16′ long. Before milling, the lumber must be inspected for nails and other metal, all of which must be pulled out by hand before the lumber meets the planer. Every scrap of wood that can’t be sold is salvaged and sent to a greenhouse where it’s ground up and used as heating fuel. Sawdust is sent to local farmers as bedding for milk cows.
Tongue-and-groove flooring emerges from the moulder, ready to be stacking and bundled. Jim Polson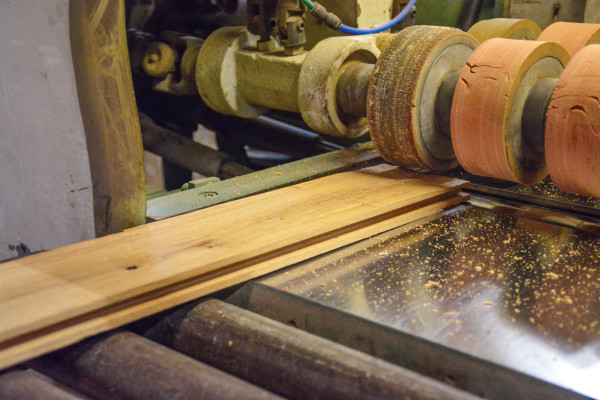
Brandt’s father, Sylvan, got into the reclaimed lumber business almost by accident. “He saw an ad for an old stone house, free if you moved it,” says Dean, who was a baby at the time. The elder Brandt and a friend dismantled and sold just about every stone and stick in that house, making so much money that Brandt soon quit his $67 a week job in an asbestos plant and went into the reclamation business. That was 1960. Sylvan Brandt ultimately built its success by remilling antique wood into beautiful flooring, the likes of which went into the homes of many well-known Main Line Philadelphia families.
Unlike many flooring manufacturers, Sylvan Brandt does not prefinish or stain the wood it mills. It’s meant to be sanded and finished on site the old-fashioned way—usually with three coats of oil-based urethane.
Boards at Sylvan Brandt are milled with a slight bevel on the bottom of the groove to make it easier to slide the next tongued board in place. Jim Polson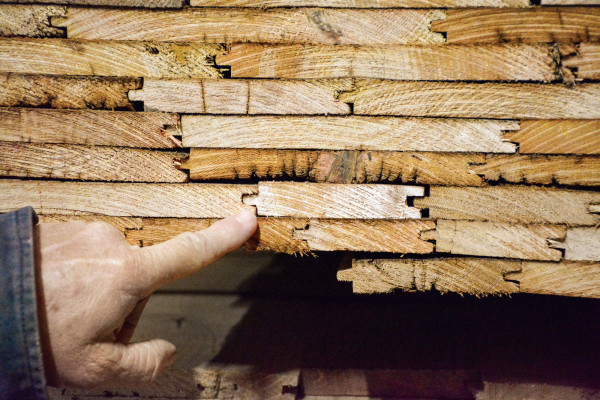
On Brandt’s rustic oak flooring, the original saw marks are left in place, and some will survive that process. “When it’s sanded and finished, it looks beautiful,” Dean says. “The finish brings it all together.”
Fight Stain With Stain
As tall as a two-storey barn, these reclaimed wide-plank antique oak floorboards from Old Wood Workshop are 18′ long.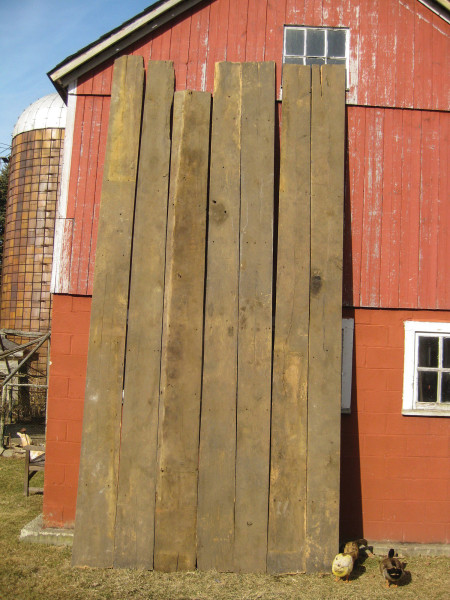
Deep, dark, or smelly stains
in wood floors can be effec
tively treated with chemicals
that range from oxalic acid and hydrogen peroxide to chlorine. Trouble is, almost all of the solutions bleach or change the color of the wood, release volatile chemicals, or both. For persistent odors like pet urine, use a commercial enzyme-based odor remover. (A neat trick to eliminate any lingering scent is to add a coat of shellac or polyurethane to the floor after treatment.)
Since most of the odor is concentrated in the top layer of the wood, the best approach for heavily urine-stained floors is to sand them, then stain and refinish. While a dark stain should successfully cover the old patches, it’s possible to use a lighter stain after a little pre-testing. After sanding, apply stain with different depths of color to one of the pet-stained areas. (Be sure to wet the area before applying even a small test stain.) You should be able to use the lightest value that conceals the pet stains completely.
Wood Over Radiant
A period-inspired ceramic tile floor, like Clay Squared to Infinity’s Spanish Mission ‘Stars and Hex’ pattern, are ideal for installation over radiant heating elements embedded in mortar.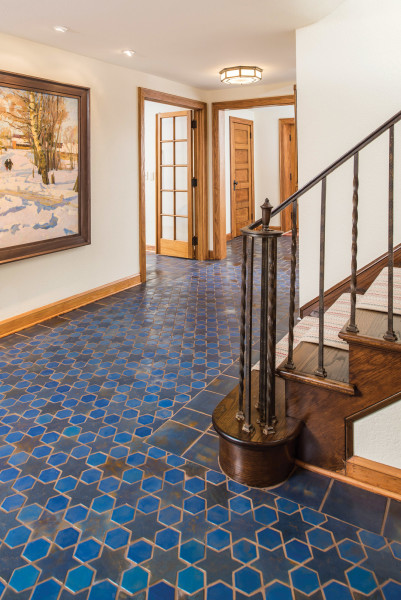
Radiant heating systems can go just about anywhere, but they still have a problematic relationship with wood floors. That’s because most radiant systems transmit warmth directly through the flooring material, usually at temperatures of 80 degrees or higher. Natural wood planks or strips can absorb and retain moisture, causing them to expand and contract when they’re heated. The dry heat from a radiant system can cause the floor to dry out quickly, leading to cupping, cracks between joints, and ultimately, surface damage.
Most vulnerable are the softer woods like pine, fir, and hickory, especially if they’re flat-sawn. Installing wood flooring with a high percentage of residual moisture over radiant heat can lead to early failure. If you will be replacing the floor in any case, consider another period flooring option, such as tile. Radiant systems work best when embedded in underlayments such as cement, the base for most tile flooring.
Hard Wax Oils
A white oak floor gets a whitened, color-wash effect from WOCA’s Wood Lye white and Diamond Oil white finishes.
Are polyurethaned floors becoming a thing of the past? Maybe, given the new wave of hard-wax oil finishes that have come onto the market from Europe in the past five years. These new finishes not only produce a more natural appearance, but also promise zero volatile organic compounds (VOCs) released, and they go down in a single coat. Best of all, there’s no need to strip and refinish the floor to touch up worn areas.
Products that include WOCA Diamond Oil Active 1K, Rubio Monocoat Oil Plus2, and Bona Craft Oil 2K are all-natural, hard-wax hardening oils that use molecular bonding to color and protect by penetrating and reacting with wood fibers. (Rubio Monocoat recently introduced a formula that cures instantly with LED exposure.) Compare this to polyurethanes, where the protective layer sits on top of the wood and can appear shiny and plastic. Hardening oils cure as quickly as oil-based polyurethanes, offer good longevity with regular maintenance, and come in more than 50 colors.
Given an application method that demands reaction times of as little as three minutes and removing all excess oil in under 15, they’re best installed professionally. A pro can also pre-age, fume, or add lye effects to the finish as part of the installation.
For those in search of an easy-care finish, urethanes are still more forgiving than a hard-wax oil floor, which must be cleaned weekly with a natural oil soap recommended by the manufacturer, and damp-mopped (cotton mop only!) with an oil refresher every three to six months.


