The mellow patina of an old floor is the result of decades of aging and judicious care. This antique floor and staircase were installed in an addition at Gore Place in Waltham, Massachusetts, in the early 20th century. (Photo: Steve Marsel)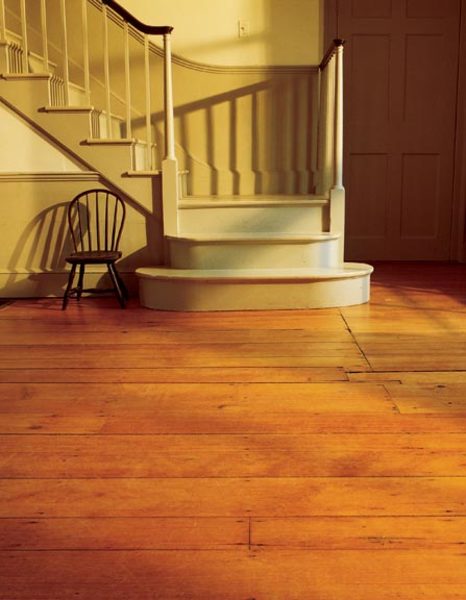
Part of the charm of an old floor lies in its minor imperfections: the familiar creak of a floorboard, a gentle undulation in the hall, the gouge mark so ancient that the scar has a patina. While any old house can be expected to have floors that squeak, sag, or slope, in most cases these flaws aren’t structural. With a little know-how, you can easily silence faulty floorboards and repair minor damage. We’ll also give you tips on what to do about those pesky cracks that open up as the seasons change. The good news is that when flooring problems are the result of old age, it’s a good bet that conditions have stabilized. (In other words, they probably won’t get worse—at least not while you live in the house.) You can trouble-shoot your own floors by talking a walk around the room.
Squeaks, Creaks, Springy Spots
You’re likely to hear problem spots before seeing them. A squeak usually means a floorboard isn’t making adequate contact with the supporting joist below. A deeper-sounding creak probably means the joist is inadequate. Spongy spots can result from either condition. The solution is to reattach loosened boards using a pair of nails driven into the heart of the squeak, or by anchoring them with screws.
A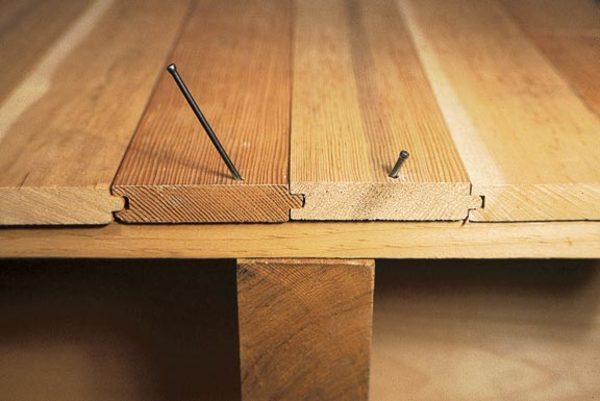
Once you’ve found the heart of the squeak, drive a pair of 10d finishing nails toward each other in a V so that they grab the joist solidly at that spot [A]. Repeat the procedure every 6″ or so down the length of the joist until the squeak disappears. Set the nails using a hammer and nailset, and fill in the holes.
B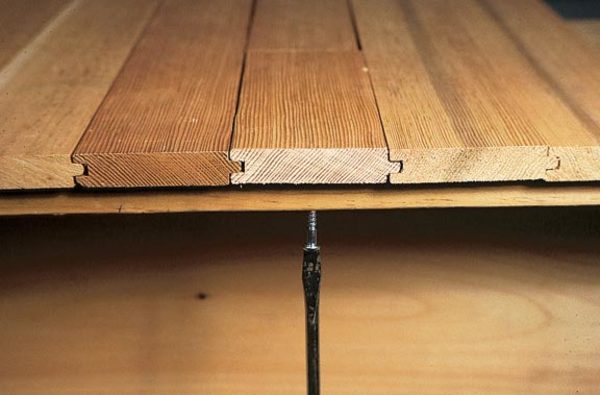
If you have access to the underside of the subfloor (from an unfinished basement, for example), try anchoring the loose boards from below with screws [B]. You’ll need an assistant to walk on the floor over you to identify the problem spot while you work. Use round washerhead screws with a shank slot, such as those sold by McFeely’s. Depending on the combined depth of the subfloor and top floor, use a 1″ to 1 1/4″ screw. (You want the screw to penetrate no further than halfway through the finished flooring.)
Minor Floorboard Repairs
To replace one or two bad boards, begin by finding replacement wood that closely matches the sound condition of the original flooring. Some tips for matching wood:
- Look for wood of similar species, age, and size (width, depth, and profiling). Likely candidates will also have a similar ring pattern (rings spaced closely or loosely together). They should also be cut the same way: flat-cut (flat-grain) boards have annual growth rings that run parallel to the face of the board. The rings on rift-cut (and quarter-sawn or vertical grain) flooring are usually vertical to the face of the grain, and are much more uniform.
- Unless you have rare or unusually fine flooring, look for sources close to home. A local salvage house, or even your own closet or attic, may yield the best match.
Replacing a Floorboard
Most floors in older homes are composed of individual (plank) or interlocking (tongue-and-groove) boards laid together. Replacing one bad section on a plank floorboard is a relatively simple repair, but there are some caveats. First, the boards tend to run the full length of the room, so a small patch may stick out like a stubbed toe. Second, there may be no subfloor, so any repair should span at least one joist and share support on another. (Fastening a sturdy block of wood, or cleat, next to the joist to support the new board is one such method of “sharing.”)
C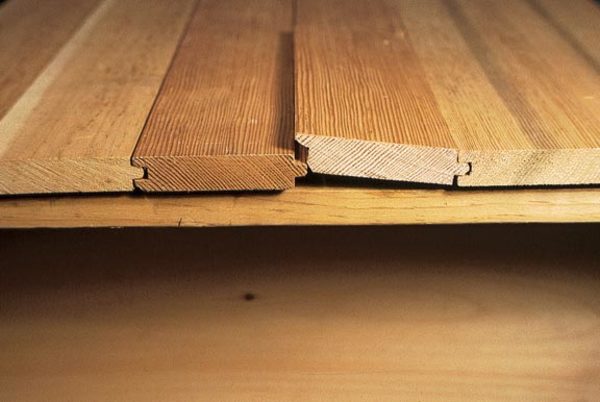
Before making any repairs, first determine whether the floorboards are face-nailed (heads exposed) or blind-nailed (heads concealed between boards, usually driven at an angle). Use the same method for repairs.
To finesse a new piece of tongue-and-groove into place, cut the bottom shoulder off the groove of the new piece [C]. Once the patch is in place, face-nail it or anchor with a screw.
D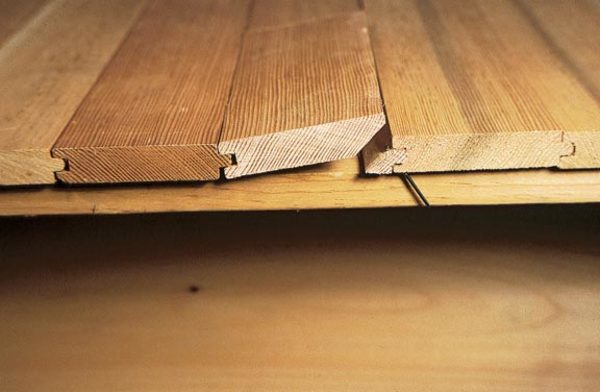
If that doesn’t work, separate the tongue from the new strip, and nail it to its mate [D]. Using a table saw, rip the tongue off the strip at about a 45-degree angle. Nail the tongue to the mating strip with 4d finishing nails. Apply glue or epoxy cement to the cut surface, and work the patch into place. To fill a gab created by facing grooves, cut a spline from a thin strip of hardwood to create a common tongue [E].
E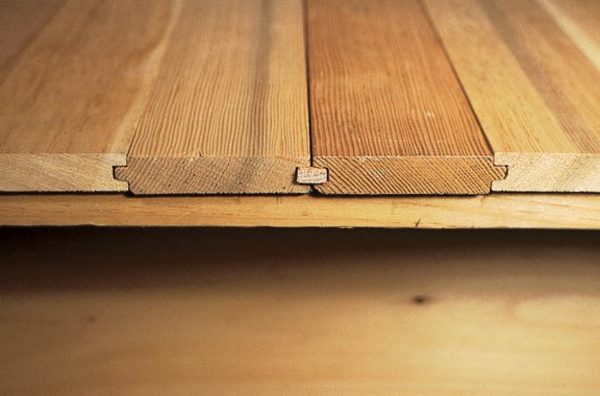
Minor holes and gouges can be filled with wood putty. To repair a crack in an otherwise sound board, glue down any long splinters, then fill the crack with wood filler or wood putty.
Gaps Between Boards
Both plank and tongue-and-groove floors can develop unsightly gaps as the floor ages. This is caused by compression shrinkage. During periods of high humidity, a floorboard will expand and compress its neighbors. When dry air returns, the boards shrink, but don’t fully decompress.
Since the shrink/swell pattern persists even in the oldest floors, the best remedy is to do nothing, particularly if the gaps tend to close up during the humid months. If the gaps are especially large or pronounced at certain times of the year, consider the following alternatives.
- For gaps that appear during dry, cold weather, try increasing the humidity level in the house by running a humidifier. This may encourage shrunken boards to expand.
- Fill gaps with a flexible paste or fiber filler that can adapt to the shrink/swell pattern of the floor. Homemade remedies include mixing sawdust with a binder such as varnish, shellac, or white glue, or hemp rope soaked in linseed oil or glue. The sawdust mixture is simply pressed into the gap; pack the soaked hemp rope into the crack using a large flathead screwdriver or small putty knife. (Apply two layers if the crack is deep.)
- Gun in an elastic caulk that cures to rubber. A flexible marine or silicone caulk should only be applied when the cracks are halfway through their shrink/swell cycle (normally in spring or fall). Carefully mask the edges of the crack to keep the caulk off the floorboards. You may need to partially fill very wide cracks with a pliable backing material, such as cloth or weatherstripping.
- For wide gaps that persist throughout the year, it’s possible to fill in the cracks with wood strips ripped to a slight taper on a table saw. Be aware, though, that introducing new wood into the situation can compound the problem. Glue or toenail the strips with brads to each board, or face-nail them to the joists or subfloor. The repair may need to be hand-planed or sanded to match the level of the floor.
Treating Stains
Chlorine, oxalic acid, and hydrogen peroxide are the most effective stain removers for wood floors. All three work primarily by bleaching; each is most effective only on certain types of stains. Before you apply any strong agent, test it in a spot that doesn’t show.
- Chlorine: Effective on stains containing aniline dyes and ink stains. Use common laundry bleach (a weak solution of about 5 percent sodium hypochlorite) or dry swimming-pool chlorine mixed with hot water. Even low concentrations of chlorine can burn the skin and eyes, so wear long rubber gloves, eye protection, and allow for plenty of ventilation.
- Oxalic acid: Mixed with warm water and as concentrated as possible, this organic acid removes blue-black water stains, iron stains on oak, and lye-blackened wood stains. It’s usually available in dry crystalline form at hardware stores or wood finishing suppliers. Dissolve the crystals in hot water until you get a saturated solution—i.e., the crystals won’t dissolve any more. Oxalic acid is poisonous and should be used with care.
- Peroxide: Sold as a caustic solution with a concentration of up to 30 percent, hydrogen peroxide is effective for lightening woods (“blonding”) and last-chance stains.


