

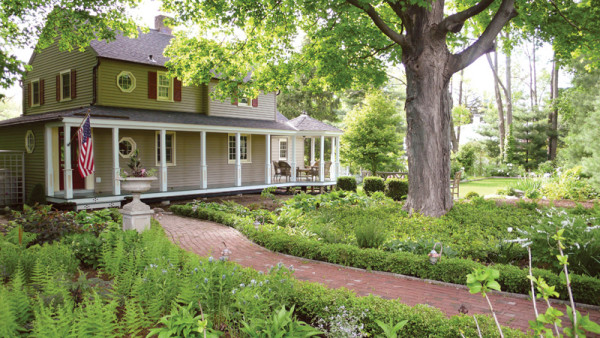
Although the path leads almost directly from gate to entry door, it has a picturesque jog near the front porch.
Bill Ticineto & Jill Chase
Leaving footprints in the new snow from her front door to the site of a planned garden gate, Jill Chase took advantage of a Connecticut winter’s day to map out a brick walk. Envisioning a tall planter as a focal point near the entry, she included a small jog around it in the path near the porch.
Jill and her husband, Bill Ticineto, later selected bricks to lay in a Flemish-bond pattern. Experts recommend using hard-fired paving bricks in good condition, either new or salvaged. (Remnant bricks found on the property may or may not qualify; test one to see if it crumbles or chips easily when tapped with another brick. Do not use face brick.)
As a design medium, brick is flexible; consider a variety of patterns before settling on running bond, basketweave, herringbone, or a more elaborate choice. To visualize the finished walk, lay out patterns on paper or with actual bricks. Once you’ve settled on a laying pattern, plan the whole walk on paper. Use the brick dimension plus joints to determine the width of the path, which should be visually pleasing for the site and minimize brick cutting and waste. (A minimum functional pathway width is 24″; 36″ is typical, and you need a minimum of 48″ for two people to walk or pass, as to a front door.) Use actual bricks to lay out a section, to make sure the anticipated width accommodates mostly whole bricks and that any cut bricks are balanced on either side. Smaller pieces of broken or imperfect bricks can be used to fill the row ends where the pattern meets a single-brick-wide border.
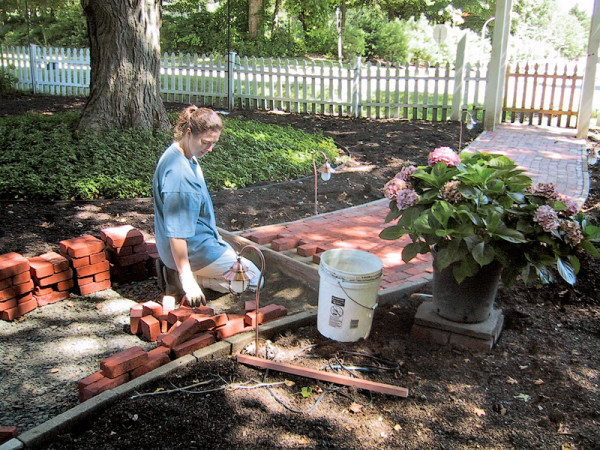
Ideally, this is a two-person job: one levels and lays the bricks, the other cuts bricks to fit small voids in the pattern.
Bill Ticineto & Jill Chase
To estimate the number of bricks you’ll need, multiply the square footage of the walk by five (the approximate number of common bricks per square foot). Then estimate number of bricks for the border: calculate linear feet and divide by the size of the brick exposure as laid. Add about 10 percent more for breakage.
With the brick pallets stacked on site, mark the walk’s boundaries with stakes and a mason’s line, and create 1″ x 6″ forms at the edges, allowing for the border. A brick path should crown: “We deliberately laid the path with a very slight arch so it’s higher in the middle, to prevent puddles and ice patches,” says Chase. Allow about a ¼” per 1′ pitch.
Excavate the soil deep enough to accommodate layers of bedding material; depth will vary depending on whether you live in a frost-heave zone and with the thickness of the brick. Chase placed a layer of gravel in the path’s bed, topped by sharp sand. (As an alternative you can use 3″–4″ of stone dust as a base.) Working in sections of two or three feet at a time, level a section of the bed using a screed, a 2×6 board cut to the width of the walk. Screeds may be cut a few inches longer and notched at both ends to slide along the forms when pulled, to level the stone dust. Tamp down the top layer of sand or dust carefully, and wet it with a fine spray of water to harden it.
Screeds may be cut a few inches longer and notched at both ends to slide along the forms when pulled, to level the stone dust.
Bill Ticineto & Jill Chase
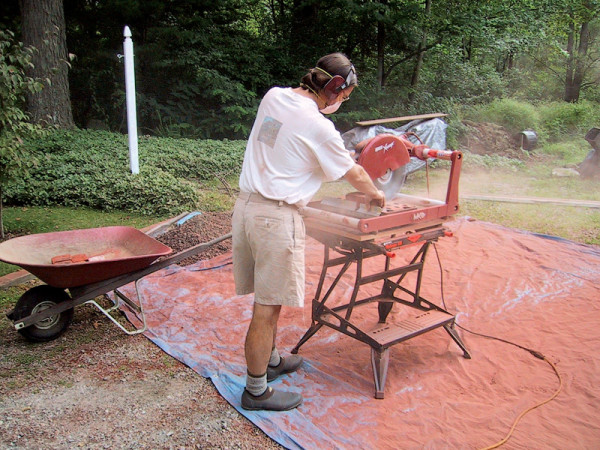
To lay the brick, set the edges or border bricks first in the desired pattern, then lay down the pavers, following the planned field pattern. Pack the bricks in tightly, tapping them into place with a rubber mallet. To create corners or half pieces, cut good pieces from imperfect bricks using either a masonry saw or a brickset—a broad bladed, sharp-edged chisel. To use the brickset, first score a line on the brick with the masonry saw. Hold the edge of the brickset firmly on the line (bevel facing away from the part to be used). Strike the brickset sharply with a hammer, and the brick should break cleanly.
Once all the bricks are in place, shovel fine sand over the entire walk until the cracks are filled to the top of the bricks. “That’s what really locks it together and keeps the walk from collecting weed seeds in the cracks,” says Chase. Then mist it through a hose nozzle. All set!
Tips from the Gardening Pros
• Before settling on a design or selecting new brick, look for remnants of old brick paths or walks on your property. Even a few remaining bricks may suggest a pattern to guide decisions.
• Check old photos of the house for the existence and placement of old paths, brick or otherwise. If original plans for your home exist, brick walks may be detailed on the drawings.
• If the path will run perpendicular to the house in a rear or side garden, lay the walk on an axis with a prominent feature or entry point, or so that it visually bisects the house, to create a visual connection between structure and garden.
• Create focal points along the path to merge it with the landscape. For a small garden, add a fountain or sundial, or place a bench at the end of the path. In a larger lawn or garden, consider a sequence of visual “stops” toward the vanishing point.


