

What old-house owner doesn’t have a cracking or sagging plaster ceiling in need of repair somewhere? Besides the normal wear and tear of living, plaster-and-lath ceilings are at the mercy of gravity, and they can take only so many water leaks and structural movements before they pull away from the framing.
The good news is, it’s possible to repair and rescue plaster ceilings from further damage. We have successfully reattached many old ceilings by injecting adhesive between the plaster and lath where the keys (anchors) have broken away over time. Though variations of this technique are not new–texts from the 1920s recommend liquid sulfur as an adhesive–we use modern materials that are easy to handle and inflict minimal damage to sound plaster. With these methods and good tool skills it’s possible to restore the integrity of plaster ceilings for many more years of service.
Sizing up Plaster Ceilings
Stained cracks and suspicious shadows—the telltale signs of a delaminating plaster ceiling.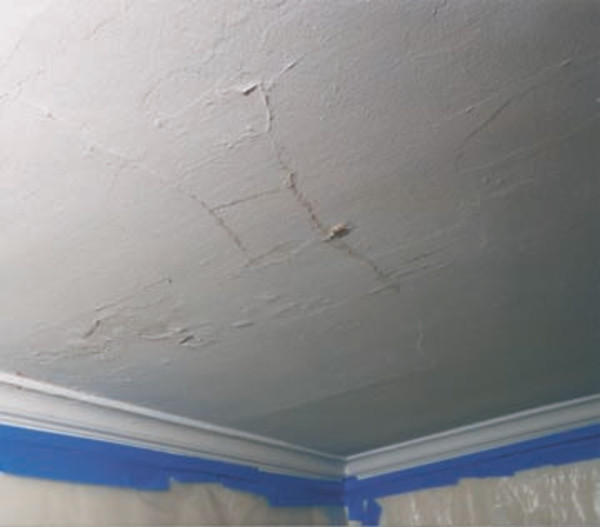
After correcting whatever problem made the ceiling loose in the first place (leaky roof, structural alterations), the first step is to assess how far the ceiling has pulled away. Gently push on the surface and judge the amount of play between plaster and lath. Hopefully, you will feel it move back into place like a jigsaw puzzle piece sliding into its own unique spot.
If there are broken keys or debris in the way, the plaster will resist seating, and it will feel and sound “crunchy” akin to breaking eggshells or crushing popcorn. Do not force it back into place or more plaster may break. Instead, just gently encourage the plaster with the flat of your hand. If the separation is slight—say, between 1/4″ and 1/2″—good reattachment is likely because the plaster will usually push back into place solid and flat against the lath. If the plaster sags 1/2″ to 1″ from the lath, there is often too much debris (broken keys, years of silt) between the plaster and lath for success.
Remove the Debris
Unless you can vacuum out all this debris from above, reattachment is probably not an option. Often we find that the worst part of the ceiling has too much debris, and we have to remove this section, reattach the edges, then infill the lost parts with new plaster. Plaster that is soft and crumbly will not hold up during the pushing and drilling and has to be removed as well.
Holding a vacuum nozzle on the drill bit helps suck the 1/4″ injection holes clear of dust.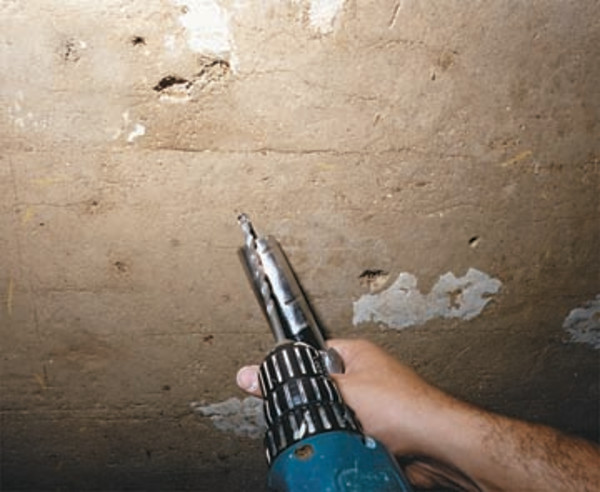
Removing areas of damaged plaster—particularly in a ceiling—will encourage more plaster to come down, especially if you use a chisel-edged tool. (We call this the domino-delamination effect.) To control this tendency we recommend carefully marking out your repair plan, then removing any areas with a sharp utility knife. Mark with a lumber crayon or pencil; a pen will bleed through your paint later on.
Find The Wood Laths
The holes you bore to inject the adhesive must be directly beneath the wood lath—not the spaces between the lath—so that the adhesive can bond to something solid. If you have removed any plaster, or dug out a crack for repair, then you can see the positions of the lath. In a reattachment-only repair, however, finding lath is basically hunt-and-peck. Sometimes, if the plaster is not too thick, you can stand back and look for ghosts or shadows of the lath showing through the finish coat.
Once you have a solid fix on one lath, assume that the rest of the lathing is 1 1/2″ to 2″ wide and spaced approximately 1/4″ to 1/2″ apart. If you have an infill area that needs reattachment at its edges, mark for injection sites 1 1/2″ to 2″ back from the edges. If you are only reattaching plaster, plan for injection holes every 3″ to 4″, no more than 6″ apart.
Drill Injection Holes
We bore injection holes with a 1/4″ carbide drill bit. Making these holes presents a second challenge because it is very important to bore only through the injection surface. For example, if you are reattaching from the plaster side, you must bore completely through the plaster, yet stop before going into the wood lath.
The 1/4″ injection hole is an effective size for a good seal with the adhesive tube.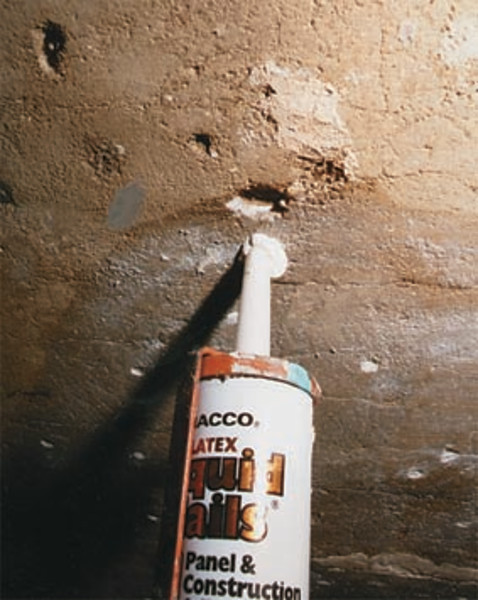
Conversely, if you are reattaching from above, you need to bore through the lath, but stop before the plaster. By paying attention to the changing resistance of the materials on the drill bit, it’s possible to develop a feel for these different layers.
Vacuum Again
After you have bored your injection holes, you need to vacuum out the debris and drilling dust. Older plaster is soft, so be careful not to suck it off the ceiling with the vacuum! Place your hand near the hole to gently support the plaster while you vacuum using the other hand. Do not push the plaster back up into place, however; the void will allow the vacuum to pull some of the debris out through the hole.
If you have access from above, you can vacuum more of the silt and debris. Remove keys that are visibly loose or broken as well. Use a wet/dry shop vacuum designed to handle the fine dust. Plaster will kill a household vacuum in short order. Next, wet the injection holes by either spraying down the lath with a squirt bottle or squirting up into the drilled holes from the plaster surface. Wetting encourages the adhesive to travel farther when it is compressed and will also slow the drying time slightly for a stronger bond.
Inject The Adhesive
Finally it’s time to inject adhesive. We use a water-based, latex product that is actually a vinyl floor adhesive. However, any good-quality latex or acrylic adhesive can work (for example, Liquid Nails or floor adhesive). You can purchase these products at construction supply houses and hardware stores in caulking tubes for small projects or five-gallon pails for large jobs.
We use a caulking gun with the tip cut to fit snugly in our 1/4″ holes, and inject the adhesive until the plaster moves ever so slightly (one squeeze of the average caulking gun is usually enough). If you inject too much adhesive you will actually push the plaster off the ceiling. As you inject, follow along with a damp sponge to wipe away the excess adhesive that leaves the holes when you remove the nozzle.
Adding wire lath over wood lath improves an infill repair.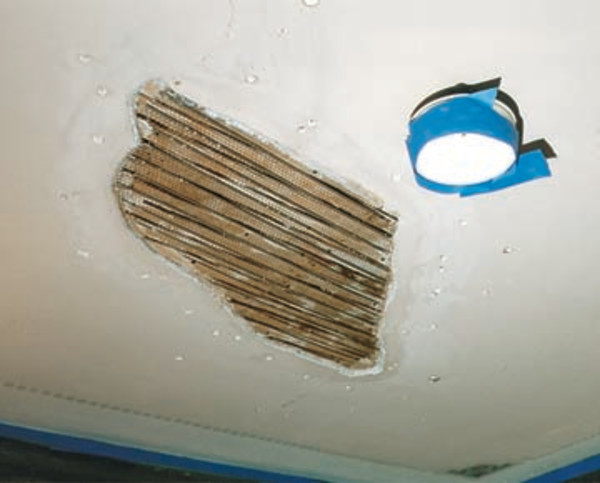
Complete your entire series of holes, then go back over the plaster with a clean, damp sponge to remove further glue residue. Follow the same process if you’re working on the lath side, leaving adhesive wipe-up as an optional step.
Secure The Plaster With Forms
Once we have injected adhesive into the repair area, we push the plaster back into place against the lath and secure it with forms. This step spreads the adhesive so that it bonds to a greater surface area.
We use flexible plywood squares (1/2″ to 3/8″ thick) covered with a layer of sheet polyethylene. Do not underestimate the importance of this layer of poly; if you forget it you will glue the plywood to the ceiling and take all the plaster with it if you attempt to remove the form. (Sound like first-hand experience?) Last, we secure these in place with screws or wood shores running to the floor, then allow the adhesive to set up for 24 hours.
Screws Versus Shores
Screws save the time of fitting wooden shores and keep the work area clear, but they can damage the plaster and leave more holes to fill later. Shores are more appropriate for fragile, decorative, or museum-quality plaster, and we use them for both plaster-side and lath-side reattachment.
Remove The Forms
The next day you can remove the forms. Where some of the plastic sticks to adhesive injected from the plaster side, simply scrape it off with a putty knife. The adhesive is still soft around the holes at this point, but has set up enough to remove the forms. On the plaster side, scrape off the dried adhesive residue with a drywall or putty knife, then use the corner of a putty knife to gently scallop out excess adhesive showing from the hole.
Fill the Injection & Screw Holes
As with all good restorations, a successful repair is hard to see.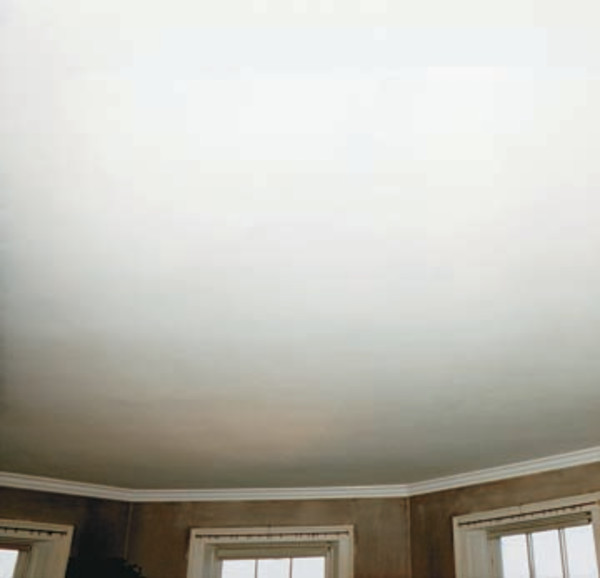
As it dries fully over another day or so (depending on heat and humidity) the adhesive will further retreat into the hole, leaving a clear space to fill. We usually fill the injection and screw holes with Durabond 45 (sandable), mixed to the consistency of peanut butter, because this product has a quick set-up time and dries very hard with minimal shrinkage. However, any vinyl paste filler or plaster/joint compound can be used for this step. Usually, it takes two to three applications to fill the holes flush with the ceiling, depending upon the product. Other than this, the ceiling is now reattached and ready for a skim-coat of plaster or a fresh coat of paint.


