

The success of the standing seam roof rests on the height and integrity of the seam. It typically projects 1″ or more above the surface and is therefore higher than any running water.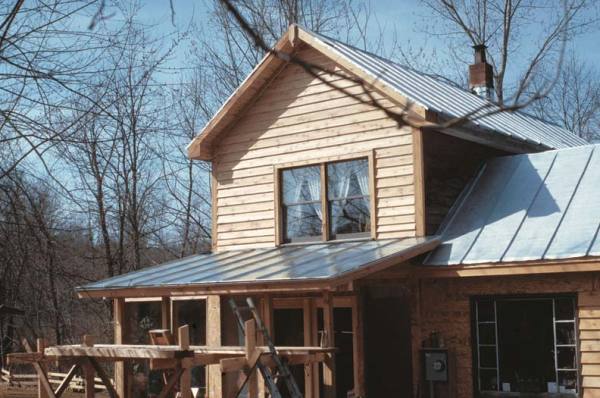
Among the most common roofs on old houses, standing seam metal roofs have been used with almost every architectural style since the basic materials became widely available in the mid-19th century. An ingenious system of metal sheets crimped together in seams that jut an inch or more above the surface, standing seam roofs are attractive and highly durable as the primary roof and one of the few options for low-pitched, secondary roofs over porches and bay windows.
They are also relatively easy to install, especially on houses with a minimum of ridges and valleys, requiring only a few specialized hand tools and the average mechanical skills of an old-house restorer. If you are smitten by the appeal of metal roofs, here are the basics to get you started on your own.
Preparation Makes Perfect
When measuring the metal pans, be sure to account for seams at ridges and ends.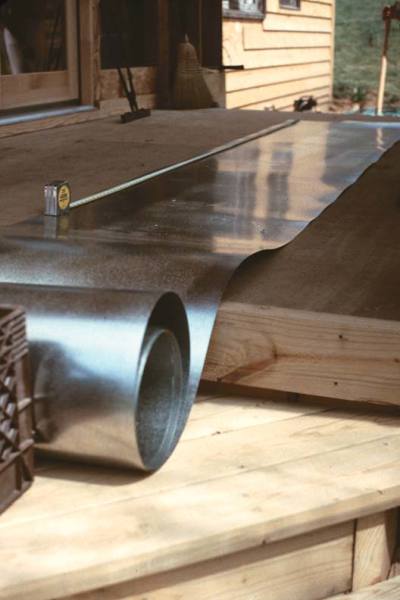
Begin with a clean roof deck. Strip off all old roofing and pull all old nails, making sure that the surface is scrupulously free of anything that can puncture or blemish the new roof. On simple houses and secondary roofs, steel-based standing seam roofing is often installed over spaced decking or skip sheathing—boards laid with gaps of 1½” or so—but all three commonly used materials work equally well over closed-board or plywood decking. The next step for roofers using steel or the alloy terne is to underlay them with red rosin paper; never use black roofing felt or tar paper with these metals, since the asphalt will corrode them. Copper manufacturers do recommend a roofing felt underlayment topped by rosin building paper to keep the saturated felt from bonding to the copper.
In any event, before starting, you should install metal edging around the perimeter of the roof to support the ½” to 1″ overhang of the sheet metal to discourage water from running back under the edge. Use standard, prefabricated steel drip edge for Terne II and galvanized steel; use copper locking strip for copper. Nail the edging every 10″ along gable ends and edges—anywhere that water will run off.
Metal clips that are nailed to skip sheathing (shown here) or plywood deck will anchor pans and seams.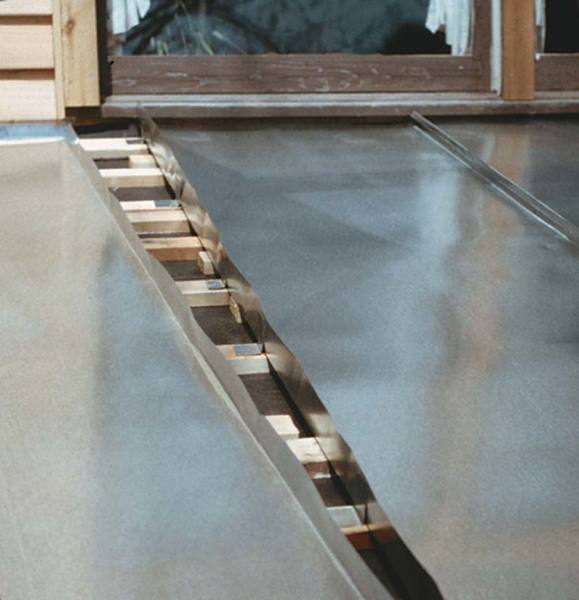
Start Your Sheets
Each length of roofing sheet metal—called a pan—must be bent up at the edges to make seams. Thoughtful planning of the layout and careful measuring of the materials will help make an attractive, smoothly executed installation in the long run. Sketch the layout of your roof, calculating for symmetrical seams and avoiding awkward or unusually narrow pans. Many old-house roofs are built with less than even dimensions, so be prepared to work your layout from the middle of the roof to split up any odd spacings. If you will be making seams along ridges where two roofs meet, remember to offset the pan spacing so that the seams in one roof meet the center of the pans in the other roof. This way, you won’t have too much metal to bend into a uniform, tight ridge seam.
To make pans, measure from 4″ above the roof ridge (to allocate metal for a seam) and 1″ beyond the roof edge, then cut your metal to this dimension with metal shears or tin snips. Next, bend up the long edges of the pan, 1½” on one side, 1″ on the other. (On a simple gable roof, the outboard first and last pans will have one edge—the one that runs along the roof rake—bent down 1″ so it can be crimped to the drip edge or locking strip.)
Pan ends get cut and crimped over metal drip edge where they meet the roof eaves and rakes.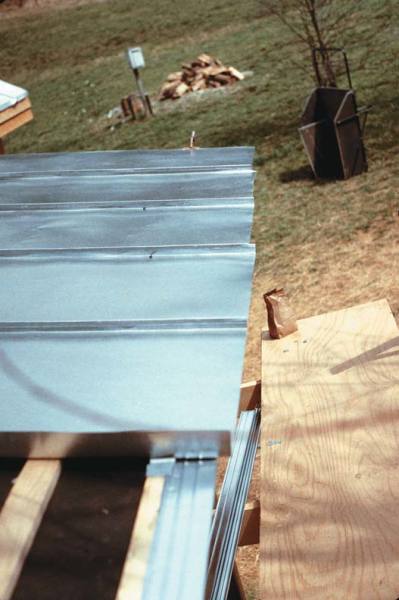
The tools made for this purpose, called pan benders, come in several styles—typically simple universal types that work like a giant pair of locking pliers, and patent types that employ foot pedals to speed the bending process. On some you must first set the jaws to the desired seam depth by adjusting stops and bolts. Generally, it pays to bend an edge in two stages. First bend the entire edge to roughly 45 degrees, then return and bend to the full 90 degrees, taking pains to make sure you have a nice sharp crease in the metal. Don’t discard small pieces of scrap metal; instead, cut them into 1″ by 2½” strips to make clips for fastening the pans to the deck.
Installing Pans
When you have bent all your pans, you can begin laying the roof. Start with an end pan, fitting the 1″ downward bend up snug to the roof rake. (When working on old houses, some roofers like to start laying pans in the middle of the deck and work out to the ends to make sure the pans lie square.) Next, secure the pan to the deck by bending clips over the upright edge every 10″ or so, then nailing the clips to the deck. Again, keep all the creases sharp; they will have to be folded into a seam with the adjacent pan.
Once your end pan is secured, you need to bend the edges around the locking strip or drip edge at the roof perimeter. On the rake, you can simply crimp the metal together using locking pliers. On the bottom edge, however, you will need to cut the pan back 1″ or so at the up-bends that make the standing seams.
Some patent roofing tongs can be used for making seams as well as bending up edges.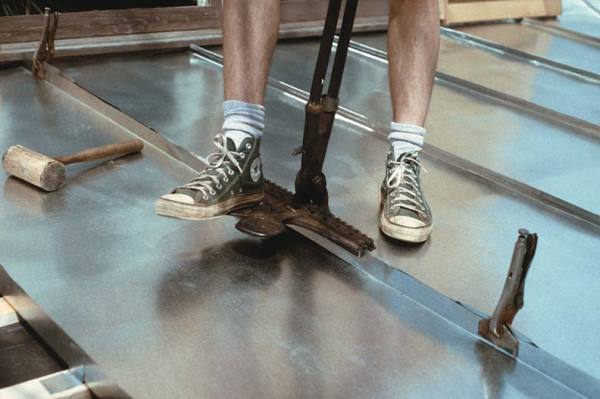
Then you can bend the metal around the drip edge or locking strip. With the end pan installed you can start laying the rest of the roof and making seams. Take a common pan and lay it with the 1½” edge next to the 1″ edge you just clipped down. Fine-tune its position, so the bottom and top edges line up with the previous pan and make sure the pan is snug against the decking. Then clamp both pans together every 2′ with locking pliers.
Start seaming between the first two locking pliers at the top of the roof using a seaming iron. Place the iron against the 1″ upturned metal edge then, using a soft-faced mallet, bend the 1½” metal edge over the iron to 90 degrees, sliding the iron along as you hammer. When you have bent roughly 2′ of seam this way, remove the iron and tap the metal down another 45 degrees using just the hammer. Then move the iron to the opposite side of the seam, place it against the metal, and hammer the seam closed into a tight crimp, making sure that the longer metal edge completely covers the shorter edge and that all the clips are well covered and crimped too.
A seaming iron is a low-tech tool, easily made by a welder. Use one side to form the first bend, and the other side to complete the double lock.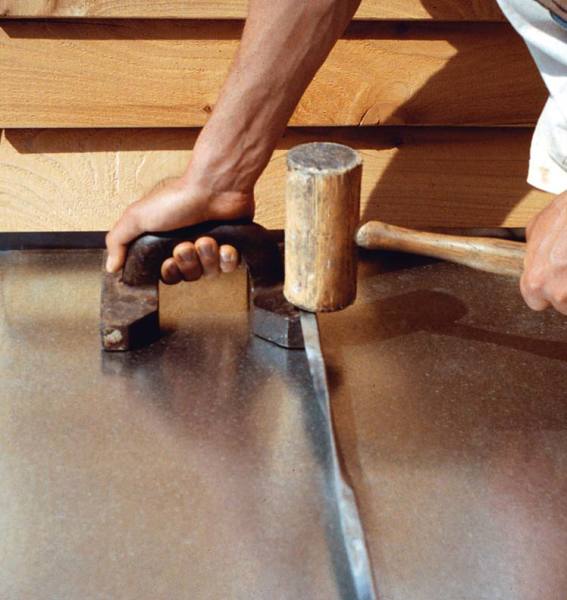
At this point you have completed a bend, but you will need to repeat this process to join the pans in a double-lock standing seam. Starting in the middle of the section you just finished, place the shorter side of the iron against the same edge where you began and bend the metal down to 90 degrees. Continue with the rest of the steps on as much seam as possible between the locking pliers, then move on and do another section. After you have completed an adjacent seam section, you can remove one of the pliers and fill in the seam underneath it.
Once you have mastered the basic bending and seaming methods, you can employ these skills to make roof and hip ridges, valleys, and other details that may be called for on more complex roofs. When you’re done, paint your Terne II roof immediately in a historic shade of black, red, green, or silver, then stand back and enjoy the traditional lines of a standing seam roof.


