

DESIGN & LAYOUT
Consider both the house and landscape in determining placement, symmetry (or not), gentle curves (but not Ses), and the start and termination points. A walkway of at least four feet in width allows two people to pass each other. If the walkway will start at a stairway—say, from the porch—use that same width at the junction. Herringbone, basketweave, and running-bond patterns are the most common, but brick units make it possible to create many designs, with different repeat patterns. When you’ve decided where to lay the walk, draw plans on paper. Try to get your hands on a dozen bricks so you can lay them out and visualize size and proportion.
To determine how many bricks you’ll need, multiply the walk’s square footage by 5 (or the approximate number of bricks per square foot). Add up to 10% for breakage and corners. Add the number of bricks needed for edging,
if you are using brick edging. (Both steel and plastic edgings are made for brick walks; they’re installed on top of the gravel bed and will be almost invisible.) Soldier bricks (standing on end) or bricks set sawtooth (leaning tight against each other) are good standards; a flat, running-bond border probably needs to be mortared to avoid shifting.
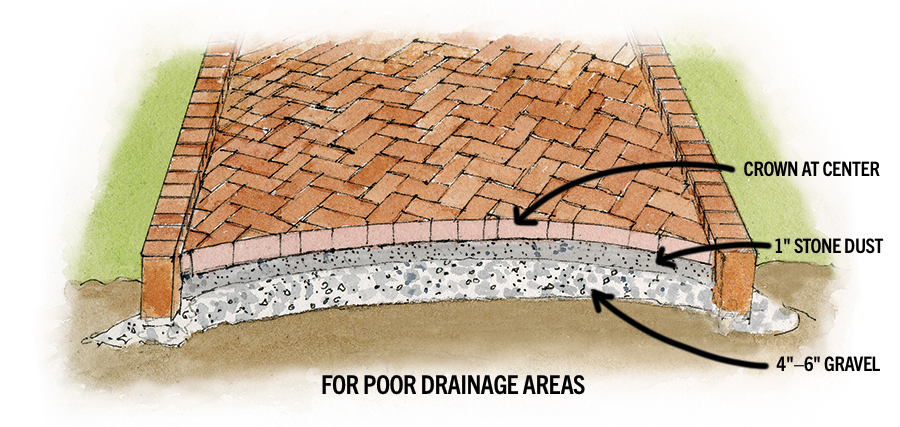
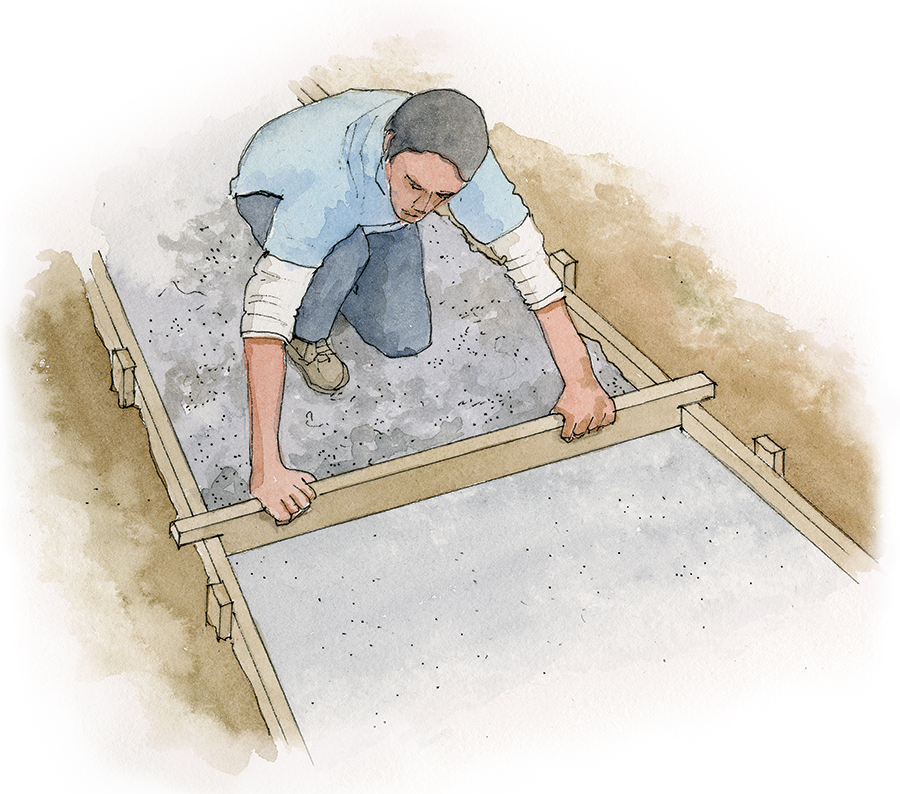
Using wood stakes and mason’s line, lay out the boundaries of the walkway. Depth of excavation depends on the type of soil and rainfall. For poorly drained soils or extreme weather, dig out to accommodate a 4″- to 6″-deep bed of gravel plus 1″ of packed sand or stone dust plus the depth of the bricks. In well-drained areas without clay soil, you can get away with just 2″–4″ of sand or stone dust over well-tamped dirt. Use a level to set 2×4 edge forms, against which you’ll pull a screed and for placement of edging bricks, if applicable.
EXCAVATION
If the walk is to be near the foundation, you must lay it with a slight slope away from the house to avoid water in the basement. Use a long bricklayer’s level or rest a carpenter’s level on a long 2×4. A pitch of ¼” per foot, or 1″ to 6′, are common recommendations.
It’s a good idea to “crown” the walkway at the center so that water won’t pool. This is less important for well-drained areas and back-garden paths.
After excavating and tamping the dirt, use a screed (a board cut to the correct depth, notched or run along edge forms) to level it. Spread the gravel, if using, tamp it down, wet with a hose, and tamp again. Add sand or stone dust (the latter is less likely to attract ants or subside). Again, level it with a screed: rest the board on the edge framing and pull it towards you. Add material at the center to create a crown. Tamp it down hard, apply a fine mist of water, then tamp again. Continue until the bed is dense and hard-packed.
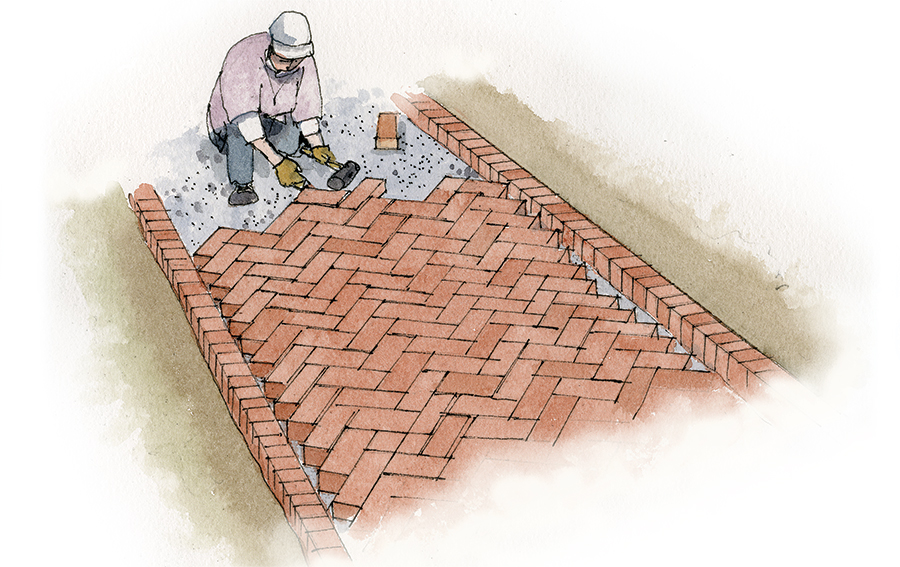
LAYING THE BRICKS
Set the border bricks first. Lay out the pavers in your preferred pattern, starting with full bricks only. Pack them in tightly, tapping each with a wood or rubber mallet. Check your work frequently and adjust as needed, but keep it tight.
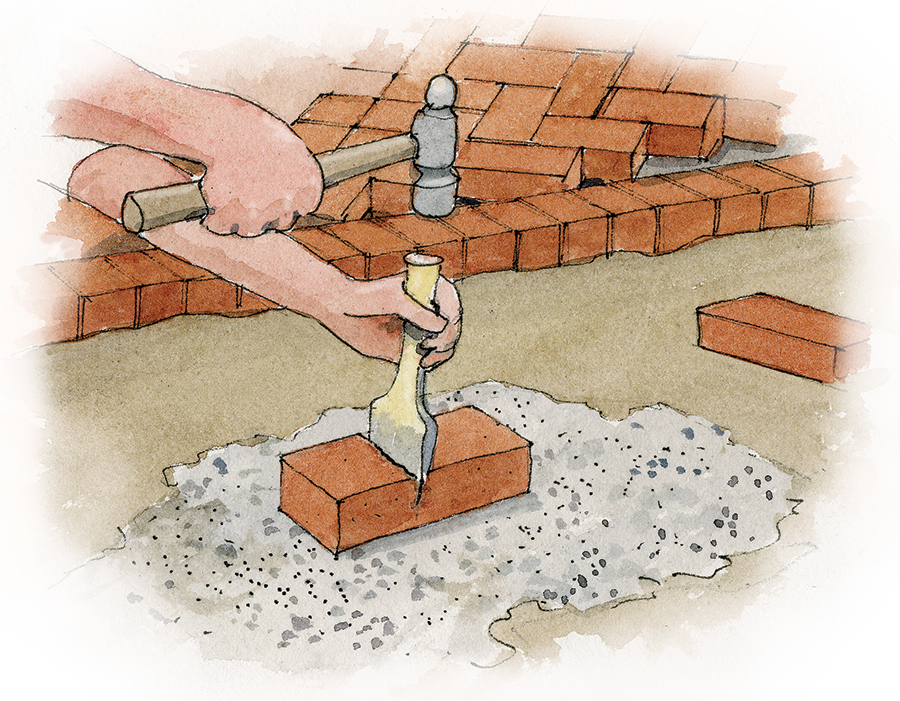
Bricks will need to be cut, perhaps, to fit around trees or curbs. A herringbone walk will need edge corners filled. For cutting, choose broken or less-attractive bricks. Masons cut with masonry saws, but you can get good results using a brickset, which is a broad-bladed chisel. Score the cut line all around the brick, using a brick hammer. Set the brick on a bed of sand. Wearing safety goggles and a leather glove, hold the brickset blade firmly on the scored line, with the bevel facing away from the portion of brick to be used. Strike the brickset sharply with a hammer to get a clean break.
DRY GROUTING
After the entire walkway is laid with bricks, you’ll dry grout it. This simply means shoveling fine masonry sand or stone dust on top of the walk, then sweeping it into all the cracks. Follow with a fine spray or mist of water to pack the stone dust and clean off the surface. Repeat the shoveling, sweeping, and misting until the filler is hard and flush with the brick surface.
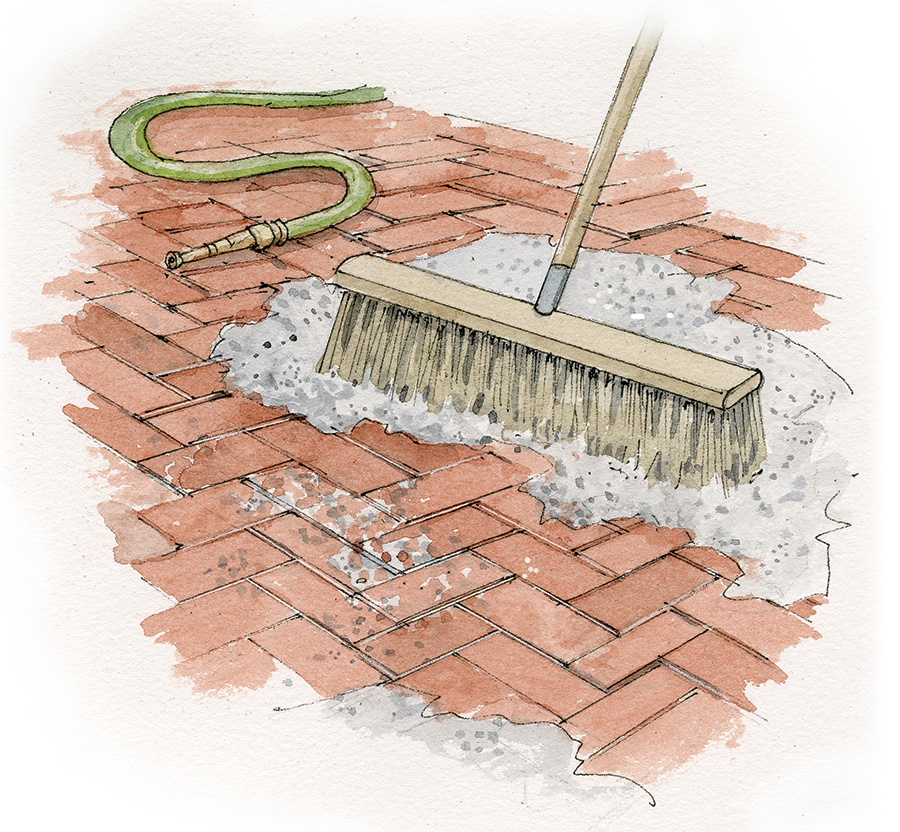
Note: For areas with heavy traffic, such as a sidewalk, some masons recommend using four parts masonry sand to one part Portland cement as the grout.
Remove wood forms and backfill with soil and sand. You may need to sweep in more stone dust a week later.
The old method of installation
Bricks dry laid, in a bed of sand or stone dust—is appropriate for an older property, and easier than a mortared walk for the do-it-yourselfer to accomplish. As long as you use proper materials and techniques, the brick walkway will endure, without breaking up or heaving in winter, and it will mellow over time.
Recycling Old Bricks?
Used bricks are often available as salvaged material and may seem like a nice historical touch. But be sure
that they are paving bricks, not the softer bricks used to build walls. Fired in the high-temperature zone of
the kiln, paving bricks are harder and heavier, and can withstand weathering.
New pavers are available in at least 40 shapes and a range of colors. Common sizes are 3 5/8″ x 7 5/8″ and 3 ¾”
x 8″. If you’re doing a basketweave or herringbone pattern, the bricks must be exactly half as wide as long. Don’t use thin (veneer) pavers, which are meant for wet-concrete installations only. Grade MW or moderate weathering bricks are okay for mild, dry climates, but Grade SW or severe weathering bricks stand up to extremes of temperature and moisture.
Specialty suppliers sell traditional square-edge pavers. Pine Hall Brick [pinehallbrick.com] also sells shaped bricks and preformed corners, and they offer tumbled bricks that look like reclaimed antique pavers. Old Carolina Brick Co. [handmadebrick.com] hand-moulds each brick in the colonial tradition of Williamsburg, etc., then fires them to create historical colors.


