

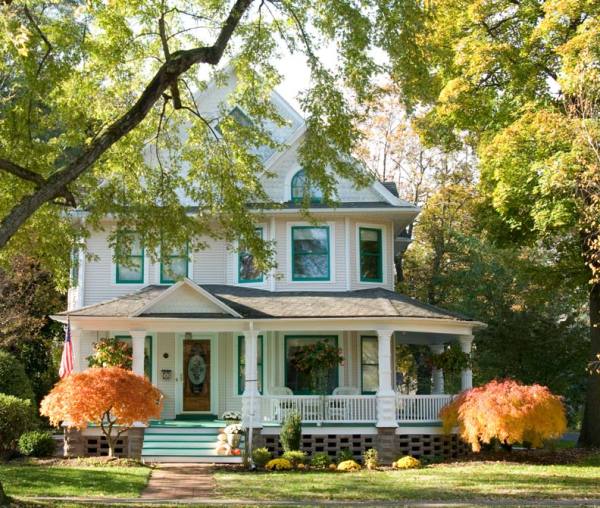
This Queen Anne porch is more appealing with the help of concrete blocks.
Homeowner Gary Stottler knew it wouldn’t be easy to restore the front porch on his circa 1900 Queen Anne because of the material used. The porch—from the foundation piers to column capitals and even the apron in between—was constructed of cast ornamental concrete block, a material that was quite popular at the turn of the 20th century but went out of production by the 1940s. Unfortunately, the porch was falling apart, and needed an additional column to correct a sagging roofline. Substituting modern blocks would have been unsightly, and replacing all the blocks would have changed the character of the porch. Gary was left with two choices: Find salvaged cast blocks for repair, or find a mason who could cast new blocks to match the old.
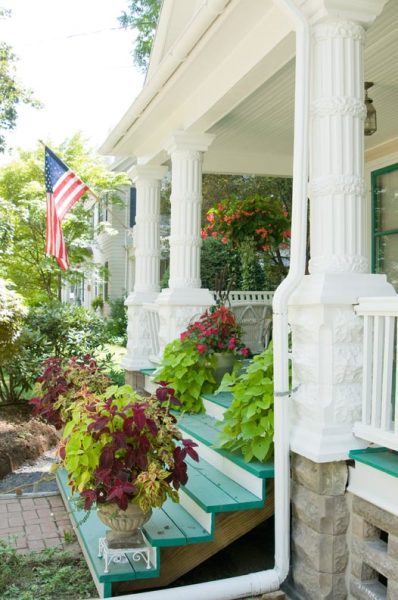
With new concrete blocks, the porch is ready to weather another century.
Gary spoke to at least nine contractors; many came by, looked at the porch, and never called back. A catch-22 developed as carpenters commented that the project was mason’s work and masons insisted it was a carpenter’s domain. A local contractor, Doug Shultz, began repairs—removing and rebuilding the footings, and making structural repairs—but then the work stalled. At this point, many homeowners would have given up, but as a vintage-car enthusiast, Gary knew that anything can be done if you find the right person. That’s when he discovered Marty Naber of Naberhood Restorations.
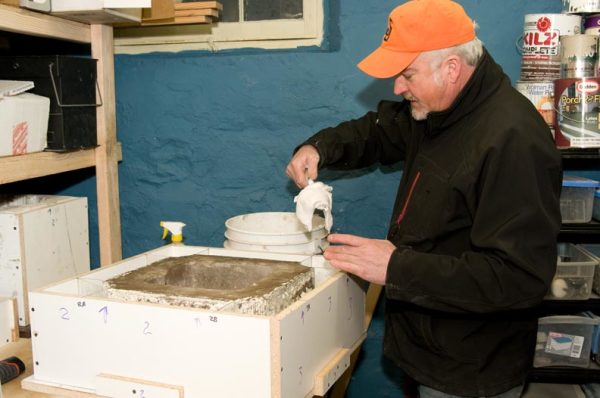
Marty was aware of some local attempts to replicate cast blocks. While the process isn’t rocket science, it is slow and tedious. His first issue was how to make molds for the five rusticated block shapes: pier blocks, tapered bases, tapered column capitals, column drums, and column disks, all with the same rough-hewn finish. Although it’s possible to buy mold-making materials that can be used repeatedly, because Marty needed to copy four designs (the fifth was an altered version of another), the cost of the materials would be prohibitive. Since he didn’t need to make numerous copies, he chose to create mother-molds for the project out of molding plaster. These molds wouldn’t last forever, but they would hold up for the number of blocks needed, and the materials were both locally available and inexpensive.
To create the mother-mold, Marty assembled a form around the original block, then filled it with plaster. Once the mold had cured, he unscrewed the form and cut along the sides to remove the original block.
The Mother-Mold
Marty began by building a form to make the mother-mold. He chose melamine-surfaced particleboard for the form because it’s less porous than bare wood, which makes it easier to remove from castings. He screwed the form together so that after the plaster sets, the mold can be unscrewed easily and pulled away from the new piece. He designed the form with 3″ to 4″ between the sides and the original block, which makes the mold sturdy enough to use repeatedly, and wide enough to trowel in the wet plaster.
After all the surfaces were well-coated with a petroleum-based release agent, he mixed enough plaster to trowel into the cavities, lightly tapped the sides to settle the wet plaster, and screeded the top for a flat surface. He let the plaster cure overnight, then disassembled the form and cut along each side of the mold with an oscillating tool to gently pull the pieces away and remove the original block. He was then ready to cast new blocks.
Casting Call
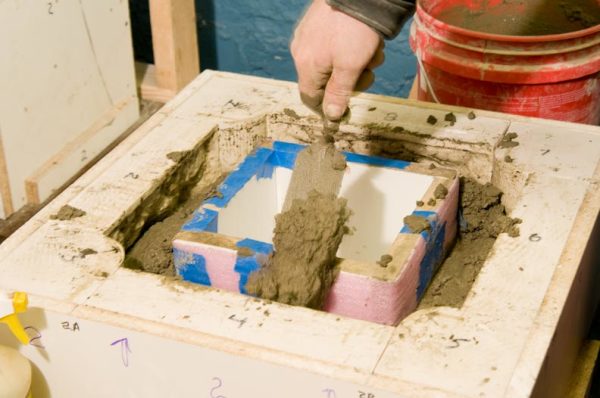
Marty fills around the form with concrete, adding rebar for strength at mid-fill, and finishing by vibrating the interior block to spread the concrete.
The original blocks were made from a dense mixture of Portland cement and sand. Marty chose pre-mixed high-strength concrete mix for his castings. Since the original blocks were hollow, he inserted an open-ended box in the mold, which he centered and screwed to the base to keep secure. To allow for expansion of the new concrete casting, and to make removal easier, he wrapped this box with 1/8″ sill-seal closed-cell foam. After spraying all surfaces with the release agent, he mixed the concrete and gently troweled it into the void between the center box and the mother-mold, tapping the sides to remove voids and air bubbles. When the void was about half filled, he carefully inserted steel rebar to add strength and prevent cracking.
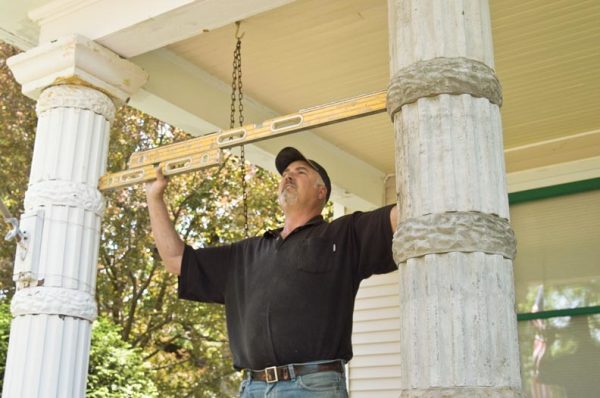
Getting everything plumb and level was critical when installing the porch columns and their bases. Marty’s team meticulously checked measurements during each step of the process.
After letting the concrete set up for at least 12 to 15 hours, Marty disassembled the form and pulled the mother-mold away from the new “green” block. Next, he dampened the surfaces and rubbed them with a 50/50 slurry of Portland cement and sand mixed with a bonding agent to fill the honeycomb imperfections where the concrete didn’t properly fill the space. Once the blocks dried, he sanded out the smooth surfaces with wet-or-dry sandpaper. He waited 28 days for the blocks to fully cure before installing them. During this time, they were covered with plastic and misted with water once a day to prevent premature drying.
Installation began with the heavy pier blocks, which weighed 150 pounds each. Because the piers join the columns at the deck and extend from the ground to the roof, there was no room for error—even a fraction of an inch mistake at the top would be obvious.
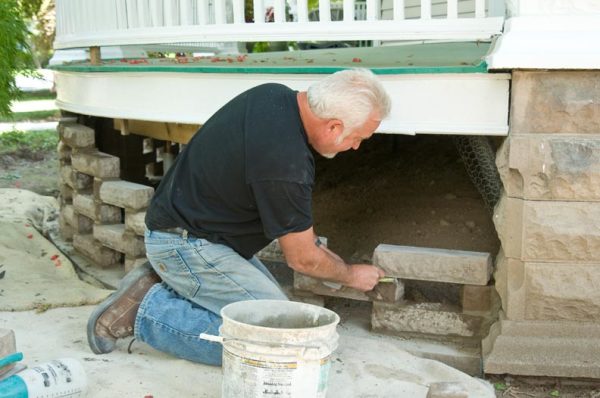
As with the other work, assembly of each apron element required careful calculation to ensure the courses were plumb, level, and ended exactly at the skirt board.
To maintain a perfect vertical installation, Marty hung a plumb line in the center of the assembly. As he added each block, he removed the line from a hook at the ceiling, inserted it through the block void, then reattached it. Joints were mortared with an exterior thin-set mortar, varying from 1/16″ to ¼”, and each piece was leveled in every direction and checked from a distance before moving on to the next.
This was no weekend project—it was carried out over two years on a time-and-material basis. Both homeowner and artisan were patient as the blocks were made and other work took Marty away. The Stottlers are pleased with their new porch, and Marty says he appreciated the opportunity to undertake and successfully complete this challenging restoration.


