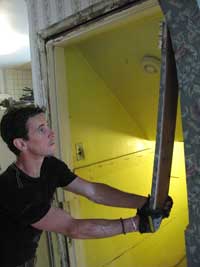
The author moved this original four-light exterior door from the back wall of his kitchen to the top of his cellar stairs.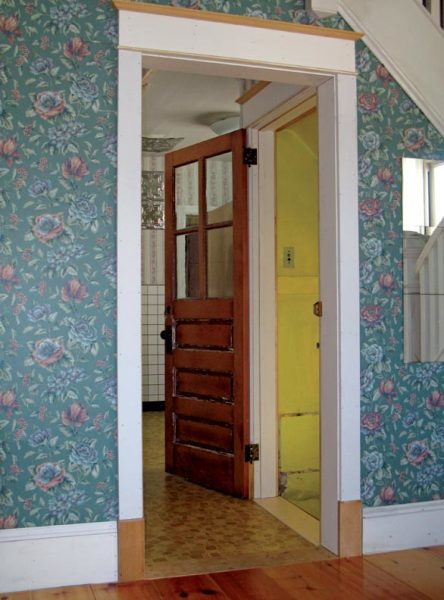
“Ouch!” It’s an exclamation I heard often within the confines of my small kitchen, where people regularly banged into an awkwardly placed door when trying to maneuver around the rear of the room. The door wasn’t a problem when it served as the back entrance into my 1903 American Foursquare. But ever since a previous homeowner enclosed the back porch decades ago, the four-light entry door hung in what amounted to a hallway, serving as a stumbling block for folks coming and going.
My wife, Theresa, noticed that the door’s dimensions nearly matched those of the solid wood door fronting our cellar stairs. “Why don’t we move the four-light so we can see as we’re coming and going from the cellar?” she suggested. Thus, we decided to create two much more functional spaces, while breathing new life into our home’s original back door.
Step 1: Getting Started
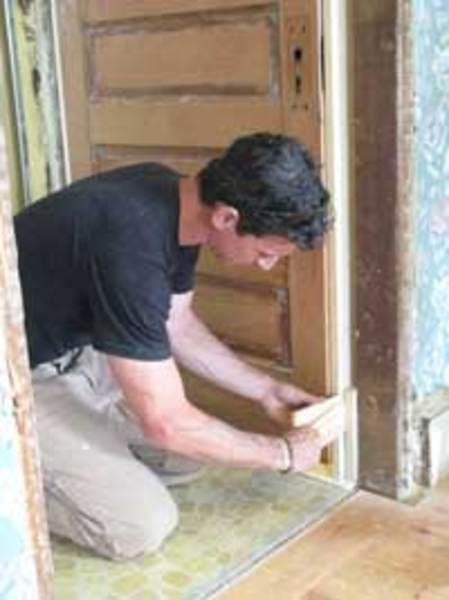
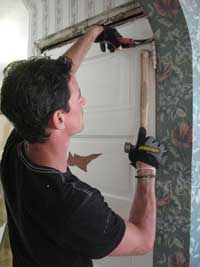
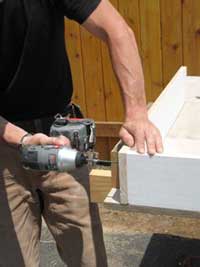
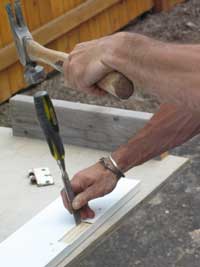
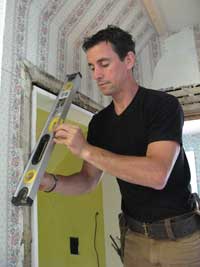
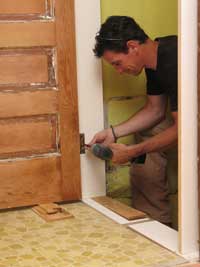
B A Start by removing the doors. I like to use my wire cutters to pinch the hinge bolt free from paint and/or friction [A]. A 5-in-1 tool plus a hammer works nicely, too. Remove the top bolt first, then the bottom, before yanking the door out of its hinges [B]. Next, remove the trim. I drove a sharp Estwing flat bar behind the casing, braced it against the jamb, and gently pried it loose. I removed all of the casing on both sides before tackling the jambs. After taking off the casings, I removed the jambs, cutting across the center of each jamb leg with a reciprocating saw. Once halved, you can wiggle the jamb, working the lower nails free and pulling the bottom leg out. C Yank out the other jamb leg, leaving an upside down U at the top, which you should be able to work free [C]. With the rough framing exposed, look for a control point to serve as the starting point for your layout. For door openings, it’s generally the shortest distance between the floor and the door head. For example, if one side is 80″ and the other side is 80 1/4″, I place my level on the 80″ corner then strike a level line to the other side. Once you’ve determined a level line, you can measure everything else from this point. Width. The width of the new jamb can be a tough measurement to capture accurately because there’s nothing dependable to measure off of—or to. I run a 6′ level diagonally across the plaster opening in a couple of spots to measure the wall’s true thickness. Usually the wall/plaster thickness undulates within 1/8″; accommodate for these wavy conditions by taking the largest value and making that the width of the jamb stock. D Finished Height/Opening Width. Next, I measured how to get a square door into an out-of-square opening. If your finished floor isn’t already in place (which was the case with my project), place blocks the thickness of your new floor on the subfloor (note my blocks in the photos). -On the floor (or atop your floor blocks), place 3/4″-thick blocks of jamb stock. Measure up each side of the doorway to the level line (control point). This is the actual length of your new jamb legs. Note: If the floor isn’t level, each jamb leg’s measurement will be different. -To determine the head jamb length, measure the rough door opening at the top, middle, and bottom. If the measurements are different (they often are), subtract 1/4″ from the smallest dimension for fudge factor. This is the actual length of the head jamb. -As a double check, after cutting the head jamb piece, I slide it up and down in the opening. If it fits without touching either side, I know the width is right. -Test your measurements. On a flat surface, square up the head jamb and legs, then fasten with three 2 1/2″ deck screws through the head jamb [D]. Dry-fit the assembly in the opening to make sure it’s the right size. E Often, the edges of old doors have been sanded and planed through the years, so you may have to trim the edges and bottom in order to make the door fit the new jamb. Here, the control is the short point on the out-of-square top and bottom door rails. A framing square across the door [E] is a quick way to identify the short end (if the door doesn’t match the shape of the square, you’ll see what needs to be trimmed). The width of the finish door is the distance between the jamb legs, minus 1/4″. (Or, to put it another way, it’s the head jamb length minus 1 3/4″—two 3/4″ jamb legs, plus 1/4″). The extra 1/4″ leaves room at each side of the door for hinges and travel. If you have to remove more than 1/4″, make sure to take half of the total amount from each side of the door to keep the stiles the same size. You don’t have to be as exacting when cutting from the top and bottom, because the bottom rail is usually wider, but whenever possible, split the difference. Measure from the straightest edge (usually the hinge side), then make the cut. Repeat on the other side. F The circular saw leaves corners very square, so if you want softer edges, run a router with a chamfer bit down each side. Saw swirl marks can be sanded out with 100-grit sandpaper, but don’t sand so much that you change the width of the door—1/16″ matters here. Once the door is squared, it’s time to measure and mark the new hinge locations on the new jamb. They don’t have to go exactly in their original spots, but if you haven’t cut the original hinge mortises off, you can use them as a template. G Take the hinge-side leg off the jamb assembly. Next, lay the door flat on a worktable, and place the hinge-side jamb leg next to it. Make sure the jamb leg rests 1/8″ above the door’s top rail and at least 3/4″ past the bottom rail. Using a sharp pencil, transfer the hinge location from the door to the jamb stock. (I mark the top and bottom of the hinge, then put an X in the middle.) Use a router with a hinge jig and mortising bit to cut the new mortises [F]. I used a hinge leaf held against the bottom of the jig to set the bit depth, adjusting my router bit flush with the hinge. Once cut (you may have to chisel the corner to match your hinges [G]), re-assemble the jamb. H To position the jamb assembly in the opening flush with the plaster, use the same technique as you did when you were laying out the jamb thickness—run a level diagonally across the front of the opening [H]. Next, butt the jamb to the level, then pop a nail in the top of the hinge side with a finish nailer. Then, use the level to get the jamb leg plumb (also double check for flush lower down the leg) and pop a nail in the middle. Finally, tack the bottom. It only takes a few nails to hold it fast. If the hinge-side jack stud is out of plumb—or the gun nails otherwise deform the jamb leg—simply use a flat bar to gently pry the jamb leg straight and plumb. Next, register the head jamb to your control point level line (it should be there automatically if you measured and cut right), then pop a few nails in. Repeat the process for the strike-side jamb. I To hang the door, install one hinge leaf in the door and the other in the hinge-side jamb leg [I]. I only use two of the three screw holes on each hinge. Using two stacks of shims on the floor (or another person), lift the door, align the hinge barrels, and slide together—this almost always takes several adjustments and some wiggling. Once the barrels are lined up, drop in the hinge pins, top one first. Tap them gently with a hammer if needed. Now you can operate the door to see what adjustments need to be made. A plumb hinge-side jamb means the door swings easily at every point in its arc, except right when it closes. (Typically, it either swings too far or not far enough.) This happens when the hinge-side jamb leg is out of square with the strike side. To fix, slide a bar or a shim in behind the hinge-side jamb [J] and adjust. J Once the door swings closed easily (a little tension at the end of the arc is OK), shim behind the strike-side jamb. The goal is to get an even “reveal” (or gap) between the door and the strike-side jamb leg and head jamb. I typically eyeball this. Tucking shims in from both sides usually works best, but whatever you do, snug them in there gently. If you cram them, you’ll deform the jamb and have to start all over again. Once the shim is snug, pop two nails into it from the jamb side. I like to get three or four shim locations per jamb leg. After the strike side is set, I shim and nail the hinge side. Now the door needs something to stop against to terminate its swing. You can buy a stock stop bead, or make one on the table saw. I like to use square 3/8″ x 1 1/4″ stock. It’s plain and graceful, but thick enough that it closes any gap I may have overlooked. Measure and cut the head first, then the jambs, which tuck underneath. To get the best fit, close the door flush to the face of the jambs. (I like to get a helper to close me into the room.) With the door stationary at its best spot for closing easily, I install and fasten the beads with a 1/8″ gap between them and the door, giving the door room to fully close and latch, and buying me some space should it swell. If I’m alone, I cut the stop bead tight, then position (or “friction-fit”) it where I want it before nailing. There’s a lot of door opening and closing to get it just right, but it works. Carpenter Mark Clement is working diligently on his Foursquare outside of Philadelphia. Online exclusive: See how Mark kept the mushroom factor in check on this project.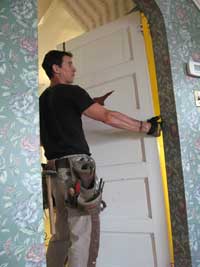
Step 2: Assembling the Jamb
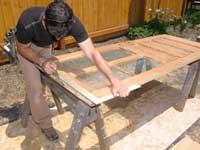
Step 3: Fitting The Door
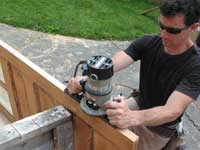
Step 4: Re-Mortising for Hinges
Step 5: Installing the Jamb
Step 6: Hanging the Door