

Most masons today don’t take the time to shape stone in order to reproduce a replacement part for a historic building (and few are properly trained in doing so). Instead, they tend to rely on patching compounds and coloring agents, which usually result in mismatched shades and textures. These types of repairs often fail at the interface between the patching compound and the original material.
Such short-term fixes are not only more costly, but they often damage the building: When the patch spalls off in a few years’ time, it invariably pulls some original stone with it. A more permanent remedy is to remove a damaged stone and shape another to fit the cavity—a repair that, while time-intensive, can be readily tackled by a handy homeowner. When it comes to work on stone buildings, there’s a lot to be said for doing the job yourself.
Repairing stone walls is time-consuming but not difficult, making it an ideal task for do-it-yourselfers. Jessica Salas-Acha photo
6 Steps for Repairing Stonework
1. Assess the Damage.
Repairing only what’s necessary not only keeps the budget down, it also preserves as much of the original building fabric as possible. A good rule of thumb is that any damaged or crumbling stone, one that is worn down an inch or more, or one with large chunks missing, is unsightly and should be replaced. The challenge is deciding where to stop.
If the individual stone is large but the damaged part is relatively small, you can remove only the deteriorated portion and fit a new piece into the old with the smallest joint possible. After you’ve made repairs to all severely spalled or crumbling stone surfaces, it then becomes a matter of judgment as to how to handle other minor imperfections. Here, you’ll want to take the least intrusive approach possible. In other words, if it isn’t broken or too badly damaged, leave it alone. This applies to hairline fractures or even larger cracks, which generally aren’t a problem unless they carry significant structural weight (over a window or a door, for example).
2. Find a Match.
An important step in any stone repair job is selecting an appropriate match. Stone in historic buildings typically came from a local or regional quarry, so start by contacting masonry supply dealers in your area. If they don’t have an appropriate stone available on pallets, visit local quarries, where you’ll find similar stone being crushed for gravel. Look around the quarry for stone with like color and dimension, and ask permission to take some blocks to fit your replacement parts. Architectural salvage stores can often be a good resource, too. These searches will usually yield the raw stone blocks needed for the job.
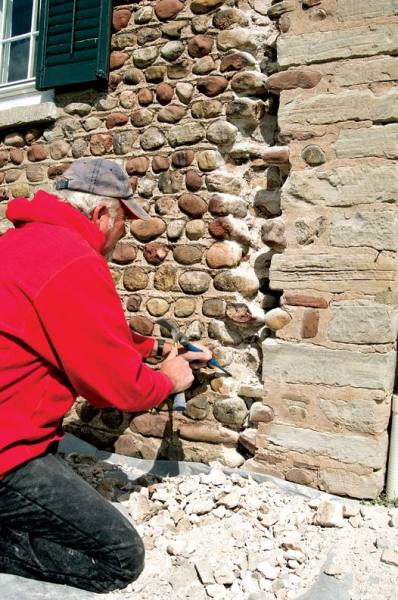
Marty began the repairs by carefully removing old caulk, mortar, and rubble stone with a hammer and chisel. The cobblestones were set aside and later fitted back into the wall.
3. Remove the Damaged Stone.
Use a circular saw or an angle grinder outfitted with a diamond blade to cut the stone, but not the mortar joint; remove the joint by hand with a tooth chisel. Saw grooves into the face of the damaged stone (be careful not to hit adjacent stones) until you have a series of parallel horizontal lines along its length. Take a flat-blade chisel and wedge into one of these “piano keys.” Strike the chisel with the hammer to split a piece from the face of the stone. Continue removing the stone along the parallel lines with the flat-blade chisel, then begin cleaning up the surface with a point chisel. You’ll need to repeat this scoring process until the cavity is cut back into the wall 4″ to 6″ deep. Using a point chisel, clean out the inside corners until they’re as close to 90 degrees as possible, and you’ll be left with a clean cavity in the wall, ready to be filled with a newly shaped stone.
4. Cut the New Stone.
Use the diamond-blade saw and grinder to get the rough shape and depth of the new stone, measuring to match the cavity with 3⁄8″ for mortar. A Partner saw will allow you to get a 5″ depth on your cut. (An alternative is to use a regular circular saw to cut to 2 1/4″ deep, then turn the stone over for another cut to clear the desired depth.) Remember that, in addition to the final depth, your replacement stone will need an additional buffer because some of the new unit’s surface will be chiseled away when you create the texture on the stone’s face. A split-face texture, for example, requires a raw block 3″ thicker than the desired dimension because chisel work needed to achieve the texture will lop that much off the face.
5. Work the Surface.
Once the rectangular block is cut to fit the gross dimensions of the wall cavity, the next step is to reproduce the texture of the original units. There are many different surfaces made on stone, but the four listed here are some of the most historically popular. From these examples, you should be able to modify your technique to match the texture on just about any stone building. Three basic chisels—flat-blade, point, and tooth—will do the job for any texture you encounter. Always refer to the details of the original wall surface—its texture, border, and mortar dimensions—to guide your work.
Split-face is the most difficult surface to achieve, so practice your technique first on a scrap piece of stone. Set your stone on a sturdy bench so the face is vertical, as it will sit in the wall. Take the flat-blade chisel and hold it on the top edge of the stone at a right angle, then strike hard with a hammer to snap off a piece of material. Repeat all along the top of the stone. You’ll notice that some pieces will snap off farther down the surface of the stone. This is a function of both the angle of the chisel and how far you’re holding it back from the face. The more vertical the chisel, the deeper the shard will be. After you’ve cut the entire top edge, turn the stone and work your way around the whole outer surface, giving a rough split-face texture to the entire face of the stone.
Margined split-face is a dressier version of the same surface, and involves adding a smooth border around the stone’s edge. Once you have completed the split-face texture, use the tooth chisel to work the margins of the stone surface, making the outer edges flat. The tooth chisel will leave fine lines; take care to create lines that are crisp and perpendicular to the edge for a clean look.
Pointed surfaces—those with pockmarks or small pits—are also found on many historic stone buildings. The points weren’t necessarily marks of conscious design; instead, they’re the pattern left over from cutting a flat, square block of stone using hand tools—a feat often carried out in the quarry. To re-create this look, take the point chisel and, in a steady rhythm, remove all the high points until the surface is flat, creating a pock-marked texture. Many historic buildings combine this texture with tooth-chiseled margins for a very pleasing surface.
Tooth-chiseled is the final surface popular on historic buildings; it repeats the tooth-chiseled margin across the entire stone. It takes a little practice to achieve straight lines on this finish. One trick is to create the lines with the hammer and chisel as cleanly as possible, then use strong hand force to drag the chisel across the grooves a number of times, which will clean up the choppier finish from the hammer chisel.
6. Set the Repairs.
Finally, place the newly fabricated stone into the cavity to make the wall whole again. Using the right mortar is important: Mix lime and sand in a 3:1 sand-to-lime ratio without Portland cement additives to mimic the original mortar. Make sure the size of the stone matches the old one exactly so that the mortar joint will also mirror adjacent ones. Before placing the stone, dampen it and the surrounding units, which will make the mortar cure slowly (if it cures too fast, it won’t bind properly, and can crumble). Then, butter the joints with mortar and ease the new stone into place. Have some wood shims handy in case you need to make final adjustments to level the unit. Once it’s in place, tuck point with your mortar.
After a few hours, brush the excess mortar from the joint, tool it to the same profile as the original and clean up the surfaces for a neat replacement job.
Jacob Arndt, principal of Northwestern Masonry & Stone Co. in Lake Mills, Wisconsin, has specialized in historic restoration masonry for three decades.


