

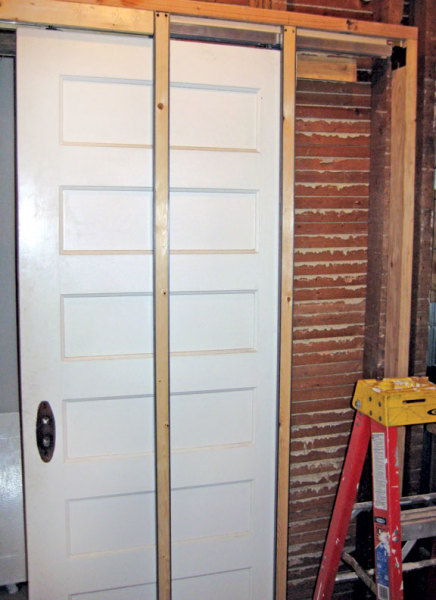
Pocket door kits come with two split jambs; one is installed next to the header, and the other halfway down the wall.
Restoring the only full bathroom in our circa-1900 Victorian duplex launched my husband, Todd, and me on a race for space. We wanted to fit a lot into the small room: tub, toilet, sink, and hopefully a tiny linen closet, too. When we mapped out a design, the floor plan had one stumbling block: the sink obstructed the swing of the bathroom door. So, inspired by two sets of original pocket doors in our living room, we decided to turn our existing bathroom door into a pocket door.
We were well aware of the problems associated with historic pocket door repair, because they are notorious for sticking, being noisy to operate, or worse, falling off of their tracks. (Todd and I both have had to pry our cantankerous living room pocket doors out of the wall.) But after researching modern options, we found the same wasn’t true of the new breed of pocket doors. Today’s pocket door hardware uses nylon rollers on box-style metal tracks for smoother operation, and track-jumping is rare. If rollers should jump tracks, modern doors are removable for easy re-hanging. Even the tracks, which affix to the floor via keyhole slots, are easy to take out without opening up the wall. With this information in hand, we forged ahead to create a new pocket from our original door. Here’s how we tackled the project.
Step 1: Frame the rough opening.
If your door is 80″ high—standard size—construct a rough opening of a header and two studs at a minimum height of 84 1/2″. Our old door measured 78 1/2″, so we lowered the header by 1 1/2″, cutting the bottom ends of the split jambs. The width of the rough opening is two times the door’s width plus one inch—for example, if your door is 34″ wide, the opening should be 69″ wide. Additionally, because our pocket door was paneled, we realized that it needed to look centered in the closed position. We calculated the 3/4″ trim for the jamb into the width of our rough opening (69 3/4″).
Square and plumb the header (for the rough opening) with the studs, making sure the header is level. We used 2x4s for the header and the studs, and secured them with 2″ nails. Depending on the clearance needed under the door, measure up from the finished floor 80 3/4″ to 81 1/2″, which will leave 3/4″ to 1 1/2″ of space at the floor. Then mark each rough stud. At the level of the marks, drive a 2″ nail in the center of each stud, leaving 1/8″ protruding for the pocket door header end brackets to rest on.
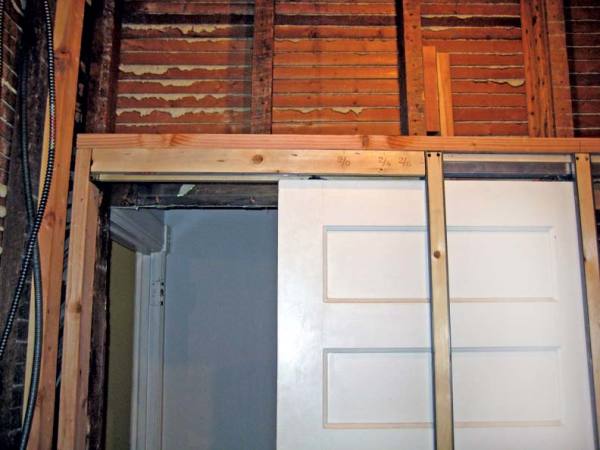
The wood header’s markings are stamped at the factory for easy cutting to length.
The header is composed of a wood header and a metal track sandwiched between two nailing strips (the nailer headers). The wood header has markings on it for various door widths. To adjust the length of the pocket door header before hanging it, remove the end brackets. At the length for your door, cut the wood header only. Turn the header over and cut the metal track 1 3/8″ shorter than the wood header. Put the end brackets back on the cut end of the header. Measure the door and add 1″—this is the length you’ll use to cut the nailing strips. Turn the header on its side and cut nailing strips only at the proper mark. Repeat with the other side.
Hang the end plates for the header by slipping the slots over the nails in the rough studs. Again, make sure the header is level. Drive nails through the remaining holes in the end plates.
Step 2: Attach the split jambs.
Now you’re ready to attach the split jambs. The split jambs are positioned in two places. The first split jamb is flush with the nailer header; the other is set halfway in the “pocket” of the wall.
As a guide for plumbing the split jambs, the manufacturer recommends snapping two chalk lines on the floor even with the side jambs, but we found that a plumb bob worked just as well. Drop the plumb bob flush with the nailer header and mark on the floor, then repeat halfway in the “pocket” of the wall.
Starting with the split jamb by the nailer header, attach the bottom of the split jamb to the floor plate. The floor plate has protruding “fingers” that connect with slots on the split jamb; slip the “fingers” into the slots. Next, butt the split jamb against the nailer header and nail into place. Repeat the process with the second split jamb at the halfway point. Make sure the split jambs are plumb using your marks from the plumb bob or chalk line; check with a level. Attach the floor plates to the floor.
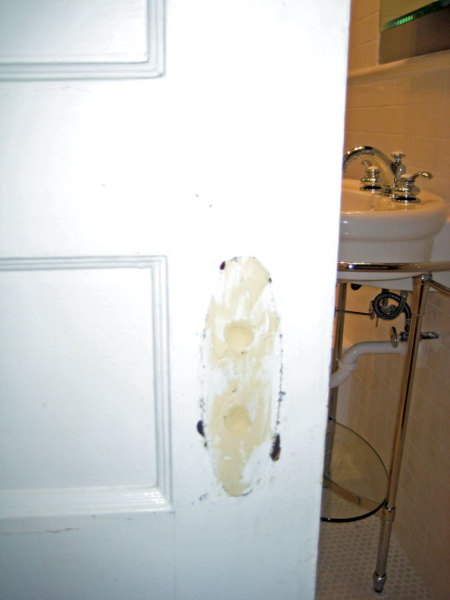
A combination of sawdust and wood putty fills the large hole left by the old doorknob.
Step 3: Enclose the frame.
At this point, the frame needs to be enclosed. Proceed as you would with any drywall project: hang the drywall, seal the seams with drywall tape, cover the tape with joint compound, smooth with a damp sponge, and, when dry, sand any further imperfections. Remember, however, when attaching the drywall with drywall screws, it is very important not to use screws that are too long. (We used 1″drywall screws.) Nothing must protrude into the wall pocket, or the door will be damaged. If you need a firm nailing surface, you can temporarily slide a 2 1/8″-wide board between the split jambs.
Before hanging, prep the door by painting or staining its entire face and edges. Because we were using the original bathroom door, we had an extra step before painting: closing up the hole where the old doorknob used to be. We used a combination of sawdust and wood putty to fill in the large hole—an old carpenter’s trick that thickens the wood putty. Allow the wood putty to dry thoroughly, and then check for any cracks. Refill the cracks, dry (repeating as necessary), and then sand until smooth. Finally, we painted the door and cut a new opening for the pocket door latch.
Step 4: Mount the pocket door.
Measuring up from the bottom of the door, fasten the bumper on its back edge halfway up—40″ for a standard door. (For our door, it was 39 1/4″.) At the top of the door, measure in 2″ from each edge and attach the doorplates, with the lock tabs facing the same direction. Insert the hangers onto the track, alternating their wheel positions so the weight is evenly distributed.
If possible, have someone help you mount the pocket door. There is a slot on the doorplate for the “pin” of the hanger to go in. Lift the door and push the pin into the doorplate, then swivel the lock tab into place; repeat with the other hanger and doorplate.
Next, install finished jambs, split header, and trim. Use screws when attaching the finished jamb to the steel studs on the “pocket” side of opening, just in case you need to remove the door for adjustments in the future. Plumb both jambs with the door; shim if needed. Remember to keep a minimum of 3/16″ clearance between the jamb and the door. Follow by attaching the finished split header and then the trim.


