

Sometimes, it’s what we can’t see that causes the most problems in old houses, from migrating moisture and escaping heat to hidden building failures. Fortunately, today we don’t need X-ray vision to spot what’s going on with the invisible or inaccessible. We just need one of the many high-tech inspection tools that are more user-friendly than ever.
Among other forensic technologies, infrared thermal imaging quickly can identify the presence of a leak, even where dampness is not readily apparent. Courtesy FLIR Systems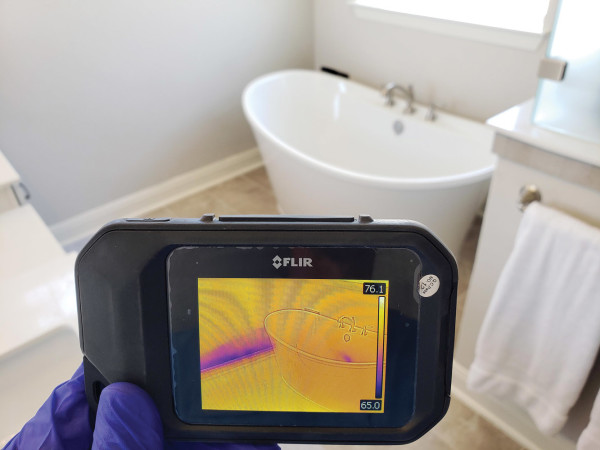
Once the domain solely of professionals—even top-secret military—these tools are now everywhere at specialty suppliers, big-box home-improvement stores, and, of course, online. Part of a larger industry called non-destructive testing (NDT), inspection tools are essential in manufacturing as well as all types of construction, to test and evaluate materials and assemblies without destroying their serviceability: think examining the insides of a brick wall but not cutting into any masonry.
Infrared imaging is a new essential for energy audits, identifying air leaks, for moisture detection, and zeroing in on hot spots in electrical systems 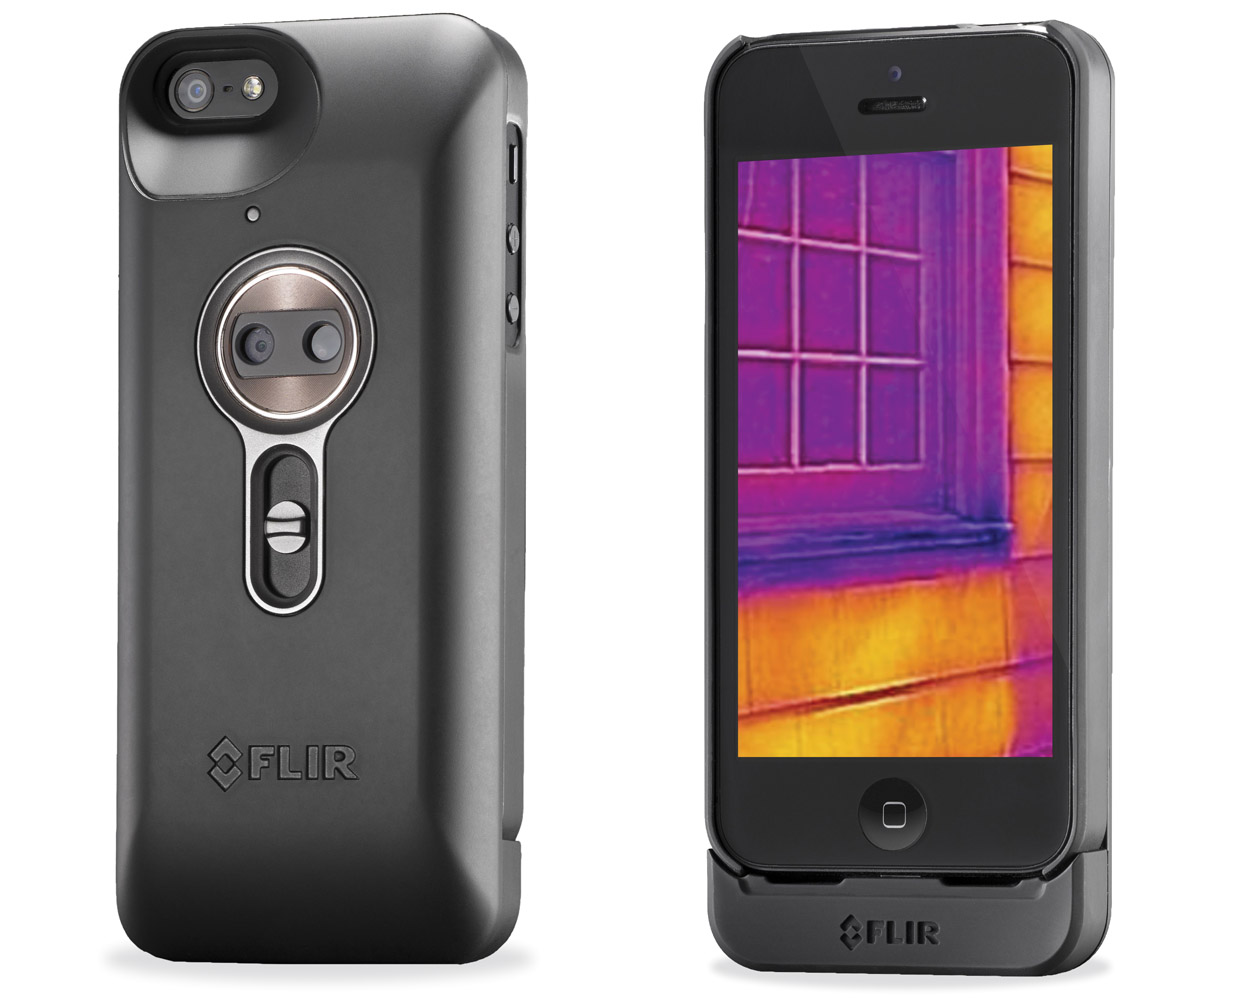
In buildings, NDT is a primary part of forensic investigation—the study and evaluation of problematic conditions—and it’s critical for landmark buildings, where there’s a premium on keeping historic fabric unharmed. While the needs of the average old house may not rise to this level, NDT tools and their cousins make the job of inspection easier and the results better.
Stud Finders ($10–$50; $150)
Time was, anyone hanging a heavy mirror or anchoring a shelf hunted for framing studs by sounding across plaster with knuckle taps or probing with a parade of nails. By the early 1900s, simple tools holding magnets pointed to steel nails or screws—and, one hopes, a stud. However, when electronics started to improve over magnets in the 1970s, stud finders became a whole new tool, meaning they’re not just for finding studs anymore. | Electronic stud finders employ sensors to detect shifts in the dielectric constant of the wall—in effect, a change in density.
A magnetic stud detector from Franklin Sensors locates studs and electrical wires behind walls. The LED display shows the full width of the stud. 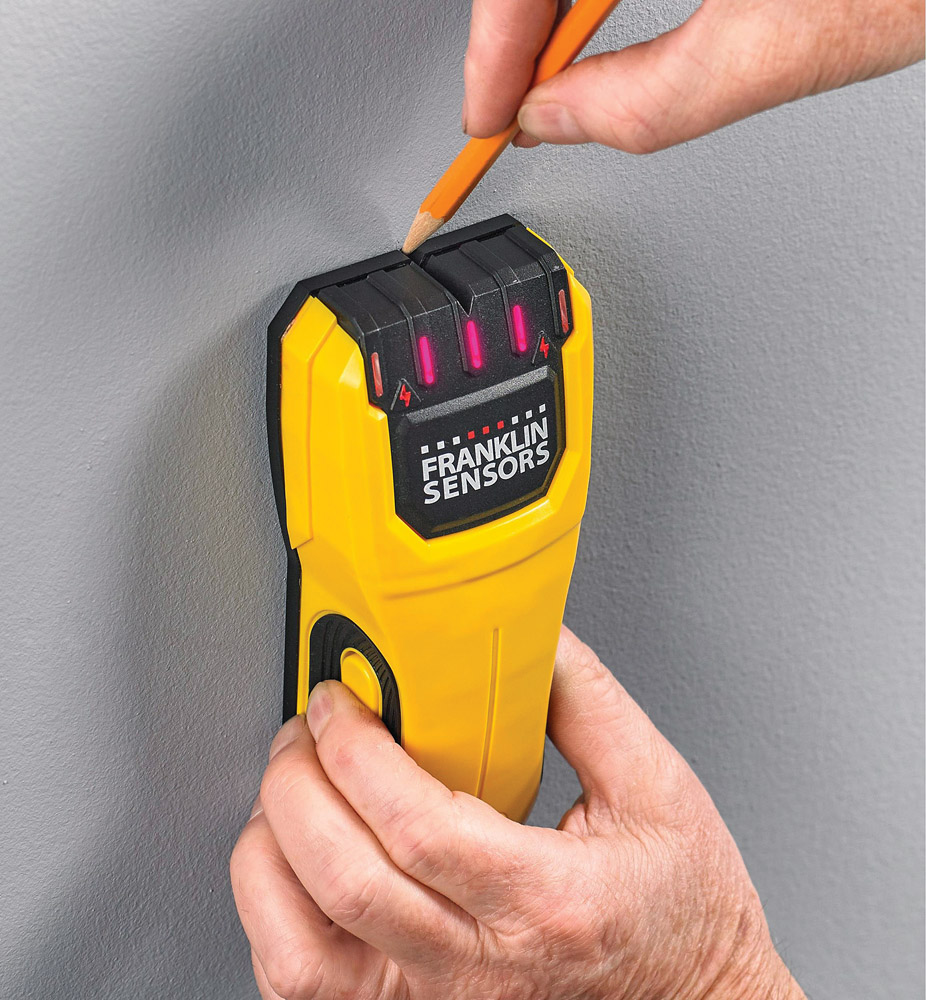
Edge finders, the most basic type, incorporate a single sensor that detects the stud edge as a change in density when the tool is moved along the wall. To work, edge finders first need to be calibrated to a stud-less section of wall, then they must be passed back and forth over the suspected stud to confirm position and center.
Center finders, which are more sophisticated, employ two sensors that compare separate readings of the wall density to find a stud’s center. These tools also need to be calibrated, but generally they do their job in one pass. | Instant stud finders, the latest type, incorporate multiple sensors (as well as analyzing algorithms), so they take multiple readings from multiple parts of the wall. This yields more information, such as the presence of multiple studs and widths, giving quicker and more accurate results than other types. Also, instant finders do not need to be moved along the wall, reducing errors from bumpy surfaces or uneven plaster.
The latest news in stud finders is radar. These tools emit small pulses of radio waves (often called micro impulse radar or MIR) that are reflected back by targets in a wall and detected by sensors. Though on the high end for cost, this technology is precise enough to distinguish a wide variety of materials—wood, plastic piping, electrical lines, rebar, even rodent movement—making it well-adapted to building rehabilitation and remodeling. Some products work in conjunction with a smartphone. | Nonetheless, magnetic stud finders are not history. Today’s advanced versions use super-strong, rare-earth magnets, suspended in the tool in such a way that they can move. When the magnet finds metal, it darts to the spot with an unmistakable thud.
Laser levels ($30–$500)
Using a laser to measure longer distances is far more accurate than a hand-held locking tape measure. Courtesy BoschTools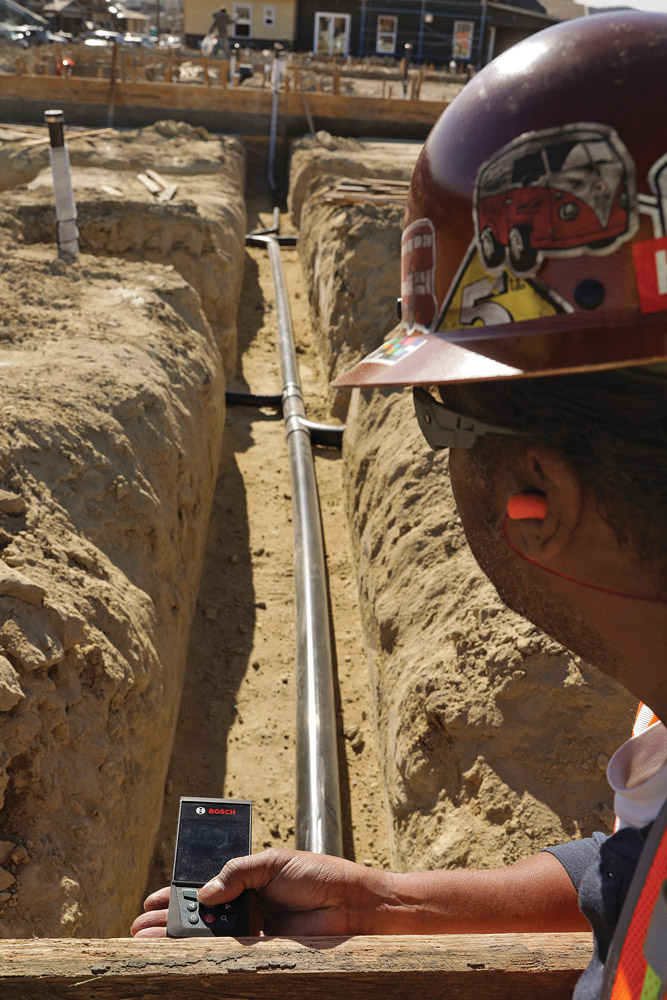
A good adjunct to forensic home-inspection tools, these can measure long distances—up to 100 meters or so—with a degree of accuracy impossible with a hand-held device.
Borescopes ($30–$130+)
You don’t have to be a doctor to benefit from tools that see where the sun don’t shine. Borescopes are mandatory for inspecting the insides of jet engines, turbines, and other machinery without disassembly, but they are also put to work in all kinds of buildings, from peering into cavity walls to examining inside pipe welds.
Basically a light-transmitting tube with a lens at one end (which forms the image) and an eyepiece at the other (to enlarge the image), borescopes were perfected during World War II for inspecting cannon bores—hence the name. (Endoscopes are their medical cousins.) The technology has become so convenient of late that borescope-type gadgets are hawked on late-night TV for homeowners who want to snoop behind kitchen cabinets or down sink drains.
Like this model from Teslong, a borescope is essentially a cord with a camera at the end. This version transmits imagery straight to your smartphone. Courtesy Teslong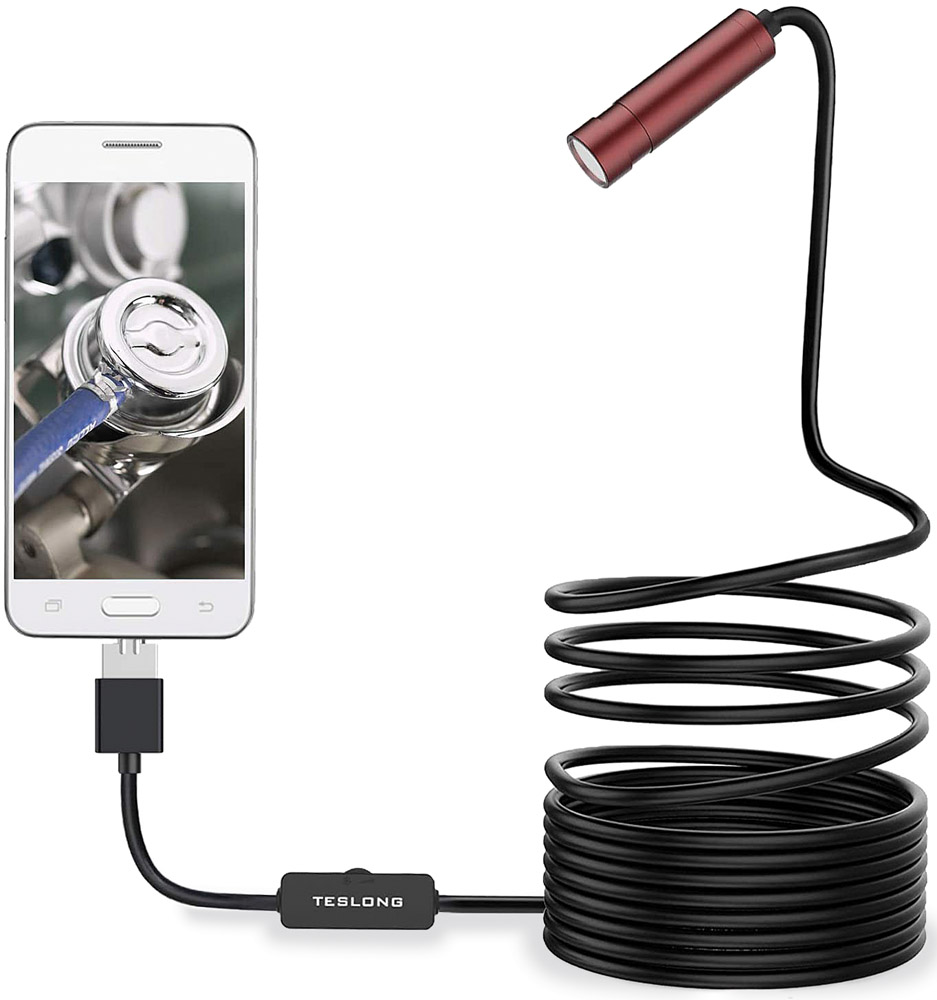
Rigid borescopes, the simplest type, mount the lens and eyepiece on a stiff tube. While not as versatile as other types—the subject of inspection must be in a straight line from the viewer—they do offer a higher quality image at a lower cost. In industry, rigid borescopes find most use in inspecting automotive cylinders and in gunsmithing.
Flexible borescopes (aka flexscopes) replace the rigid tube with a fiber-optic bundle that conducts light between lens and eyepiece. This bundle allows the scope to articulate around bends, but the trade- off is image quality, which can be prone to distortion such as pixelation from the individual fibers or crosstalk between them. The quality and clarity of the image also depends upon the number of fibers. More fibers and larger tube diameter equals better resolution and quality; 10,000 pixels is generally considered the minimum, with the best in a range of 15,000 to 22,000 pixels. The bundle also includes fibers that control lighting for the target. Flexible borescopes perform all kinds of building inspections: wall cavities; ceiling, roof, and floor voids; HVAC ducts; boiler flues and sewer lines.
Equipped with a pan-and-tilt camera head, the GECKO 9060 inspection robot from Fiberscope has a digital video recorder and a wide-angle field of view. 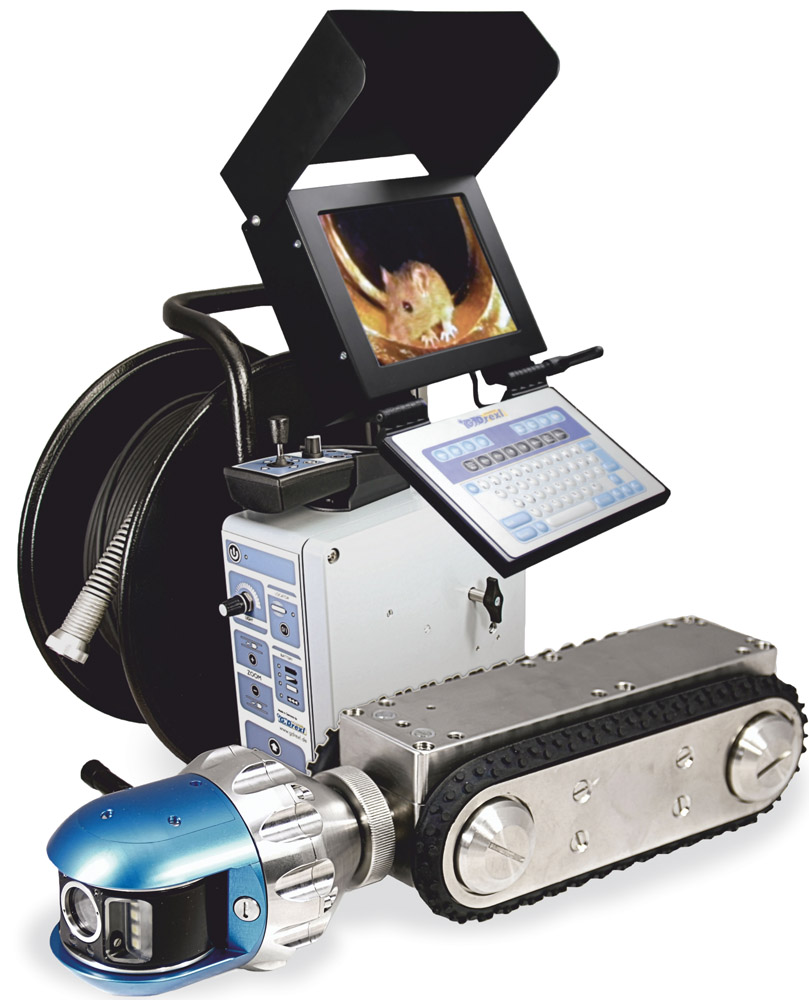
Video borescopes (aka inspection cameras) upgrade the optics of a flexible borescope with a miniature, real-time camera. These are typically based on CCD (charged coupled device) sensors, the same used in digital and video cameras. The larger the CCD, the more light it can capture, so the better the resolution and image detail, but at greater expense. Sensors based on CMOS (complementary metal oxide semiconductor) technology are less costly to produce, and have made video borescopes affordable even at the consumer level. No surprise, video units are the most expensive borescopes of the lot—typically several hundred dollars, but prices drop every year. As with thermal imaging, some of today’s borescopes send images to a smartphone for recording or further transmission.
A laser level used in a shower prior to tiling demarcates guidelines in three dimensions, a foolproof way to eliminate installation mistakes. Courtesy DeWalt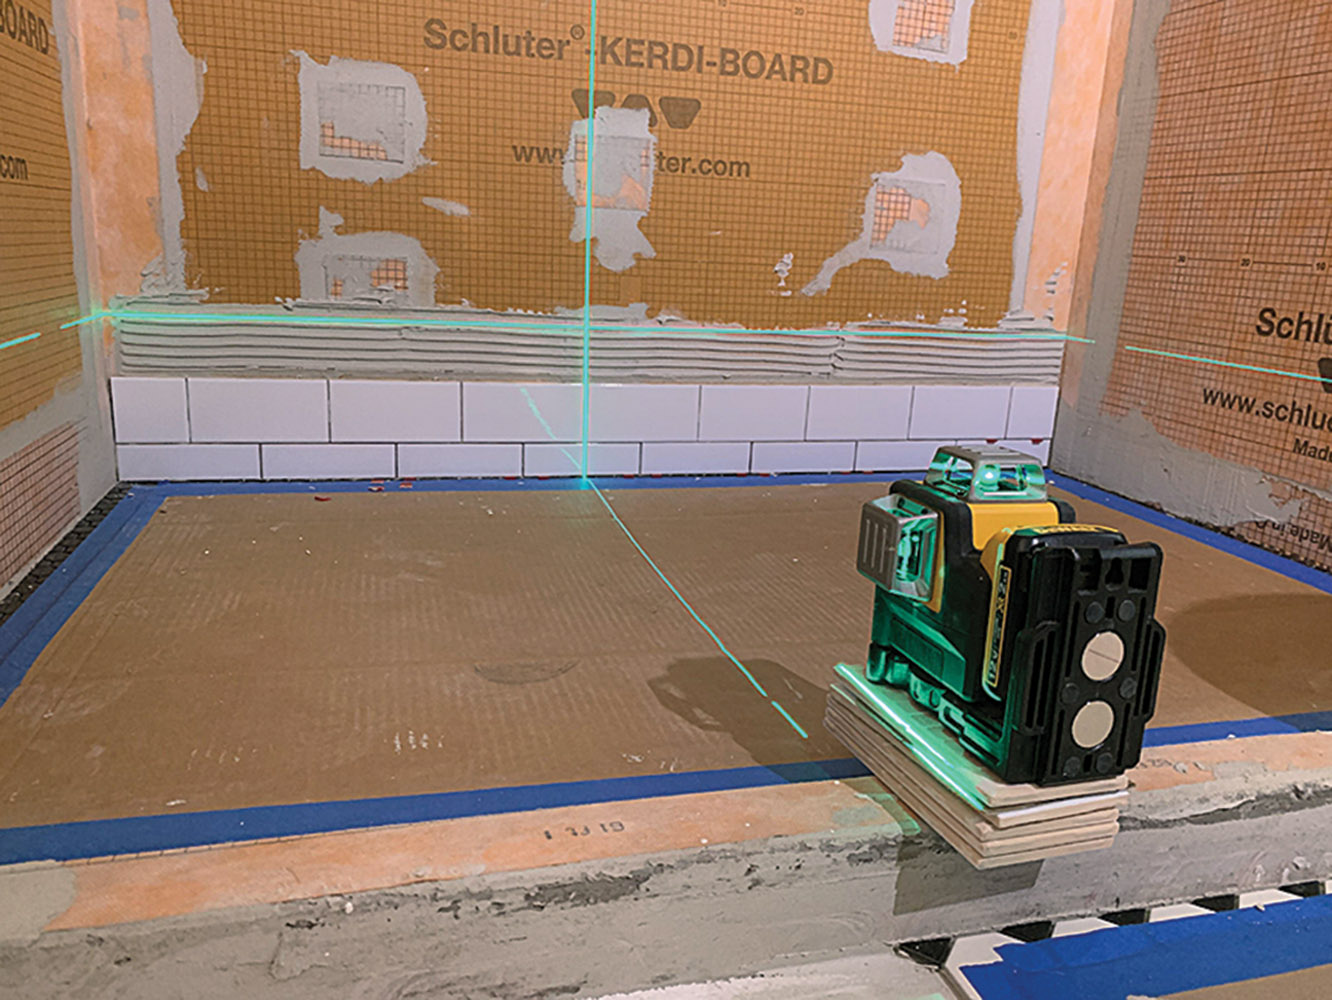
A moisture meter, like this one from Tramex, takes the guesswork out of estimating when wood paneling or flooring is dry enough to install.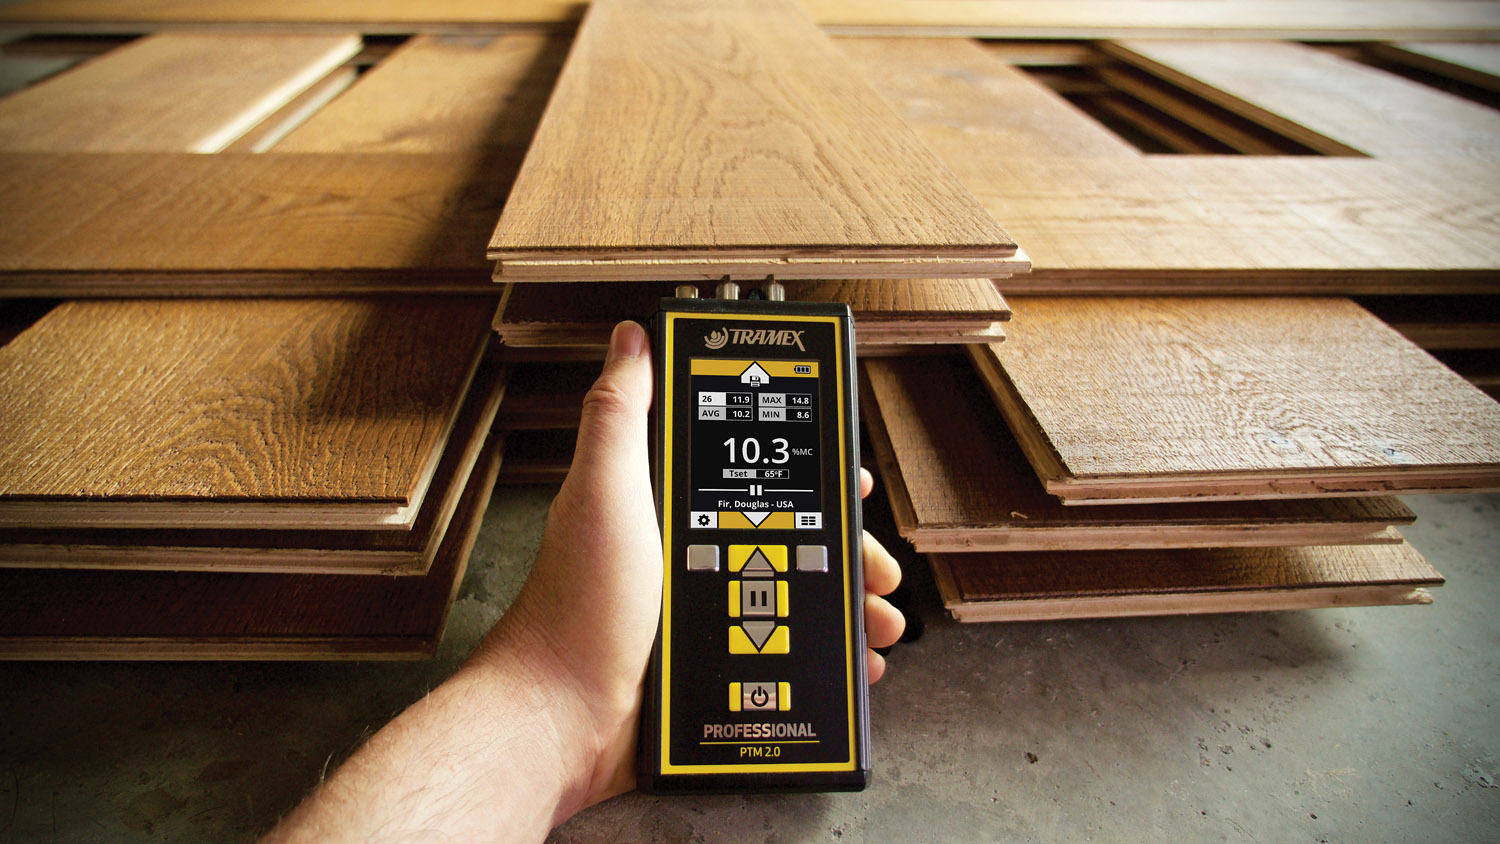
Moisture meters $15–$460+
Moisture is a stealthy force in buildings, typically as invisible as it is universal, and the fundamental tool to detect it has long been the moisture meter. Lumber, furniture, and flooring companies rely on moisture meters to guarantee their products are below a promised moisture content (typically 7% to 8% for flooring) and will not shrink or deform once in the hands of the end-user. Contractors use moisture meters to determine if rooms or concrete subfloors are dry enough to install flooring, or to assess flood damage. In building inspection, taking multiple moisture readings in a careful pattern can detect areas that exceed normal moisture levels. This may explain why paint is peeling, wood is deteriorating, or brick is spalling—and even point to causes, such as a leaky roof.
Like their kindred inspection tools, moisture meters come in three common types. Pin-type meters, the original versions, work by penetrating the material surface with two pins, then measuring the electrical conductivity between the them: more moisture, more electrical flow. Conductivity is displayed as a number (once by analog meter, now usually digital). Meters are typically calibrated for wood to directly read percentage of moisture content, but they’re also applicable to other materials, such as gypsum (drywall), acoustic tile, or masonry when interpreted on a relative scale of 0 to 100. Some meters now use colored displays, such as red for high moisture content, green for dry. Since the pins must be inserted into the surface, readings can depend on the depth of penetration and, in some situations, do not qualify as a non-destructive test. However, pins make this the only meter type that can detect the exact location of moisture.
A good read: How To Survive a Home Inspection
Pinless meters (aka EMF and capacitance meters) avoid pin issues by identifying moisture via the principle of electrical capacitance. Here, the tool emits an electromagnetic field through sensors pressed against the material, then measures the material’s ability to store energy. Pinless meters are the tools of choice where any impact to the surface is out of the question—say, taking readings over decorative wallpaper. However, since they can read to ” to 1” below a surface, they also have the ability to evaluate moisture beneath finishes such as bathroom tile or sheet flooring that cannot be penetrated or do not show any evidence of moisture.
All-in-one meters (aka pin/pinless) combine both meter types in one tool, and are popular with professionals who want to compare readings—one to find a high moisture area, another to pinpoint its location.
Through indirect evidence, a moisture meter can find more than moisture—problems like insects or mold.
No surprise, today there are apps that will plot digital moisture maps from meter readings Courtesy Tramex
Moisture Mapping
A handful of random meter readings is fine for just following up hunches about a moisture problem, but to see the big picture, do what the pros do and create a moisture map. A series of meter readings taken in a grid, a moisture map allows you to visually identify the location and extent of moisture in an area—most importantly, the perimeter where the high-moisture zone ends and the “dry” zone begins. By plotting varying moisture levels relative to the “dry” area, moisture maps sketch a picture of moisture migration into the area, often suggesting its source. Moreover, making multiple mappings (say, a week apart) can track moisture increases—or, with luck, decreases that indicate the problem has been corrected successfully.
Moisture mapping is not difficult and can be done several ways. You can map the readings on a piece of paper or a computer screen, or chalk them onto the wall or floor itself. The critical first step is to read a known “dry” area to establish the baseline value, then calibrate the meter. When using a pin-type meter (generally preferred where pins are permitted), always insert the pins to the same depth to ensure accuracy. Many pros use their most sophisticated tools just to document the perimeter. Floors, walls, and even entire houses are often mapped to chart relative moisture levels and movements. Outdoors, moisture maps help explain what’s going on water-wise in gardens, landscapes, and agricultural fields.
Drone flyovers make the danger of clambering up a steep roof to inspect shingles or the condition of a chimney a thing of the past. Courtesy Chimney Champions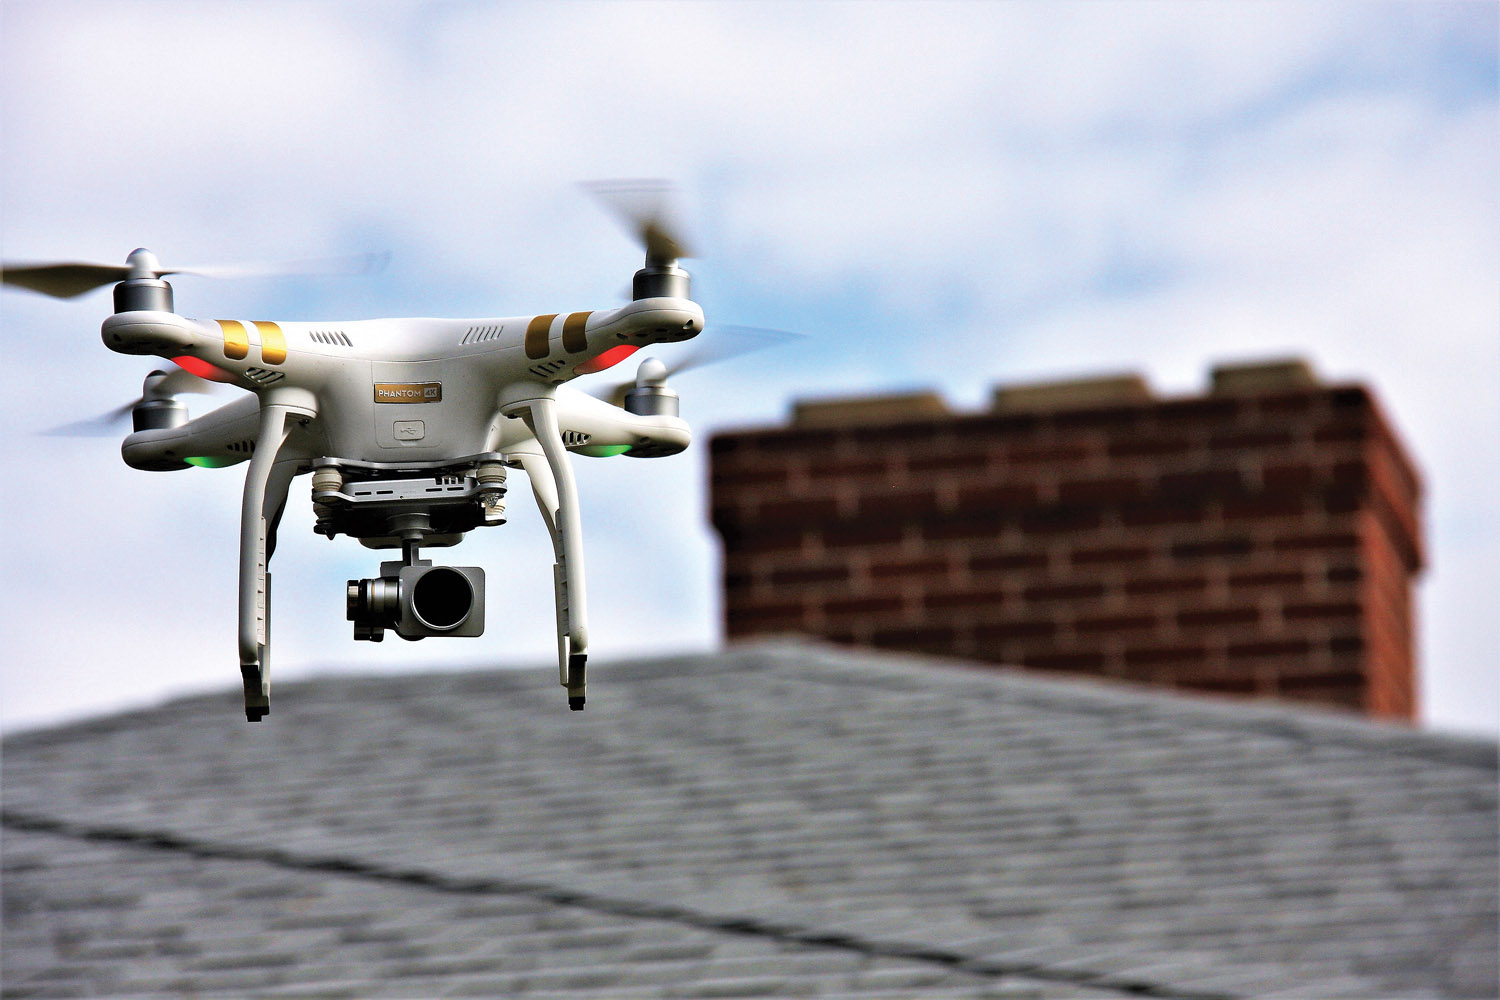
Drones
With over 7 million of the little buzzers in the air as of 2020, no overview of inspection tools can get by without at least a snapshot on drones. Camera-carrying drones are now common for closeup visuals of building exteriors (and even interiors) in places that were formerly accessible only by aerial lifts, scaffolds, or ropes—think roofs, or almost any place over three storeys aloft. Drone photography gets complicated and expensive, though.
As with spacecraft, the final image is actually a mosaic of overlapping digital shots composited together by a service, then corrected for vibration and other shortcomings. The results, however, can be revealing: from a comprehensive view of the entire roof, to a measured depiction of the skeletal framework of the whole building.
As recently as a couple of years ago, only photo-type cameras appeared on drones, but today IR cameras for thermal inspections are one of their most popular applications, particularly for commercial buildings. In fact, along with thermograms and photogrammetry (making measurements with photos), there’s now a burgeoning inspection/survey drone industry for hire, using sensors ranging from LiDAR (light-scanning radar for measuring) to those detecting methane.
Thermal Imaging Infared Camera ($1000+)
Another branch of military research to bear ever more peacetime fruit is the thermal imaging camera. These tools detect thermal energy—specifically infrared radiation (IR), a range of wavelengths often experienced as heat. Along with visible light, IR is part of the electromagnetic spectrum, but like X-rays, microwaves, and radio waves, it cannot be seen with the naked eye. Thermal imaging cameras employ sensors that change electrical resistance, voltage, or current when heated by IR, then display this information as an image called a thermogram that can be viewed and analyzed.
A technician uses infrared imaging to look for leaks in a complex series of pipes. 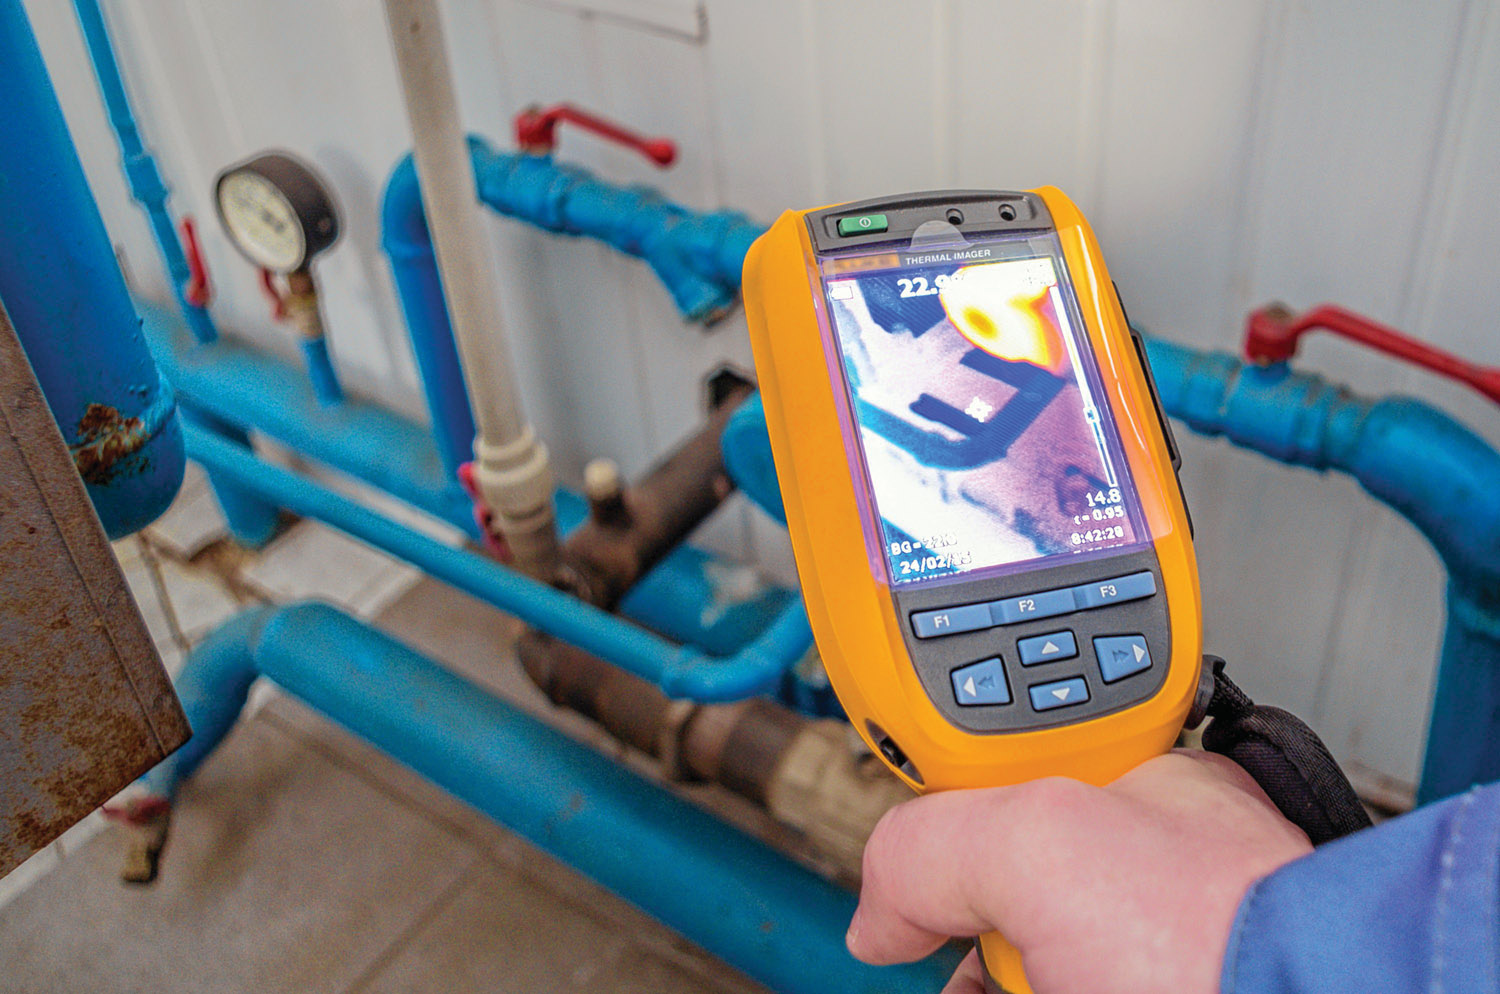
Thermal imaging came into practical use during the Korean War for identifying targets and foes through battlefield smoke or darkness, and later to fight fires on ships. Expensive and security-sensitive, it remained in the military until after the 1991 Gulf War, when reduced equipment sizes and costs opened it up to the public. Law enforcement put thermal imaging to work in surveillance and security, and municipal firefighters adopted it for search and rescue and to identify fire hot spots. Since the 2000s, even more compact and economical cameras have become standard inspection tools. Utilities use thermal imaging cameras to look for overheating in high-voltage power lines, and the building industry relies on them to find heat leaks and improve HVAC-system efficiency.
Today’s thermal imaging cameras come in many forms and complexities, from helmet mounts for firefighters to handhelds for building inspectors. Basic cameras just read the temperature under crosshairs on the image, then display the temperature as a number, or multiple numbers for comparison. More sophisticated cameras display relative temperatures as colors, typically aseither a black/white/grey range or, in the most sensitive cameras, a palette of multiple colors—say, white for hottest, reds and yellows for intermediate, blue or black for cold. Specialized cameras can offer a color alarm feature that only displays an image where the temperature is above or below a user-selected range, for example displaying only the hot spots around a window or on mechanical equipment.
Like conventional photography, the quality of a thermogram depends on the design, cost, and operation of the camera. At the top of the list is detector—that is, the number of pixels and thereby temperature data points. The higher the resolution, the clearer the image. A thermal imaging camera can cost from $1,000 to $10,000, with resolution commonly the biggest difference between an expensive camera and a cheaper one. Also important is thermal sensitivity, or to what degree the camera can distinguish a difference in temperature between two surfaces.
Better cameras also allow the user to adjust for emissivity (how well a material radiates infrared energy, compared to a perfect radiator); reflective temperature (compensating for temperature reflected from surroundings); and thermal tuning (adjusting the temperature range the camera detects).
Infrared imaging reveals the temperature of a structure through color, identifying areas of energy loss in bright orange. It clearly identifies a trouble spot where one would not be expected: the “hot” area just right of the left window bay. Courtesy FLIR Systems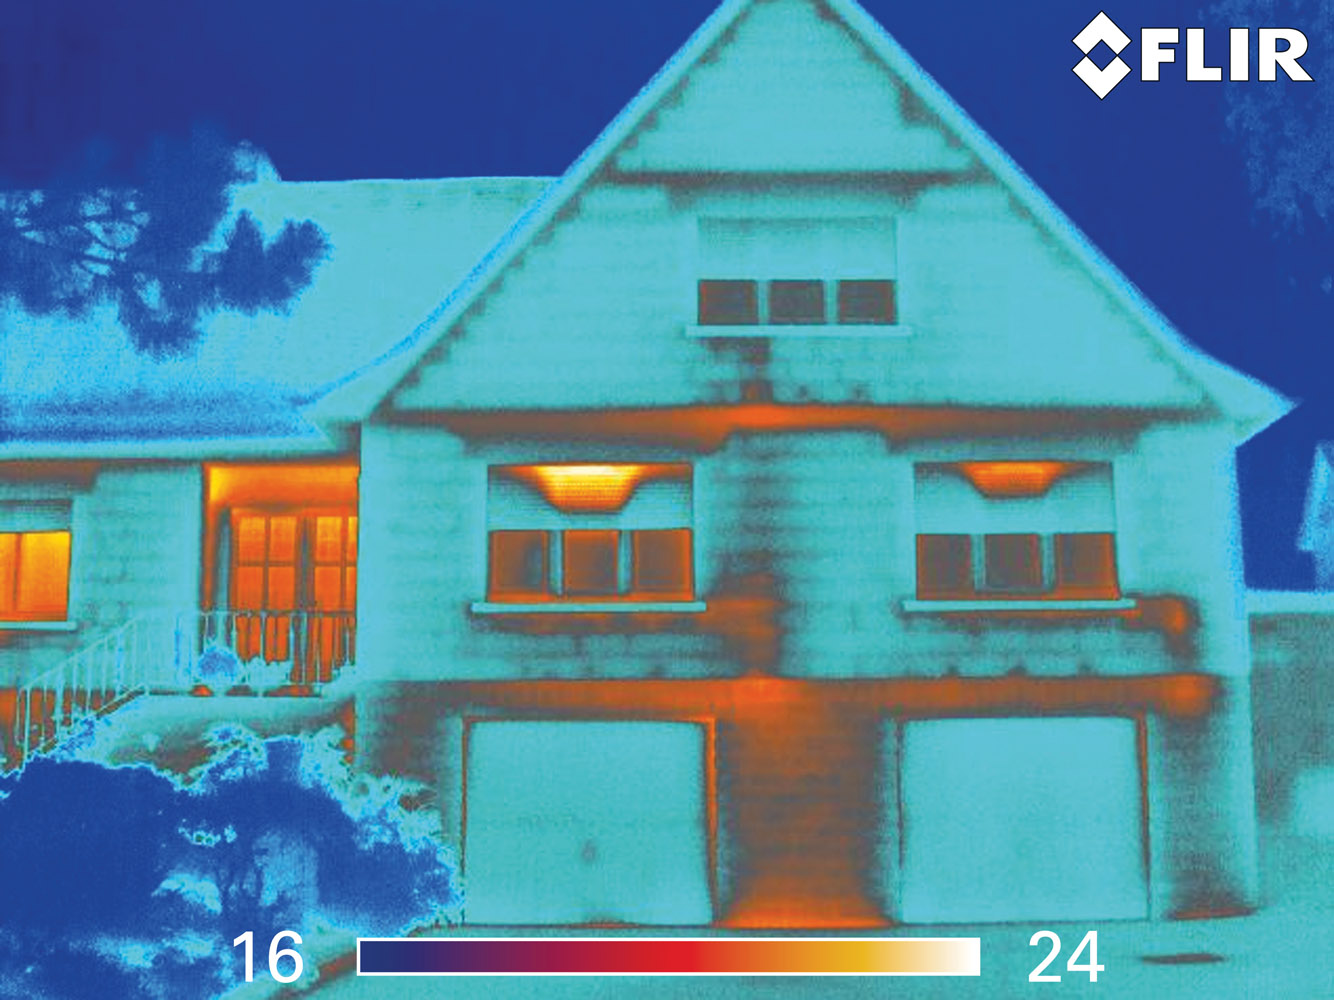
Thermal imaging cameras can’t see through walls, but they can tell a great deal about the condition of a building by “taking the temperature” of its surfaces in multiple ways:
- Energy Audit Also called a thermographic inspection, this survey of the building’s exterior or preferably its interior (where temperature differences are less affected by air movement and more accurate) can determine the effectiveness of insulation—whether a building needs it and where. Thermographic inspections are also valuable before a house purchase to evaluate its condition, and after adding insulation to assure it was done correctly. Inspections even can reveal the condition of existing insulation, such as settling or saturation from a roof leak.
- Building Leakage Thermographic inspection also will zero in on air leaks that allow heat to escape or infiltrate the building. When combined with a blower door (a fan attached to a door that tests airtightness by exaggerating air leaks), an inspection can locate air leaks around windows and doors or through building defects (such as wall penetrations or faulty siding) when they show up in the thermogram as black streaks.
- Mechanical Systems As with utilities, thermal scans of electrical systems can detect overly warm connections or circuit breakers, indicating potential problems. Similarly, scans of HVAC equipment and the like can point to areas of friction or wear.
- Moisture Detection The non-invasive nature of thermal imaging cameras coupled with their ever-growing sophistication and affordability has made them increasingly popular for moisture detection. Rather than measuring electrical resistance or capacitance like a traditional moisture meter, thermal imaging cameras can identify areas of moisture when they show up as anomalies in a thermogram, due to the effects of evaporative cooling.
- Material Defects In high-level inspections, such as structural investigations, thermal imaging is also a tool for finding defects in materials. For example, moisture trapped in a porous material such as wood increases its thermal conductivity, and shows up in a thermogram as a cooler area.
Thermal imaging cameras may be obtained through a service (some utilities do work for a nominal charge or for free), rented, or purchased outright.


