

Many houses built before about 1950 retain at least some of their original plaster walls. If sections or entire walls need attention, don’t let the idea of working with old plaster intimidate you. In many cases, problems with plaster can be fixed. It’s much easier to repair cracks or patch holes with this versatile material than with drywall.
The most common type of damage to plaster is cracking, progressing from the superficial and easily repaired to deeper and wider cracks that require multiple repair techniques. More serious repair problems include delamination, bulging walls, and key failure, where plaster has broken loose from its grip on the lath substructure.
Plaster mixture. Bill Bradley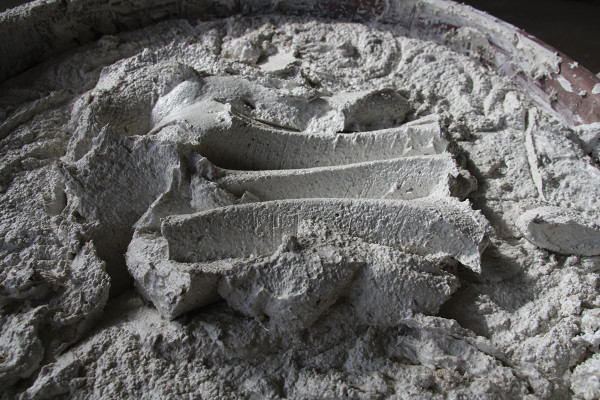
What is Plaster?
Applied with craft and skill, interior plaster is a near-magical building material for creating and coating walls and ceilings. Historically, plaster consists of dry components including sand, lime, and cattle hair (or straw or manure) mixed with water to create a wet, plastic medium that cures and hardens as it dries. About 150 years ago, a new component, gypsum, was added to the sand and lime mixture to enable the plaster to cure more quickly and allow for faster working times.
Three-coat plaster is a system of multiple layers that work together to form a strong, sound-dampening, fire-resistant wall. Illustration by Rob Leanna based on Kathy Bray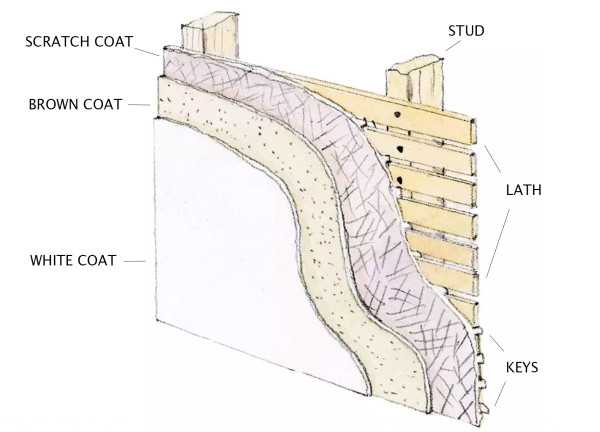
What is a 3-Coat Plaster System?
A traditional multi-coat plaster system begins with a substructure of lath—thin wood slats or metal mesh—that’s attached to the wall framing. Three coats of wet plaster are applied in layers to the lath: the scratch coat, the brown coat, and the finish coat.
The Scratch Coat
The scratch coat goes in quickly. The plasterer forces the wet mixture thickly through gaps in the lath to form “keys” that harden and lock the coat in place as it cures. The top surface of this scratch coat is then scored to prepare it to receive the second or brown coat.
The Brown Coat
As the brown coat goes on, the plasterer levels out wall surfaces and creates square and plumb corners.
The Finish Coat
Once the brown coat has cured, the top or finish coat goes on, either smooth or in a variety of textured finishes. The result is a superior, handmade wall surface that offers surprisingly good insulation and sound-proofing qualities.
This article concerns itself with three-coat plaster, applied to wood or metal lath and troweled smooth. Mouldings, however, are run in place, the profile created by pushing a template against wet plaster. Ornaments including ceiling medallions are cast in a mold, then applied. Old work can be replicated, but that’s another story.
What is Drywall?
Known variously as plasterboard, gypsum board, Sheetrock (a trade name), rock, or wallboard, drywall is a uniform panel of gypsum plaster pressed between thick sheets of paper. It isn’t as old as plaster, but drywall has a surprisingly long history, with early forms dating back to the late 19th century. In the U.S., it began its inevitable march to residential walls and ceilings between 1910 to 1930.
Offered in a standard 4′ x 8′ size and thicknesses from ¼” to 5⁄8″, drywall is relatively easy to install over large areas, especially compared to plaster. It can be nailed or screwed to wood or metal studs. Once the joints are taped and coated with joint compound, drywall is ready to be painted or wallpapered.
Manufacturers offer drywall for diverse uses and settings: there are fire, moisture, or mold resistant varieties, for example, and rock that serves as a base for tile installation. This makes it easier to tailor drywall with specific characteristics to areas where moisture or mold is a problem. For a bathroom where the original plaster is long gone or compromised by water damage, for instance, greenboard is an excellent choice.
Problems with Plaster
Crack Repair
Cracks can be caused by foundation settlement, undersized joists, seasonal and humidity changes, and poorly executed repairs. Cracks can range from hairline-size to very wide. They can follow structural members in a straight line or run diagonally across the wall surface. Patching cracked walls is a skill that falls somewhere between the trades of plastering and drywall finishing. In other words, a willing beginner can make minimal repairs, and with practice, progress to more challenging projects.
Hairline Cracks
If a hairline crack has been evident over a period of time and doesn’t move, remove the loose material and fill the crack with a coat or two of joint or spackling compound (or use an elastomeric product like Krack Kote). Allow each layer to dry, then sand lightly before applying the next coat. Sand the patch smooth with fine-grit sandpaper on a sanding block.
The tape and “float” technique is effective for repairing wider cracks in plaster. Rob Leanna based on Kathy Bray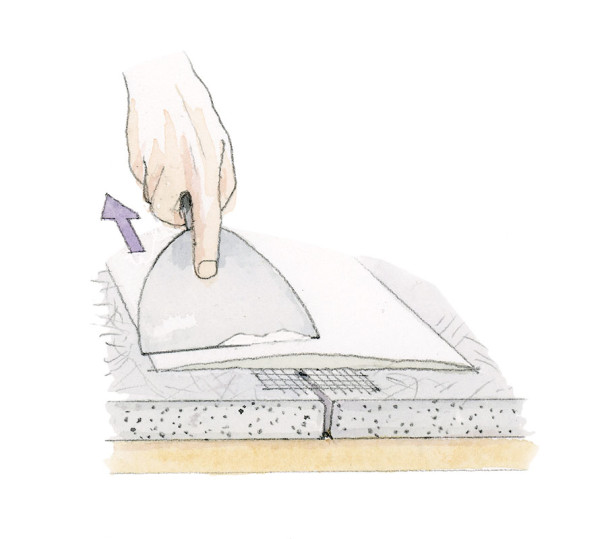
Wider Cracks
For wider cracks, or previous crack patches that have failed, use the tape and “float” technique. First press hard on either side of the crack to make sure that the plaster isn’t moving. Then check to see whether one side of the crack is higher in relief than the other.
Map Cracking or Extensive Cracks
If you’re faced with an extensive network of cracks or cracks in haphazard patterns known as map cracking, cover the walls with sheets of adhesive-backed fiberglass mesh with an elastomeric coating, such as Nu-Wal, following the manufacturer’s instructions. There may still be some follow-up taping and filling once the product is in place.
Moving Cracks
If the plaster moves, or one side of the crack is visibly higher in relief than the other, dig out the crack on the high or loose side with a utility knife or a crack opener, a small hand tool. Remove enough material to reach sound plaster.
Keep in mind that plaster continues to move over time. While it’s a simple matter to fill any crack with joint compound, unless the area around the crack is stable and isolated from other problem areas, cracks will crop up once again.
Most professional plasterers recommend securing the loose or high side of the crack with plaster washers, wafer-thin perforated discs (see below) that refasten plaster to lath, and drywall screws before filling in the crack. Start by drilling small pilot holes at least 2″ away from each side of the crack. Then fasten the washers with 2″ screws.
To repair moving cracks in plaster, secure the loose or high side of the crack with plaster washers before filling in the crack Rob Leanna based on Kathy Bray
Although the washers will flatten as the screw is driven into place, they will still stand slightly above the wall surface. In most situations you can achieve a nearly invisible patch by feathering out the repair a few inches wider than usual.
Two Methods for Filling a Crack
There are two methods for filling in the crack once the wall is anchored. They are:
The Inverted V Method
- Dig out the crack along its length in an inverted V shape and vacuum out any residual debris. This should create a toehold for the patch.
- Provided the crack survives without crumbling into chunks, fill and tape it much the same as though it were a drywall joint.
- First wet the lath and plaster around the cleaned crack to help the patch adhere (the old, dry materials tend to suck the moisture out of the new plaster before it can fully cure).
- Then fill the crack with a coat or two of stiffly mixed joint compound to raise and level out the crack.
- Also, take care that the new plaster attaches firmly to the lath by pressing the material through the openings in the slats. Otherwise, the repair will fail.
- Float the crack out with two thinner coats of joint compound, sanding between finishes.
- Finish with a final layer of joint compound or Easy Sand and touch up sanding.
The Bonding Method
Use a PVA (polyvinyl acetate) plaster bonding agent around the edges of the failed plaster and on any exposed lath before taping the crack. The bonding agent acts as an emulsifier to bond the new plaster to the old without the hit-or-miss method of wetting the old lath and plaster. Then fill in the hole as above. Allow each application of plaster to dry and sand between coats.
Read more from Old House Journal:
- How to Repair Plaster Cracks
- How to Repair Textured Plaster
- Prepping Plaster Walls for Paint & Wallpaper
- How to Patch Plaster Walls
Making Small Repairs
For smaller jobs, there’s no need to mix up a traditional lime- and sand-based plaster. Unless the house is very early or historically significant, a premixed joint compound like Murco Mud works fine.
If there are multiple cracks or areas to patch, use a dry joint compound that can be mixed to a desired consistency, such as Durabond, available at most builder’s supply stores and online. It comes in 20, 45, and 90 minute setting varieties. It cures quickly and is hard to sand, however, so for finish work use either premixed joint compound or a related product called Easy Sand, a lightweight setting-type mud with 25 to 90 minute setting times.
For scratch or brown coats, choose a basecoat plaster mix, such as Structo-Lite, a perlite-aggregate gypsum that is much lighter than a traditional sand-based plaster.
How Damaged is Your Plaster?
Failing plaster creates a tremendous mess, which is why so many people throw up their hands and call a drywall contractor. If your goal is to save as much original plaster as you can, first identify how deep the damage goes.
Delamination: Finish Coat Failure
Often only the top coat of plaster is failing. This is called delamination. If this is the case, scrape off the loose finish coat with a putty knife and brush away loose material. Leave any sound material intact.
Apply a plaster bonding agent (Plaster-Weld is one brand) over the damaged areas. Follow the bonding agent instructions carefully with regard to wall preparation and curing times. Then apply a new finish coat, using either veneer plaster or multiple coats of plaster compound.
Veneer plaster creates a thicker buildup in a single coat than drywall mud. For best results:
- Mix small batches to the consistency of mashed potatoes.
- Bring the plaster directly to the wall with the trowel and apply it in an arcing motion. (This may take some practice.)
- As the plaster begins to dry, brush a coat of water over it and smooth it out quickly. This will help the plaster cure to a smooth finish.
Key Failure
If portions of the plaster have detached from the underlying lath, all of the unsound plaster will need to be removed. As you rip out the bad material, you may hit sections that are sound and refuse to budge. Leave them in place.
To avoid damaging areas of sound plaster, use only as much force as necessary. Gently pry up pieces with a flat prybar, or cut out areas using a flathead screwdriver or sharp chisel and hammer. Once you’ve reached solid plaster, brush away all the loose debris. Then push out the remaining keys between the old lath.
Once the lath system has been patched, you can use plaster washers to secure the loose plaster. Rob Leanna based on Kathy Bray
Starting With the Scratch Coat
Once all the debris has been removed and the lath system patched, begin the plastering process with the scratch coat:
- Use plaster washers to secure the edges of loose or suspect plaster to the underlying framing or lath.
- Screw the washers into the plaster about 2″ back from the void, placing them about 4″ apart. Use as many washers as needed until the plaster no longer moves. On ceilings, you may want to anchor the entire ceiling with plaster washers, placing them along the joists about 1′ apart. Fasten with 2″ drywall screws.
- Once the washers are in, prep the repair area by coating the edges and lath with bonding agent.
- When dry, mix a batch of Structo-Lite, a lightweight perlite-gypsum base coat. Mix to the consistency of mashed potatoes, and only as much as you will need for the patch. The Structo-Lite should not bulge, drip, or fall off the trowel.
- Apply the plaster with an arcing motion, taking care to press material through the wood or metal lath (see below). Aim for a layer no thicker than the depth of the existing scratch coat (about 1⁄8″ to ¼”).
- As it starts to set, score it with a nail to prepare the surface for the next coat.
- Allow the scratch coat to set for 24 to 48 hours.
Apply the plaster with an arcing motion, taking care to press material through the wood or metal lath Rob Leanna based on Kathy Bray
Step 2: The Brown Coat
Use the same plaster for the brown coat and apply it in much the same way:
- Prep the surface by generously dampening it with water before you begin.
- Make the coat as level as possible to provide a solid base for the finish coat. To achieve this, run a squeegee trowel over the entire patch once it’s in place.
- Keep the brown coat at least 1⁄8″ below the level as it begins to set up.
- Allow to cure for 24 to 48 hours before applying the finish coat.
Step 3: The Finish Coat
For the finish coat, use Durabond or veneer plaster:
- Again, dampen the surface with water. This will help the new coat adhere without drawing too much moisture out of the first and second layers, which can cause cracks or failure.
- The finish plaster should stiffen as it is leveled and smoothed in place.
- Add small dabs of plaster to fill in hollows, then smooth out the ridges.
- To create a slick finish, spray a fine mist of water onto the surface and make a few final passes with the trowel.
- Straighten edges or corners with a margin trowel.
- Allow the top coat to cure for at least 48 hours (some veneer plasters will take longer).
- Then check for shrinkage—spots where the new coat has shrunken away from the old one.
- Tape the cracks with fiberglass mesh and joint compound as for any minor plaster crack.
It’s a good idea to bring in a set of bright lights and check the walls closely for voids and high spots. As you locate problem areas, circle them in pencil. Then mix up a small batch of very loose mud. Using a taping knife, apply the mud to the first circled area and immediately scrape it off at a sharp angle. Work the material into the void from different directions to get all the air pockets out. Try to keep the skimmed repairs as thin as possible as you work quickly around the room.
How to Use Skim Coating
Even when plaster walls are in sound condition, they’ll often show signs of repeated repairs, nicks, or roughness in the surface. You can refresh them with skim coating.
Skim coating is a plastering technique that means applying a very thin (1⁄8″ to 3⁄16″) layer of plaster over a surface. While recipes and preferences vary, a skimming plaster should be stiff enough to keep from sliding off the trowel when it’s turned upside down.
Assuming you are skim coating freshly repaired plaster walls that have not been wallpapered or painted, begin by applying a bonding agent. While this sets the stage for the new coat, it also makes the surface a bit slippery and also means you will need to work fast.
Alex Santantonio, an owner of two old plaster-challenged houses, has written extensively about skim coating plaster walls on his blog, oldtownhome.com. He recommends the following technique:
Take a scoop of the plaster mix onto a trowel and spread it on the wall using an even, fluid arcing motion. Move quickly to cover as much of the surface as the amount on the trowel allows. Alex and Wendy Santantonio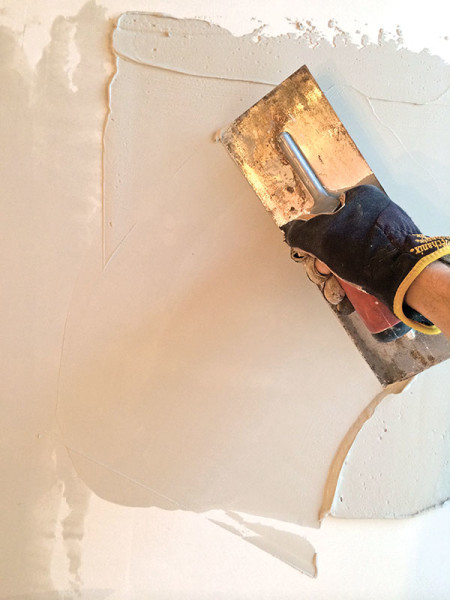
- Take a scoop of the plaster mix onto a trowel and spread it on the wall using an even, fluid arcing motion.
- Move quickly to cover as much of the surface as the amount on the trowel allows.
- Then use the angle of the trowel to scrape off the plaster that doesn’t initially adhere to the surface.
- Use a joint knife to remove the accumulation from the trowel, then scrape the trowel at the hard angle once again.
Use a joint knife to remove the accumulation from the trowel, then scrape the trowel at the hard angle once again. Alex & Wendy Santantonio
Once you’ve made your passes in one area and scraped them, move on to another. Try to keep a wet edge on the trowel as you would with a paint brush. It helps to occasionally wet the edges of your tools, wiping them in a clean bucket of water to remove any build up. Also, since the compound tends to get stiff quickly, scrape it off into the bucket and take out a fresh scoop fairly often.
Openings & Corners
At openings like junction boxes, spread the compound on quickly using the joint knife. Wipe away from the center of the opening, applying more than you need. Use the trowel to scrape directly across the opening and remove as much material as you can.
For corners, use the joint knife to spread the compound right into the corner and then pull away from it. Once you’ve got the corner filled from top to bottom, there will be ridges and lines. Take one fluid top-to-bottom or bottom-to-top stroke with the joint knife to remove any excess.
For corners, use the joint knife to spread the compound right into the corner and then pull away from it. Alex & Wendy Santantonio
Once the coat has cured, follow the same procedure as you would for a plaster topcoat: check the walls closely for voids and high spots, circle them with a pencil, and use a taping knife to quickly make repairs. As always, sand the finish coat smooth and touch up as needed.
Last step: sanding for a smooth finish coat. Alex & Wendy Santantonio


