

The author’s circa-1900 Colonial Revival-style house in Staten Island, New York, had Yankee gutters that were beginning to fail.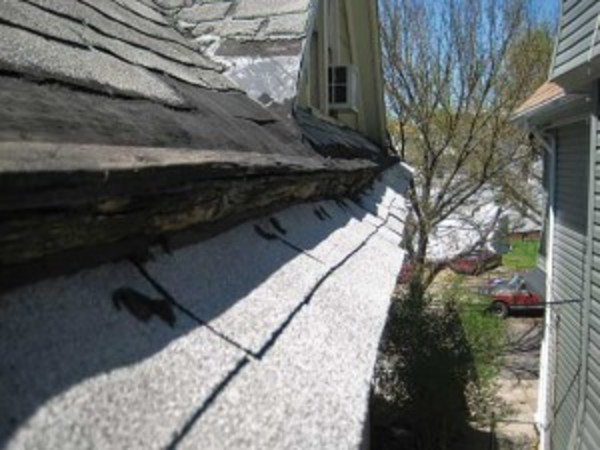
Our 110-year-old home in Staten Island, New York, was exhibiting all the warning signs: peeling paint and rotting wood on the soffits, water dripping down our home in all the wrong places. It was clear that our gutters needed repair—or perhaps replacement. But it was the combination of age and recent winter storms that moved our Yankee gutter project up the repair list from a “should do” to a “must do.”
Yankee gutters are a drainage system inconspicuously built into the roof so that it isn’t visible along the roofline of the house. Dating back to the 18th century, Yankee gutters consist of a V- or U-shaped wooden trough lined with metal—usually copper or terne-coated steel—that directs water away from the house. The channel on these built-in gutters is often wider than modern ones—anywhere from 4″ to 12″. Built-in gutter systems like Yankees and their close cousins, box gutters, require regular inspection and wood sealing to help maintain them, but on the positive side, they are less prone to clogs and obstructions. Preserving our Yankee gutters also would maintain the aesthetics of our old house’s façade, so my husband, Todd, and I decided to tackle the job ourselves.
When the gutters were viewed from above, areas of damage—pitting, flaking, and holes—were clearly visible in many locations.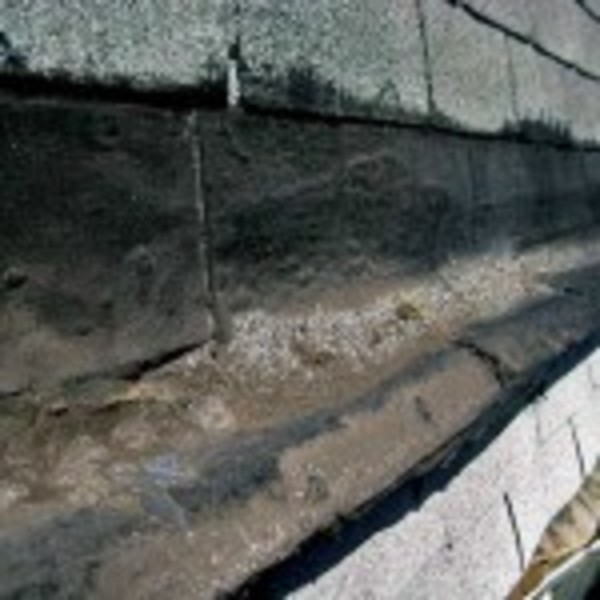
Our Yankee gutters aren’t the originals. During the 1970s, a new roof had been put on our house and the original Yankee gutters replicated. Terne-coated steel, which is the material lining our Yankee gutters, needs to be recoated every eight years or so. (Terne-coated stainless steel, common on newer Yankees, does not require this type of maintenance.) We learned that before we bought the house in 2005, our Yankee gutters may have only been recoated once since they were replaced. And yet, they had held up well until recent harsh winters. While there was some damage to the metal lining of our gutters, the wood trough was intact and in good condition. Those small areas of corrosion on the metal, though, were clearly the source of our problems. The options were either to replace the gutters entirely—which would involve rebuilding the eaves and soffits, as well as replacing two or three courses of shingles on the roof—or repairing what we had.
Damage from the problem areas was also visible from below, in the form of peeling paint and punky wood along the soffit.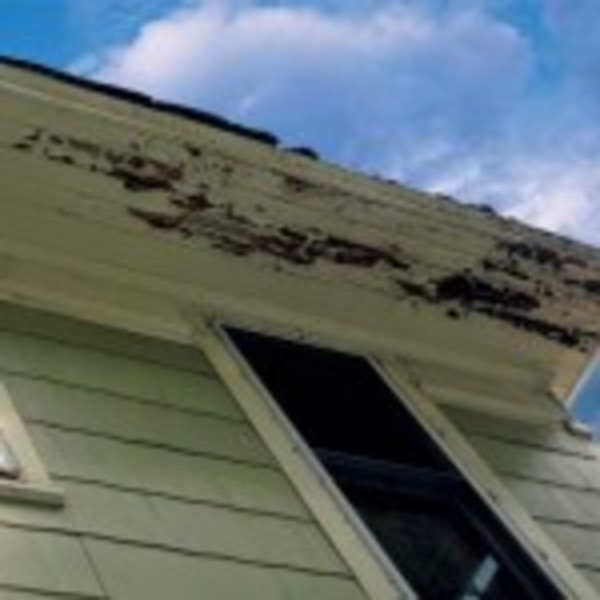
Since the wood portions of the gutters were structurally sound, we opted to recoat and repair the lining with a rubber membrane. Rubber membranes create a waterproof seal on metal, wood, and many other materials, and are often used on roofs and gutters. We chose a liquid membrane called EPDM Liquid Rubber, an emulsion that’s brushed on to create a seamless rubber membrane, which can cover areas of light corrosion directly. Where the corrosion includes gaps larger than 1⁄16″ wide, butyl tape is first used to reinforce the damaged area, then coated with the rubber membrane.
Step 1: Safety
Reaching our gutters on the second story of our home required a 28′-long extension ladder. (Alternately, scaffolding can be rented and set up for such a project.) Concerned about the height and safety, before we began any work we created a simple harness. We ran a 100′ rope over the peak of our roof, then fed one side of the rope through a basement window and tied it to a 2×4 that was then secured to the windowsill with 3″ fasteners. We used the other end of the rope as a harness, securing it around our waists high enough to keep us suspended above the ground if we were to fall.
Step 2: Prep
Prepping the gutters requires carefully cleaning away any debris. Lynn and Todd swept debris away with a paintbrush and gently used their hands and a scraper to remove loose particles.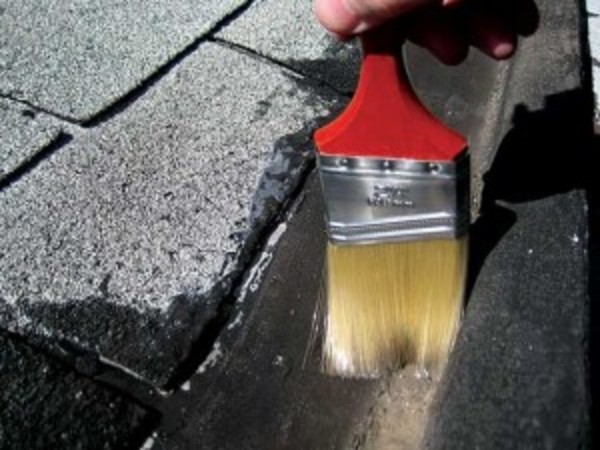
To prepare the gutters, we began by cleaning them of any debris. We swept debris from the gutters with a paintbrush, then we scraped off any loose pieces of old coating with our hands and sometimes a paint scraper (with extreme caution). Finally, we rinsed the gutters with water from the hose and a touch of detergent to ensure that the surface was clean of any oil or dirt. Then we allowed the gutters to dry completely.
If your gutters have mold, you’ll need to soak them in a bleach solution (1:3 bleach-to-water ratio) for at least 15 minutes to kill it. Then scrub the mold with a stiff brush and soapy water to loosen it and remove any remaining debris.
Step 3: Patch
Next, patch any damaged areas larger than 1⁄16″ wide—but not more than a ¼” wide—with butyl tape. Butyl is a type of rubber that adheres well to metals. The tape is self-adhesive, and comes with a backing (“release paper”) on one side. We chose a 3″-wide x 20″-long roll of the tape. Butyl tape is the only tape that can be used in direct contact with EPDM; other types of roofing tape contain petroleum products, which can damage the rubber membrane.
First, wipe the damaged area with paint thinner to clean it. Next, cut the butyl tape to size using scissors or a knife, extending the tape 1″ over both sides of the damage. If the tape sticks to your cutting tool, dab some mineral spirits on a rag and wipe it on the blade. When working with butyl tape, keep the release paper intact as you place the patch.
Press the sticky side of the butyl tape on the area that needs to be patched and, working from the center out to the sides, firmly press down on the tape with your hands or a metal or wood roller to expel air trapped between the gutter and the tape. If needed, you can overlap two pieces of tape. Remove the release paper. The patch area is now ready to be coated with rubber membrane.
To prepare the coating, start by stirring it with a 2 1/2″ mixer bit attached to an electric drill. Once the solution is thoroughly mixed, center the bit in the pail until it creates a vortex, then slowly pour in the catalyst. The solution will be usable for 4 to 6 hours.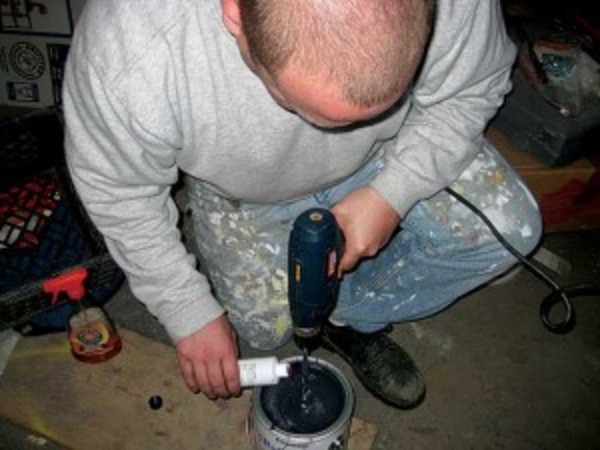
Step 4: Activate
To activate the liquid rubber membrane, you must add 6 ounces of catalyst to a gallon of rubber solution. Activate immediately before use; it has a pot life of 4 to 6 hours once mixed. Begin by using an electric drill and a 2½” mixer bit to uniformly mix the rubber solution in its pail. (To clean the bit—and yourself—afterward, keep a bucket and a can of mineral spirits handy.) Once the solution is mixed, the manufacturer recommends centering the mixer bit in the pail until it creates a vortex, then slowly pouring in the catalyst for uniform disbursement. (The catalyst is a dark blue color, but it doesn’t change the color of the membrane.) Continue incorporating the catalyst for 2 to 3 minutes, moving the mixer bit around the bucket in a circular motion, as well as up and down.
Step 5: Apply
Use an ordinary paintbrush, a roller, or a squeegee to apply the activated rubber membrane along the length of the gutter, covering it completely with a thick coat.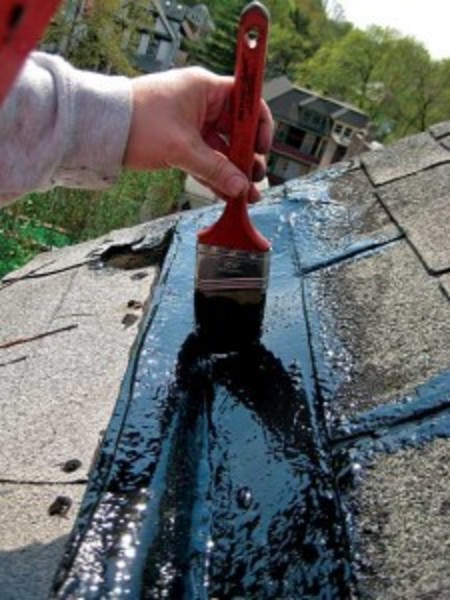
Apply the membrane when you know the weather will be clear for 16 to 20 hours after application; heavy rains before the membrane has set can pit the surface. It will take seven to 10 days to cure completely. A paintbrush works best for applying the rubber membrane to gutters, but a short-nap roller or a squeegee also can be used. Brush the gutters with one coat that’s approximately ¼” thick. We brushed the rubber slightly past the gutter to cover the area intersecting the roofing. On our project, one gallon of rubber sealant covered nearly 40′ of gutter.
Now our Yankee gutters are functioning smoothly again—no drips!—and their lifespan has been extended for a few more years thanks to the rubber membrane. We’re particularly pleased to have been able to preserve the original appearance of our home’s wide eaves.


