

This publication has been prepared pursuant to the National Historic Preservation Act of 1966, as amended, which directs the Secretary of the Interior to develop and make available information concerning historic properties. Technical Preservation Services (TPS), Heritage Preservation Services Division, National Park Service prepares standards, guidelines, and other educational materials on responsible historic preservation treatments to a broad public.
Batch of plaster. Bill Bradley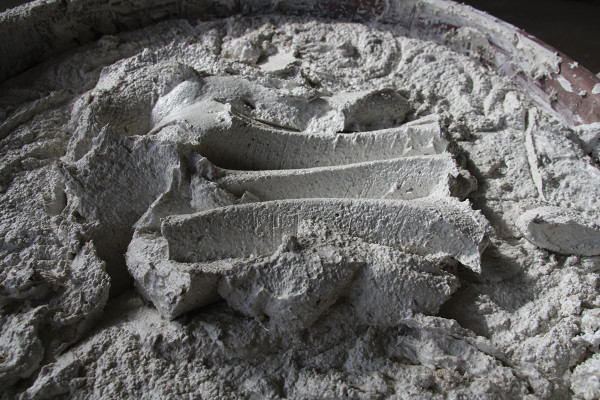
A versatile material, plaster could be applied over brick, stone, half-timber, or frame construction. It provided a durable surface that was easy to clean and that could be applied to flat or curved walls and ceilings.
Plaster could be treated in any number of ways: it could receive stenciling, decorative painting, wallpaper, or whitewash. This variety and the adaptability of the material to nearly any building size, shape, or configuration meant that plaster was the wall surface chosen for nearly all buildings until the 1930s or 40s.
Historic plaster may first appear so fraught with problems that its total removal seems the only alternative. But there are practical and historical reasons for saving it. First, three-coat plaster is unmatched in strength and durability. It resists fire and reduces sound transmission. Next, replacing plaster is expensive. A building owner needs to think carefully about the condition of the plaster that remains; plaster is often not as badly damaged as it first appears. Of more concern to preservationists, however, original lime and gypsum plaster is part of the building’s historic fabric–its smooth troweled or textured surfaces and subtle contours evoke the presence of America’s earlier craftsmen. Plaster can also serve as a plain surface for irreplaceable decorative finishes. For both reasons, plaster walls and ceilings contribute to the historic character of the interior and should be left in place and repaired if at all possible.
The approaches described in this Brief stress repairs using wet plaster, and traditional materials and techniques that will best assist the preservation of historic plaster walls and ceilings–and their appearance. Dry wall repairs are not included here, but have been written about extensively in other contexts. Finally, this Brief describes a replacement option when historic plaster cannot be repaired. Thus, a veneer plaster system is discussed rather than dry wall. Veneer systems include a coat or coats of wet plaster–although thinly applied–which can, to a greater extent, simulate traditional hand-troweled or textured finish coats. This system is generally better suited to historic preservation projects than dry wall.
To repair plaster, a building owner must often enlist the help of a plasterer. Plastering is a skilled craft, requiring years of training and special tools. While minor repairs can be undertaken by building owners, most repairs will require the assistance of a plasterer.
Old plaster walls, like this one painted a faded red in a Greek Revival mansion in upstate New York, have a textural, handmade quality that modern materials can’t match. Gross & Daley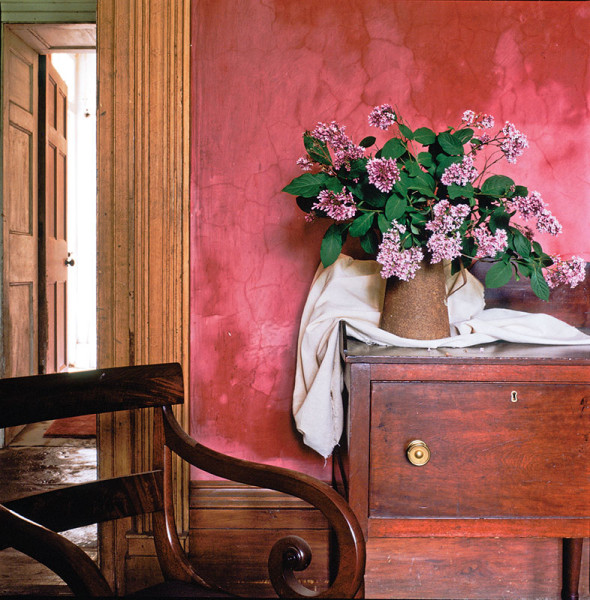
Historical Background
Plasterers in North America have relied on two materials to create their handiwork–lime and gypsum. Until the end of the 19th century, plasterers used lime plaster. Lime plaster was made from four ingredients: lime, aggregate, fiber, and water. The lime came from ground-and-heated limestone or oyster shells; the aggregate from sand; and the fiber from cattle or hog hair. Manufacturing changes at the end of the 19th century made it possible to use gypsum as a plastering material. Gypsum and lime plasters were used in combination for the base and finish coats during the early part of the 20th century; gypsum was eventually favored because it set more rapidly and, initially, had a harder finish.
Not only did the basic plastering material change, but the method of application changed also. In early America, the windows, doors, and all other trim were installed before the plaster was applied to the wall. Generally the woodwork was prime-painted before plastering. Obtaining a plumb, level wall, while working against built-up moldings, must have been difficult. But sometime in the first half of the 19th century, builders began installing wooden plaster “grounds” around windows and doors and at the base of the wall. Installing these grounds so that they were level and plumb made the job much easier because the plasterer could work from a level, plumb, straight surface. Woodwork was then nailed to the “grounds” after the walls were plastered. Evidence of plaster behind trim is often an aid to dating historic houses, or to discerning their physical evolution.
Lime Plaster
When building a house, plasterers traditionally mixed bags of quick lime with water to “hydrate” or “slake” the lime. As the lime absorbed the water, heat was given off. When the heat diminished, and the lime and water were thoroughly mixed, the lime putty that resulted was used to make plaster.
When lime putty, sand, water, and animal hair were mixed, the mixture provided the plasterer with “coarse stuff.” This mixture was applied in one or two layers to build up the wall thickness. But the best plaster was done with three coats. The first two coats made up the coarse stuff; they were the scratch coat and the brown coat. The finish plaster, called “setting stuff,” contained a much higher proportion of lime putty, little aggregate, and no fiber, and gave the wall a smooth white surface finish.
Compared to the 3/8-inch-thick layers of the scratch and brown coats, the finish coat was a mere 1/8-inch thick. Additives were used for various finish qualities. For example, fine white sand was mixed in for a “float finish.” This finish was popular in the early 1900s. (If the plasterer raked the sand with a broom, the plaster wall would retain swirl marks or stipples.) Or marble dust was added to create a hard-finish white coat which could be smoothed and polished with a steel trowel. Finally, a little plaster of Paris, or “gauged stuff,” was often added to the finish plaster to accelerate the setting time.
Although lime plaster was used in this country until the early 1900s, it had certain disadvantages. A plastered wall could take more than a year to dry; this delayed painting or papering. In addition, bagged quick lime had to be carefully protected from contact with air, or it became inert because it reacted with ambient moisture and carbon dioxide. Around 1900, gypsum began to be used as a plastering material.
Skim a thin coat of plaster over the repair. Alex and Wendy Santantonio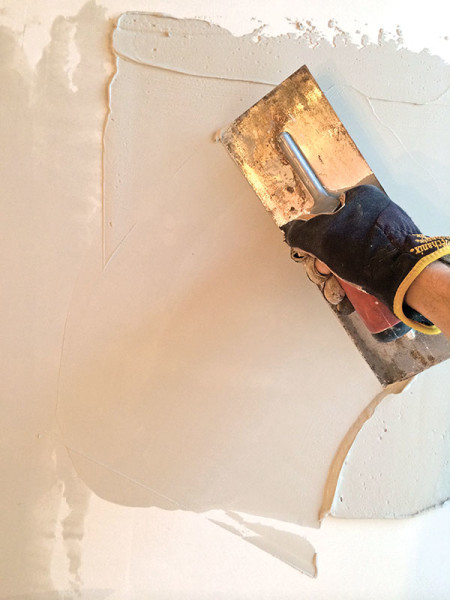
Gypsum Plaster
Gypsum begins to cure as soon as it is mixed with water. It sets in minutes and completely dries in two to three weeks. Historically, gypsum made a more rigid plaster and did not require a fibrous binder. However it is difficult to tell the difference between lime and gypsum plaster once the plaster has cured.
Despite these desirable working characteristics, gypsum plaster was more vulnerable to water damage than lime. Lime plasters had often been applied directly to masonry walls (without lathing), forming a suction bond. They could survive occasional wind-driven moisture or water winking up from the ground. Gypsum plaster needed protection from water. Furring strips had to be used against masonry walls to create a dead air space. This prevented moisture transfer.
In rehabilitation and restoration projects, one should rely on the plasterer’s judgment about whether to use lime or gypsum plaster. In general, gypsum plaster is the material plasterers use today. Different types of aggregate may be specified by the architect such as clean river sand, perlite, pumice, or vermiculite; however, if historic finishes and textures are being replicated, sand should be used as the base-coat aggregate. Today, if fiber is required in a base coat, a special gypsum is available which includes wood fibers. Lime putty, mixed with about 35 percent gypsum (gauging plaster) to help it harden, is still used as the finish coat.
Lath
Lath provided a means of holding the plaster in place. Wooden lath was nailed at right angles directly to the structural members of the buildings (the joists and studs), or it was fastened to nonstructural spaced strips known as furring strips. Three types of lath can be found on historic buildings.
Wood Lath. Wood lath is usually made up of narrow, thin strips of wood with spaces in between. The plasterer applies a slight pressure to push the wet plaster through the spaces. The plaster slumps down on the inside of the wall, forming plaster “keys.” These keys hold the plaster in place.
Metal Lath. Metal lath, patented in England in 1797, began to be used in parts of the United States toward the end of the 19th century. The steel making up the metal lath contained many more spaces than wood lath had contained. These spaces increased the number of keys; metal lath was better able to hold plaster than wood lath had been.
Rock Lath. A third lath system commonly used was rock lath (also called plaster board or gypsum-board lath). In use as early as 1900, rock lath was made up of compressed gypsum covered by a paper facing. Some rock lath was textured or perforated to provide a key for wet plaster. A special paper with gypsum crystals in it provides the key for rock lath used today; when wet plaster is applied to the surface, a crystalline bond is achieved.
Rock lath was the most economical of the three lathing systems. Lathers or carpenters could prepare a room more quickly. By the late 1930s, rock lath was used almost exclusively in residential plastering.
Common Plaster Problems
When plaster dries, it is a relatively rigid material which should last almost indefinitely. However, there are conditions that cause plaster to crack, effloresce, separate, or become detached from its lath framework. These include:
- Structural Problems
- Poor Workmanship
- Improper Curing
- Moisture
- Structural Problems
Overloading. Stresses within a wall, or acting on the house as a whole, can create stress cracks. Appearing as diagonal lines in a wall, stress cracks usually start at a door or window frame, but they can appear anywhere in the wall, with seemingly random starting points .
Builders of now-historic houses had no codes to help them size the structural members of buildings. The weight of the roof, the second and third stories, the furniture, and the occupants could impose a heavy burden on beams, joists, and studs. Even when houses were built properly, later remodeling efforts may have cut in a doorway or window without adding a structural beam or “header” across the top of the opening. Occasionally, load-bearing members were simply too small to carry the loads above them. Deflection or wood “creep” (deflection that occurs over time) can create cracks in plaster.
Overloading and structural movement (especially when combined with rotting lath, rusted nails, or poor quality plaster) can cause plaster to detach from the lath. The plaster loses its key. When the mechanical bond with the lath is broken, plaster becomes loose or bowed. If repairs are not made, especially to ceilings, gravity will simply cause chunks of plaster to fall to the floor.
Settlement/Vibration. Cracks in walls can also result when houses settle. Houses built on clay soils are especially vulnerable. Many types of clay (such as montmorillonite) are highly expansive. In the dry season, water evaporates from the clay particles, causing them to contract. During the rainy season, the clay swells. Thus, a building can be riding on an unstable footing. Diagonal cracks running in opposite directions suggest that house settling and soil conditions may be at fault. Similar symptoms occur when there is a nearby source of vibration-blasting, a train line, busy highway, or repeated sonic booms.
Lath movement. Horizontal cracks are often caused by lath movement. Because it absorbs moisture from the air, wood lath expands and contracts as humidity rises and falls. This can cause cracks to appear year after year. Cracks can also appear between rock lath panels. A nail holding the edge of a piece of lath may rust or loosen, or structural movement in the wood framing behind the lath may cause a seam to open. Heavy loads in a storage area above a rock-lath ceiling can also cause ceiling cracks.
Errors in initial building construction such as improper bracing, poor corner construction, faulty framing of doors and windows, and undersized beams and floor joists eventually “telegraph” through to the plaster surface.
For corners, use a joint knife to spread the compound right into the corner and then pull away from it. 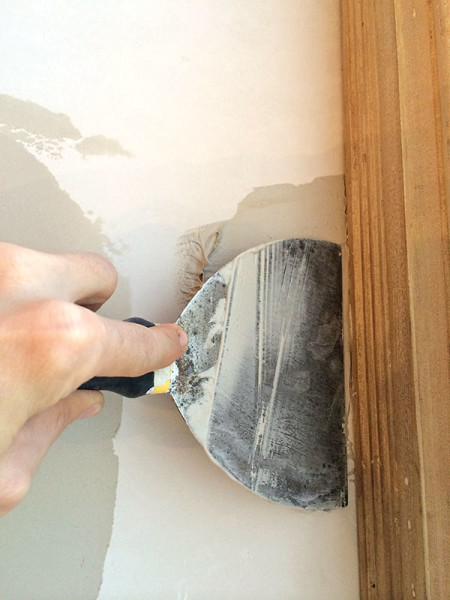
Poor Workmanship
In addition to problems caused by movement or weakness in the structural framework, plaster durability can be affected by poor materials or workmanship.
Poorly proportioned mix. The proper proportioning and mixing of materials are vital to the quality of the plaster job. A bad mix can cause problems that appear years later in a plaster wall. Until recently, proportions of aggregate and lime were mixed on the job. A plasterer may have skimped on the amount of cementing material (lime or gypsum) because sand was the cheaper material. Over sanding can cause the plaster to weaken or crumble. Plaster made from a poorly proportioned mix may be more difficult to repair.
Incompatible base coats and finish coats. Use of perlite as an aggregate also presented problems. Perlite is a lightweight aggregate used in the base coat instead of sand. It performs well in cold weather and has a slightly better insulating value. But if a smooth lime finish coat was applied over perlited base coats on wood or rock lath, cracks would appear in the finish coat and the entire job would have to be redone. To prevent this, a plasterer had to add fine silica sand or finely crushed perlite to the finish coat to compensate for the dramatically differing shrinkage rates between the base coat and the finish coat.
Improper plaster application. The finish coat is subject to “chip cracking” if it was applied over an excessively dry base coat, or was insufficiently troweled, or if too little gauging plaster was used. Chip cracking looks very much like an alligatored paint surface. Another common problem is called map cracking–fine, irregular cracks that occur when the finish coat has been applied to an over sanded base coat or a very thin base coat.
Too much retardant. Retarding agents are added to slow down the rate at which plaster sets, and thus inhibit hardening. They have traditionally included ammonia, glue, gelatin, starch, molasses, or vegetable oil. If the plasterer has used too much retardant, however, a gypsum plaster will not set within a normal 20 to 30 minute time period. As a result, the surface becomes soft and powdery.
Inadequate plaster thickness. Plaster is applied in three coats over wood lath and metal lath–the scratch, brown, and finish coats. In three-coat work, the scratch coat and brown coat were sometimes applied on successive days to make up the required wall thickness. Using rock lath allowed the plasterer to apply one base coat and the finish coat–a two-coat job.
If a plasterer skimped on materials, the wall may not have sufficient plaster thickness to withstand the normal stresses within a building. The minimum total thickness for plaster on gypsum board (rock lath) is Æ inch. On metal lath the minimum thickness is 5/8 inch; and for wood lath it is about 3/4 to 7/8 inch. This minimum plaster thickness may affect the thickness of trim projecting from the wall’s plane.
Improper Curing
Proper temperature and air circulation during curing are key factors in a durable plaster job. The ideal temperature for plaster to cure is between 5570 degrees Fahrenheit. However, historic houses were sometimes plastered before window sashes were put in. There was no way to control temperature and humidity.
Dry outs, freezing, and sweat-routs. When temperatures were too hot, the plaster would return to its original condition before it was mixed with water, that is, calcined gypsum. A plasterer would have to spray the wall with alum water to reset the plaster. If freezing occurred before the plaster had set, the job would simply have to be redone. If the windows were shut so that air could not circulate, the plaster was subject to sweat-out or rot. Since there is no cure for rotted plaster, the affected area had to be removed and replastered.
Moisture
Plaster applied to a masonry wall is vulnerable to water damage if the wall is constantly wet. When salts from the masonry substrate come in contact with water, they migrate to the surface of the plaster, appearing as dry bubbles or efflorescence. The source of the moisture must be eliminated before replastering the damaged area.
Sources of Water Damage. Moisture problems occur for several reasons. Interior plumbing leaks in older houses are common. Roofs may leak, causing ceiling damage. Gutters and downspouts may also leak, pouring rain water next to the building foundation. In brick buildings, dampness at the foundation level can wick up into the above-grade walls. Another common source of moisture is splashback. When there is a paved area next to a masonry building, rainwater splashing up from the paving can dampen masonry walls. In both cases water travels through the masonry and damages interior plaster. Coatings applied to the interior are not effective over the long run. The moisture problem must be stopped on the outside of the wall.
Repairing Historic Plaster
Many of the problems described above may not be easy to remedy. If major structural problems are found to be the source of the plaster problem, the structural problem should be corrected. Some repairs can be made by removing only small sections of plaster to gain access. Minor structural problems that will not endanger the building can generally be ignored. Cosmetic damages from minor building movement, holes, or bowed areas can be repaired without the need for wholesale demolition. However, it may be necessary to remove deteriorated plaster caused by rising damp in order for masonry walls to dry out. Repairs made to a wet base will fail again.
Canvassing Uneven Wall Surfaces
Uneven wall surfaces, caused by previous patching or by partial wallpaper removal, are common in old houses. As long as the plaster is generally sound, cosmetically unattractive plaster walls can be “wallpapered” with strips of a canvas or fabric-like material. Historically, canvassing covered imperfections in the plaster and provided a stable base for decorative painting or wallpaper.
Filling Cracks
Hairline cracks in wall and ceiling plaster are not a serious cause for concern as long as the underlying plaster is in good condition. They may be filled easily with a patching material (see Patching Materials, page 13). For cracks that reopen with seasonal humidity change, a slightly different method is used. First the crack is widened slightly with a sharp, pointed tool such as a crack widener or a triangular can opener. Then the crack is filled. For more persistent cracks, it may be necessary to bridge the crack with tape. In this instance, a fiberglass mesh tape is pressed into the patching material. After the first application of a quick setting joint compound dries, a second coat is used to cover the tape, feathering it at the edges. A third coat is applied to even out the surface, followed by light sanding. The area is cleaned off with a damp sponge, then dried to remove any leftover plaster residue or dust.
When cracks are larger and due to structural movement, repairs need to be made to the structural system before repairing the plaster. Then, the plaster on each side of the crack should be removed to a width of about 6 inches down to the lath. The debris is cleaned out, and metal lath applied to the cleared area, leaving the existing wood lath in place. The metal lath usually prevents further cracking. The crack is patched with an appropriate plaster in three layers (i.e., base coats and finish coat). If a crack seems to be expanding, a structural engineer should be consulted.
Replacing Delaminated Areas of the Finish Coat
Sometimes the finish coat of plaster comes loose from the base coat. In making this type of repair, the plasterer paints a liquid plaster-bonding agent onto the areas of base-coat plaster that will be replastered with a new lime finish coat. A homeowner wishing to repair small areas of delaminated finish coat can use the methods described in “Patching Materials.”
Patching Holes in Walls
For small holes (less than 4 inches in diameter) that involve loss of the brown and finish coats, the repair is made in two applications. First, a layer of base coat plaster is troweled in place and scraped back below the level of the existing plaster. When the base coat has set but not dried, more plaster is applied to create a smooth, level surface. One-coat patching is not generally recommended by plasterers because it tends to produce concave surfaces that show up when the work is painted. Of course, if the lath only had one coat of plaster originally, then a one-coat patch is appropriate.
For larger holes where all three coats of plaster are damaged or missing down to the wood lath, plasterers generally proceed along these lines. First, all the old plaster is cleaned out and any loose lath is re-nailed. Next, a water mist is sprayed on the old lath to keep it from twisting when the new, wet plaster is applied, or better still, a bonding agent is used. To provide more reliable keying and to strengthen the patch, expanded metal lath (diamond mesh) should be attached to the wood lath with tie wires or nailed over the wood lath with lath nails. The plaster is then applied in three layers over the metal lath, lapping each new layer of plaster over the old plaster so that old and new are evenly joined. This stepping is recommended to produce a strong, invisible patch. Also, if a patch is made in a plaster wall that is slightly wavy, the contour of the patch should be made to conform to the irregularities of the existing work. A flat patch will stand out from the rest of the wall.
Patching Holes in Ceilings
Hairline cracks and holes may be unsightly, but when portions of the ceiling come loose, a more serious problem exists. The keys holding the plaster to the ceiling have probably broken. First, the plaster around the loose plaster should be examined. Keys may have deteriorated because of a localized moisture problem, poor quality plaster, or structural overloading; yet, the surrounding system may be intact. If the areas surrounding the loose area are in reasonably good condition, the loose plaster can be reattached to the lath using flathead wood screws and plaster washers. To patch a hole in the ceiling plaster, metal lath is fastened over the wood lath; then the hole is filled with successive layers of plaster, as described above.
Establishing New Plaster Keys
If the back of the ceiling lath is accessible (usually from the attic or after removing floor boards), small areas of bowed-out plaster can be pushed back against the lath. A padded piece of plywood and braces are used to secure the loose plaster. After dampening the old lath and coating the damaged area with a bonding agent, a fairly liquid plaster mix (with a glue size retardant added) is applied to the backs of the lath, and worked into the voids between the faces of the lath and the back of the plaster. While this first layer is still damp, plaster-soaked strips of jute scrim are laid across the backs of the lath and pressed firmly into the first layer as reinforcement. The original lath must be secure, otherwise the weight of the patching plaster may loosen it.
Loose, damaged plaster can also be re-keyed when the goal is to conserve decorative surfaces or wallpaper. Large areas of ceilings and walls can be saved. This method requires the assistance of a skilled conservator–it is not a repair technique used by most plasterers. The conservator injects an acrylic adhesive mixture through holes drilled in the face of the plaster (or through the lath from behind, when accessible). The loose plaster is held firm with plywood bracing until the adhesive bonding mixture sets. When complete, gaps between the plaster and lath are filled, and the loose plaster is secure.
For finish coats, patching compound is OK for small areas, but finish plaster is preferred for large holes. Do your best to match the overall character, as a patch that’s too rough—or too smooth—may be obvious under paint.
Replastering Over the Old Ceiling
If a historic ceiling is too cracked to patch or is sagging (but not damaged from moisture), plasterers routinely keep the old ceiling and simply relate and replaster over it. This repair technique can be used if lowering the ceiling slightly does not affect other ornamental features. The existing ceiling is covered with 1×3-inch wood furring strips, one to each joist, and fastened completely through the old lath and plaster using a screw gun. Expanded metal lath or gypsum board lath is nailed over the furring strips. Finally, two or three coats are applied according to traditional methods. Replastering over the old ceiling saves time, creates much less dust than demolition, and gives added fire protection.
When Damaged Plaster Cannot be Repaired-Replacement Options
Partial or complete removal may be necessary if plaster is badly damaged, particularly if the damage was caused by long-term moisture problems. Workers undertaking demolition should wear OSHA-approved masks because the plaster dust that flies into the air may contain decades of coal soot. Lead, from lead based paint, is another danger. Long-sleeved clothing and head-and-eye protection should be worn. Asbestos, used in the mid-twentieth century as an insulating and fireproofing additive, may also be present and OSHA-recommended precautions should be taken. If plaster in adjacent rooms is still in good condition, walls should not be pounded–a small trowel or pry bar is worked behind the plaster carefully in order to pry loose pieces off the wall.
When the damaged plaster has been removed, the owner must decide whether to replaster over the existing lath or use a different system. This decision should be based in part on the thickness of the original plaster and the condition of the original lath. Economy and time are also valid considerations. It is important to ensure that the wood trim around the windows and doors will have the same “reveal” as before. (The “reveal” is the projection of the wood trim from the surface of the plastered wall). A lath and plaster system that will give this required depth should be selected.
Replastering–Alternative Lath Systems for New Plaster
Replastering old wood lath. When plasterers work with old lath, each lath strip is re-nailed and the chunks of old plaster are cleaned out. Because the old lath is dry, it must be thoroughly soaked before applying the base coats of plaster, or it will warp and buckle; furthermore, because the water is drawn out, the plaster will fail to set properly. As noted earlier, if new metal lath is installed over old wood lath as the base for new plaster, many of these problems can be avoided and the historic lath can be retained. The ceiling should still be sprayed unless a vapor barrier is placed behind the metal lath.
Replastering over new metal lath. An alternative to reusing the old wood lath is to install a different lathing system. Galvanized metal lath is the most expensive, but also the most reliable in terms of longevity, stability, and proper keying. When lathing over open joists, the plasterer should cover the joists with kraft paper or a polyethylene vapor barrier. Three coats of wet plaster are applied consecutively to form a solid, monolithic unit with the lath. The scratch coat keys into the metal lath; the second, or brown, coat bonds to the scratch coat and builds the thickness; the third, or finish coat, consists of lime putty and gauging plaster.
Replastering over new rock lath. It is also possible to use rock lath as a plaster base. Plasterers may need to remove the existing wood lath to maintain the woodwork’s reveal. Rock lath is a 16×36-inch, 1/2-inch thick, gypsum-core panel covered with absorbent paper with gypsum crystals in the paper. The crystals in the paper bond the wet plaster and anchor it securely. This type of lath requires two coats of new plaster–the brown coat and the finish coat. The gypsum lath itself takes the place of the first, or scratch, coat of plaster.
The kitchen is a new room with plaster rather than stone walls. Donna Genova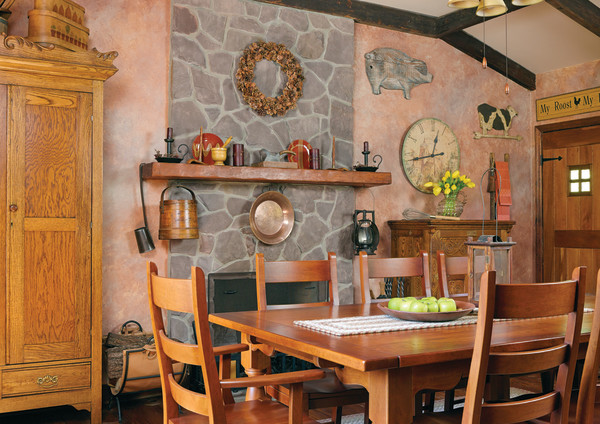
Painting New Plaster
The key to a successful paint job is proper drying of the plaster. Historically, lime plasters were allowed to cure for at least a year before the walls were painted or papered. With modern ventilation, plaster cures in a shorter time; however, fresh gypsum plaster with a lime finish coat should still be perfectly dry before paint is applied–or the paint may peel. (Plasterers traditionally used the “match test” on new plaster. If a match would light by striking it on the new plaster surface, the plaster was considered dry.) Today it is best to allow new plaster to cure two to three weeks. A good alkaline-resistant primer, specifically formulated for new plaster, should then be used. A compatible latex or oil-based paint can be used for the final coat.
A Modern Replacement System
Veneer Plaster. Using one of the traditional lath and plaster systems provides the highest quality plaster job. However, in some cases, budget and time considerations may lead the owner to consider a less expensive replacement alternative. Designed to reduce the cost of materials, a more recent lath and plaster system is less expensive than a two-or-three coat plaster job, but only slightly more expensive than drywall. This plaster system is called veneer plaster.
The system uses gypsum-core panels that are the same size as drywall (4×8 feet), and specially made for veneer plaster. They can be installed over furring channels to masonry walls or over old wood lath walls and ceilings. Known most commonly as “blue board,” the panels are covered with a special paper compatible with veneer plaster. Joints between the 4-foot wide sheets are taped with fiberglass mesh, which is bedded in the veneer plaster. After the tape is bedded, a thin, 1/16-inch coat of high-strength veneer plaster is applied to the entire wall surface. A second veneer layer can be used as the “finish” coat, or the veneer plaster can be covered with a gauged lime finish-coat–the same coat that covers ordinary plaster.
Although extremely thin, a two-coat veneer plaster system has a 1,500 psi rating and is thus able to withstand structural movements in a building or surface abrasion. With either a veneer finish or a gauged lime putty finish coat, the room will be ready for painting almost immediately. When complete, the troweled or textured wall surface looks more like traditional plaster than drywall.
The thin profile of the veneer system has an added benefit, especially for owners of uninsulated masonry buildings. Insulation can be installed between the pieces of furring channel used to attach blue board to masonry walls. This can be done without having to fur out the window and door jambs. The insulation plus the veneer system will result in the same thickness as the original plaster. Occupants in the rooms will be more comfortable because they will not be losing heat to cold wall surfaces.
Patching Materials
Plasterers general use ready-mix base-coat plaster for patching, especially where large holes need to be filled. The ready-mix plaster contains gypsum and aggregate in proper proportions. The plasterer only needs to add water.
Another mix plasterers use to patch cracks or small holes, or for finish-coat repair, is a “high gauge” lime putty (50 percent lime; 50 percent gauging plaster). This material will produce a white, smooth patch. It is especially suitable for surface repairs.
Although property owners cannot duplicate the years of accumulated knowledge and craft skills of a professional plasterer, there are materials that can be used for do-it-yourself repairs. For example, fine cracks can be filled with an all-purpose drywall joint compound. For bridging larger cracks using fiberglass tape, a homeowner can use a “quicksetting” joint compound. This compound has a fast drying time–60, 90, or 120 minutes. Quick-setting joint compound dries because of a chemical reaction, not because of water evaporation. It shrinks less than all-purpose joint compound and has much the same workability as ready-mix base-coat plaster. However, because quick-set joint compounds are hard to sand, they should only be used to bed tape or to fill large holes. All-purpose point compound should be used as the final coat prior to sanding.
Homeowners may also want to try using a ready-mix perlited base-coat plaster for scratch and brown coat repair. The plaster can be hand-mixed in small quantities, but bagged ready-mix should be protected from ambient moisture. A “millmixed pre-gauged” lime finish coat plaster can also be used by homeowners. A base coat utilizing perlite or other lightweight aggregates should only be used for making small repairs (less than 4 ft. patches). For large-scale repairs and entire room replastering, see the precautions in Table 1 for using perlite.
Homeowners may see a material sold as “patching plaster” or “plaster of Paris” in hardware stores. This dry powder cannot be used by itself for plaster repairs. It must be combined with lime to create a successful patching mixture.
When using a lime finish coat for any repair, wait longer to paint, or use an alkaline-resistant primer.
Plaster with cracks. Bill Bradbury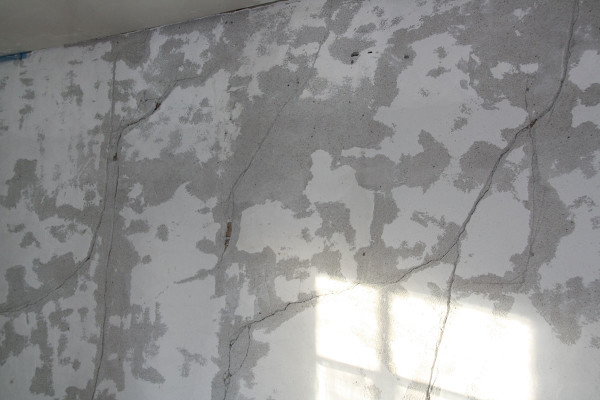
Summary
The National Park Service recommends retaining historic plaster if at all possible. Plaster is a significant part of the “fabric” of the building. Much of the building’s history is documented in the layers of paint and paper found covering old plaster. For buildings with decorative painting, conservation of historic flat plaster is even more important. Consultation with the National Park Service, with State Historic Preservation Officers, local preservation organizations, historic preservation consultants, or with the Association for Preservation Technology is recommended. Where plaster cannot be repaired or conserved using one of the approaches outlined in this Brief, documentation of the layers of wallpaper and paint should be undertaken before removing the historic plaster. This information may be needed to complete a restoration plan.
Plaster Terms
Scratch coat. The first base coat put on wood or metal lath. The wet plaster is “scratched” with a scarifier or comb to provide a rough surface so the next layer of base coat will stick to it.
Brown coat. The brown coat is the second application of wet, base-coat plaster with wood lath or metal systems. With gypsum board lath (rock lath, plasterboard), it is the only base coat needed.
Finish coat. Pure lime, mixed with about 35 percent gauging plaster to help it harden, is used for the very thin surface finish of the plaster wall. Fine sand can be added for a sanded finish coat.
Casing Bead. Early casing bead was made of wood. In the 19th century, metal casing beads were sometimes used around fireplace projections, and door and window openings. Like a wood ground, they indicate the proper thickness for the plaster.
Corner Bead. Wire mesh with a rigid metal spline used on
Outside corners. Installing the corner bead plumb is important.
Cornerite. Wire mesh used on inside corners of adjoining walls and ceilings. It keeps corners from cracking.
Ground. Plasterers use metal or wood strips around the edges of doors and windows and at the bottom of walls. These grounds help keep the plaster the same thickness and provide a stopping edge for the plaster. Early plaster work, however, did not use grounds. On early buildings, the woodwork was installed and primed before plastering began. Some time in the early 19th century, a transition occurred, and plasterers applied their wall finish before woodwork was installed.
Gypsum. Once mined from large gypsum quarries near Paris (thus the name plaster of Paris), gypsum in its natural form is calcium sulfate. When calcined (or heated), one-and-a-half water molecules are driven off, leaving a hemi-hydrate of calcium sulfate. When mixed with water, it becomes calcium sulfate again. While gypsum was used in base-coat plaster from the 1890s on, it has always been used in finish coat and decorative plaster. For finish coats, gauging plaster was added to lime putty; it causes the lime to harden. Gypsum is also the ingredient in moulding plaster, a finer plaster used to create decorative moldings in ornamental plaster work.
Lime. Found in limestone formations or shell mounds, naturally occurring lime is calcium carbonate. When heated, it becomes calcium oxide. After water has been added, it becomes calcium hydroxide. This calcium hydroxide reacts with carbon dioxide in the air to recreate the original calcium carbonate.
Screed. Screeds are strips of plaster run vertically or horizontally on walls or ceilings. They are used to plumb and straighten uneven walls and level ceilings. Metal screeds are used to separate different types of plaster finishes or to separate lime and cement plasters.


