

In locales like Nantucket and Charleston, where houses were built right on public sidewalks, turning the stoop so that it opens to the side is an elegant solution, permitting a landing wider than the door. Brian Vanden Brink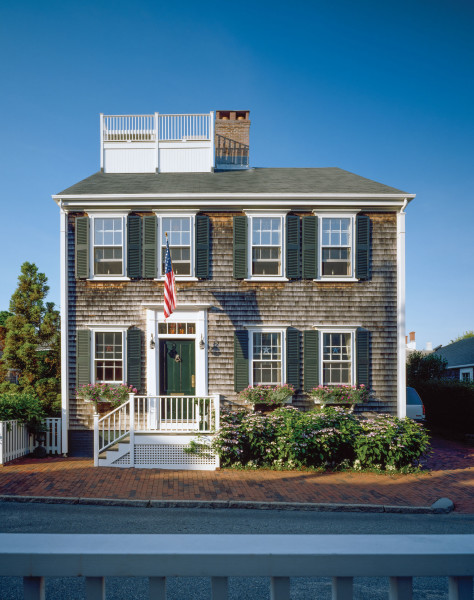
The landing pad between house and front walk or city sidewalk, a “stoop” may be as small as a single step to the front door of a country farmhouse, or as tall and imposing as the stone steps leading to the parlor floor of a Brooklyn brownstone. The word “stoop” comes the Dutch term for “step,” and has become a handy moniker for all sorts of structures that provide access to the house or porch.
A single step would have sufficed—but this low, welcoming stoop becomes an Arts & Crafts-period porch with the addition of built-in benches and an arched trellis. Brian Vanden Brink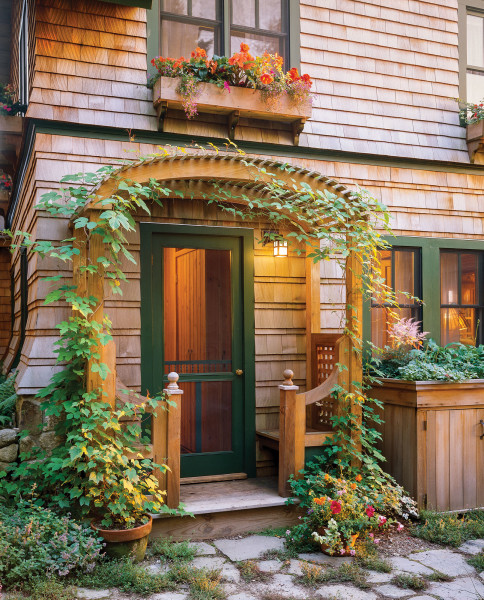
Guidelines for Stoop Construction
At a minimum, a stoop consists of a single step of natural stone, poured concrete, concrete block or other masonry, or wood. The most historical materials are stone and wood, with concrete becoming more prevalent in the 20th century. For comfort and safety, make the stoop wider than the door. Any stoop with three or more steps should be securely anchored to the house, have at least one railing or side wall, and terminate in a landing in front of the door. Taller stoops should have railings on both sides. A wood stoop with multiple steps should rest on a poured concrete pad or piers, so that no wood touches the ground.
This partially completed project shows the location of stringers that support the steps and risers. The builder, Bill Cigliano, back-paints every scrap of wood and he added two extra stringers for additional support. “I try not to have a span of more than 2′ between stringers because you get too much bounce,” he says. 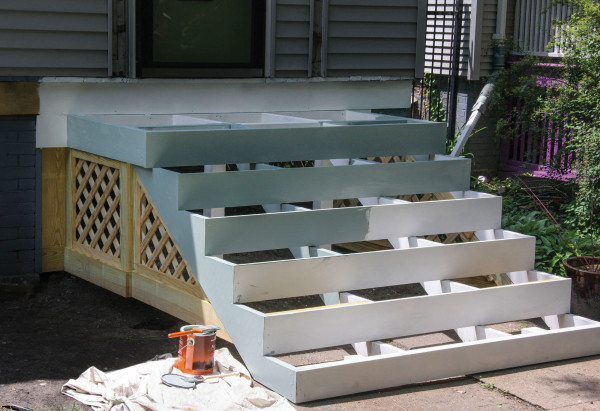
Building a Wood Stoop
Constructing a stoop from durable lumber requires basic carpentry skills, a knowledge of porch mechanics, and a bit of math.
Calculating Rise and Run
First, some terminology: The treads are the horizontal walking surfaces of the steps. In a stoop made from lumber, treads rest on or are rabbeted into stringers, the inclined boards on either side of the stoop. (In masonry construction, wood forms take the place of stringers; in both cases, stringers help define the three-dimensional look of the stoop.)
The vertical distance between one tread and the next is called the unit rise. For exterior steps, a comfortable rise from step to step is about 7″ to 7 ½”. The tread depth, or its horizontal travel, is called the unit run. In exterior steps, the depth of the tread should be deeper than the distance between treads—at least 11″. No matter what the measurements, each step should be the same height and depth as the others. Otherwise, it confuses the user and becomes a trip hazard.
One way to calculate the proportional relationship between the rise and run is to add twice the run to the rise. The number should equal 25″ to 27″. With a rise of 7″, for example, subtracting 14″ from the low figure (25″) produces a run of 11″.
The finished stoop for a turn-of-the-century house in the Chicago area includes shaped railings with period newel posts, a wide landing, and triple treads cut from 2″ x 12″ stock. Using three treads produces superior drainage, and is comfortable for stoop sitting. 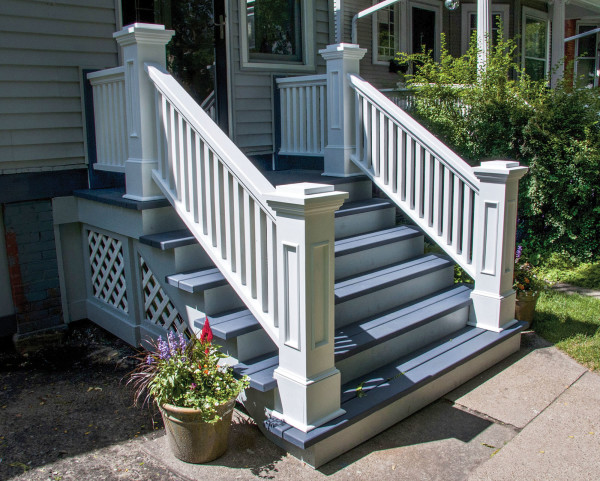
Another formula says that the sum of the unit rise and unit run should be about 17 ½”. Using this method and the same 7″ rise, the run would then be 10 ½”, roughly the same as the first sum.
Both formulas produce approximate figures, reflecting the need to tweak the numbers to accommodate conditions on site. For example, suppose the total rise—the distance between the ground and the porch landing—is 61″. Dividing 61″ by the 7″ unit rise equals about 8, which becomes the number of treads. Since steps don’t come in fractions, dividing 61″ by 8 yields a unit rise of 7 5/8″, a figure that’s easy to measure whether the work is done in wood or masonry. To figure the total unit run, multiply the number of steps by either 10 ½” or 11″, depending on the formula used. This should produce deep steps with a gradual rise ideal
for an entry stoop.
Once you’ve arrived at these figures, determine the pitch line. Sometimes called the rake of the stairs, the pitch line is the imaginary line that runs from the base of the steps along the tip of the tread nosing to the top of the run. Pitch lines are usually specified by code; a comfortable pitch line falls between 26 and 33 degrees. (Since this is an imaginary line, it can be tested while laying out the first stringer.)
It should go without saying that all steps should be level as well as consistent in height. It’s also critical that the stoop not direct water to the house. If the ground below what will become the bottom step isn’t level, take measurements at several points from house to ground along the pitch line and average them. Better yet, level the ground before beginning work on the stoop.
The treads on this wide, graceful stoop are much deeper than the risers are tall, making for easy walking. Measurements for every step must be uniform to avoid a tripping hazard. Chipper Hatter
Treads and Risers
Popular tread options for exterior steps include configurations with single, double, and triple boards per step. The front board should have a “nose” to help it shed water. Cut the treads from 2″ x 12″ stock, and locate them at least 3/8″ from posts or other vertical lumber for air clearance and drainage. Use galvanized or treated deck screws as fasteners.
The advantage of double- or triple-board treads is that they drain water more quickly and they’re less likely to cup than single-board, full-depth treads. It’s standard practice to leave a ¼” gap between each board of a double or triple tread for drainage. If using risers, leave a gap of ¼” wherever the tread meets the riser, for ventilation and drainage.
Should you need to make any adjustments to account for variations on the ground, make up the difference on the bottom step. It’s OK if it’s slightly lower than the rest of the steps, provided the others are uniform in terms of rise. Be sure to leave a gap of at least 1/8″ between the ground and the bottom of the first riser.
Illustration of properly proportioned porch steps. Rob Leanna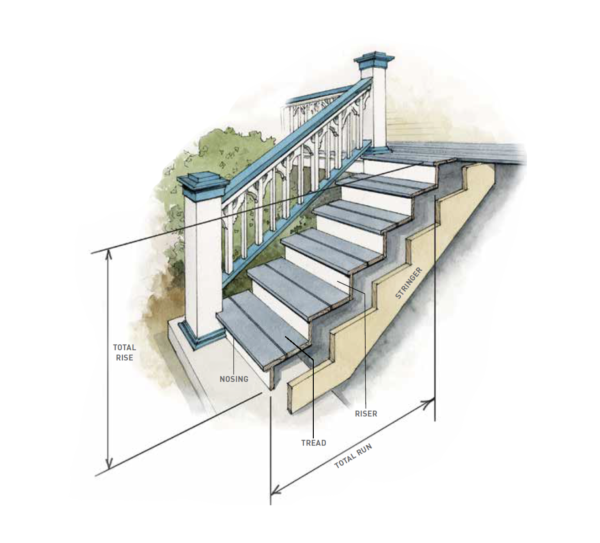
Planning a stoop
A cutaway layout for a set of porch steps shows the location of treads, risers, and supporting stringers in relation to one another. Steps and risers are uniform. The bottom step and supporting stringer rest on a concrete pad; the top of the stringer engages the house beneath the landing.
Step Terms
nosing The projection of a tread beyond the riser, usually rounded.
pitch line An imaginary line that runs at an angle along the front of the nosings of the treads.
riser The vertical element of the step between treads.
run The total horizontal travel of a staircase or steps.
stringer Inclined side member that serves as both carriage and face, also called a horse. Open stringers are more common than routed, closed stringers for porch steps.
tread The horizontal top of a step.
unit rise The vertical distance between one tread and the next.
unit run Depth of a tread (distance of travel per step) excluding nosing.
Cutting the Stringers
Once you have all the rise and run measurements, use them to mark out the first stringer. For open stringers: Choose a 2″ x 12″ piece of rot-resistant red cedar, pressure-treated pine, or redwood with as few knots as possible. The stringer should follow the desired pitch line of the stair, and the cuts will follow in zigzag fashion to follow the rise and depth of each step.
• Lay out the cuts by placing a framing square on the stringer board; mark and check the positions of all before making any cuts. Align the blade and tongue of the framing square so that the rise and run dimensions fall on the edges of the stock. Once you’ve marked the first planned cuts, slide the square along to lay out the next, taking care to mark each step accurately.
• Leave a foot or two of extra stock at both the top and bottom ends of the stringer. You won’t know exactly where and how the ends will be cut until you determine where the stringer will land. The top anchor may require another 18″ of stringer, for example, if it continues under the porch. If the foot lands on a finished surface such as a poured concrete pad, the bottom riser will have to be “dropped” by the thickness of a tread to keep the stairs consistent.
• Use the first stringer to mark cuts for the second outside stringer and any additional stringers to support the stair carriage. As a rule of thumb, use one stringer for every 2′ of span. Before laying the treads, use a level and check in several places to make sure the base for your new stoop is square and level.
Concrete steps work well for stoops, especially in forgiving climates like southern California. Poured correctly, leveled, and back-filled with stone, gravel, or concrete block—not soil—they’ll last for decades. Jaimee Itagaki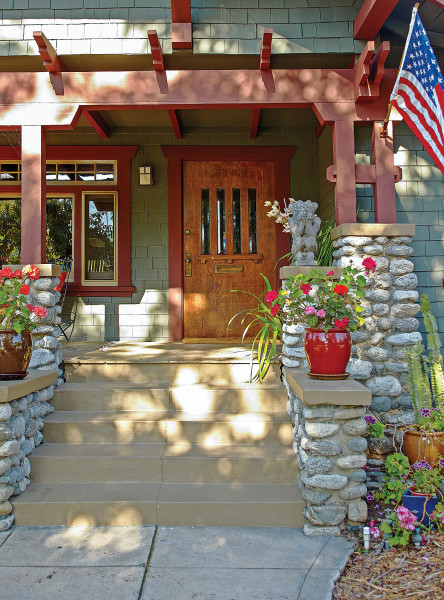
Rails & Posts
New stoops that rise 30″ or more off the ground must comply with building codes regarding rail height, typically about 34″ to 36″ from the front of the tread. If any parts of a stoop that is original to the house are still present, by all means use them as a template for rebuilding, especially with architecturally important components such as top rails, spindles, and post caps.
You’re in luck if there’s an existing concrete platform underneath what will be the bottom of the stair run. If it’s in good condition, use it as a support for the bottom posts. Anchor the posts to the concrete with concrete screws. If the slab is missing or in poor condition, remove it and pour a new slab. It’s important that the post at the bottom of the stoop not directly touch the ground. If there isn’t a concrete pad, pour concrete piers to support the stoop posts. (A Sonotube collar works well for this.) Place a 4″ x ½” bolt in the middle while the concrete is still wet. After the concrete has cured for a day or two, slip a galvanized post base over the bolt and fasten with a washer and nut. Slide on the new post, making sure that it rests at least 1″ above ground level.
A simple two-step granite stoop at a Georgian entry is beautifully proportioned. Peter Lewitt
Anchoring and Skirting
To anchor a stoop with multiple steps to the house, fasten a 2″ x 8″ board to the faceplate below the door with large galvanized deck screws. Reinforce the bottom of the steps with a 2″ x 8″ board that runs between the exterior stringers. Butt any interior stringers into this support. To conceal open areas underneath the stoop but allow for ventilation, add skirting. A skirting apron is typically composed of latticed panels that are hung or hinged to the framing. Lay a bed of crushed stone underneath to keep wood from touching the ground.
The Pro Tip Looking for clues to what the steps originally looked like? If there’s no evidence at your house, look around the neighborhood for homes with original steps still in place. Take into consideration the type of construction (wood or brick, for instance) and whether one material—concrete, wood, brick—dominates.
The finished cap is made from cedar that’s been allowed to air dry for several months. Trim mouldings are cut from PVC composite and back-caulked to give them greater longevity. Bill Cigliano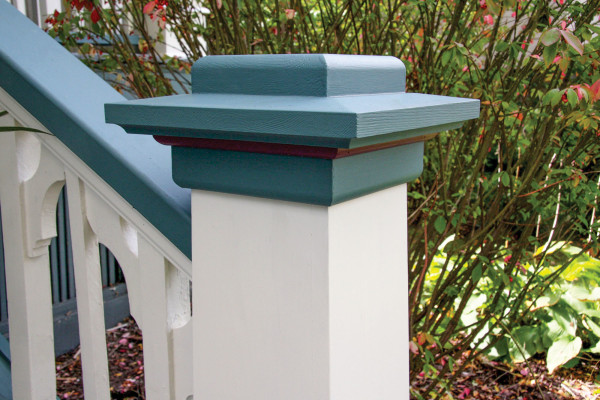
Newel Posts
When Chicago-area carpenter Bill Cigliano rebuilt the porch and stoop on his 1907 home, he milled new rails and balusters to match the originals from Red Grandis, a sustainable, tropical wood similar to mahogany. While new posts can be milled from a single piece of lumber, it’s difficult to get quality stock that will hold up to exposure from wind, snow, and rain. “Most of the newel posts I repair rot from the inside out,” Cigliano says.
Bill Cigliano’s post caps are always beveled to direct water away from the wood. He draws newel post details to scale before constructing them, often giving owners two or three different profiles to choose from. 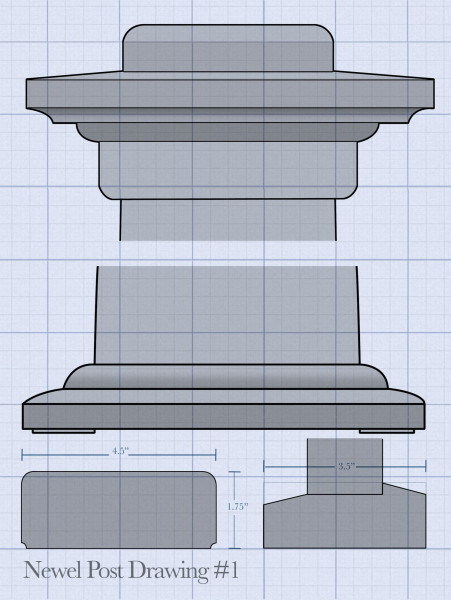
That’s one reason he builds his posts as 4″ x 4″ boxes of pressure-treated pine mitered and glued together at the corners, then slips them over a galvanized post base. He finds that treated pine is harder than cedar and less prone to cracking. All wood is back-painted (primed with oil-based paint on all sides) to protect it against moisture. He also staples ¼” PVC shims to the bottom of each post to prevent any wood from wicking up moisture from the ground.
Cigliano air dries clear, knot-free cedar stock for post caps in his workshop before milling them into shape. For shaped mouldings, he uses a PVC that won’t shrink or swell, such as AZEK, then caulks behind them to ensure low maintenance and longevity.


