

There is probably no tool that has changed the speed and ease of trim work in homes more than the nail gun. Not only does it speed up the initial installation of trim, but it also simultaneously sets nail heads below the surface in the same action that drives the nail, a task that would require an extra step if done by hand. Additionally, nail guns offer singlehanded operation, freeing up a hand to hold trim in place. Professional finish carpenters most often use pneumatic nailers with portable air compressors, but in recent years, the compressor has become less of a requirement.
Cordless nail guns were at first powered by gas cartridges, but these could be loud and smelly. The first battery-powered nailers were quieter and produced no odor, but were heavy and bulky. Today, this technology has been refined, and many battery-powered finish nailers are as light as pneumatic tools, without requiring a noisy air compressor or the awkwardness of dragging a hose around.
Finish nailers come in several sizes, specified by the gauge of the nail, from larger 15-gauge “finish nails” down to 18-gauge “brads.” If you’re looking for one all-around trim nailer, the middling 16-gauge size is probably your best bet. These guns can shoot finish nails ranging in lengths from ¾” to 2½” and can tackle most finish carpentry tasks. They’re available with either straight or angled magazines; straight is the most common, and as a result, nails are easier to find and less expensive. But if this is your only nail gun, you may appreciate the angled magazine, as it allows the nose of the tool to fit into tighter corners.
Head to Head Test
Senco F-16S
With its slim profile and rubberized grip, the Senco got high marks for comfort. The streamlined nose took some getting used to, but “allows for the best sighting of nail placement in the group,” said our expert, Brian Campbell. The redesigned magazine—nails are side-loaded into a tray—also threw some for a loop at first, but ultimately facilitated easier jam clearing. While the Senco fired nails into softwoods with ease, hardwoods like oak and maple gave it some trouble.
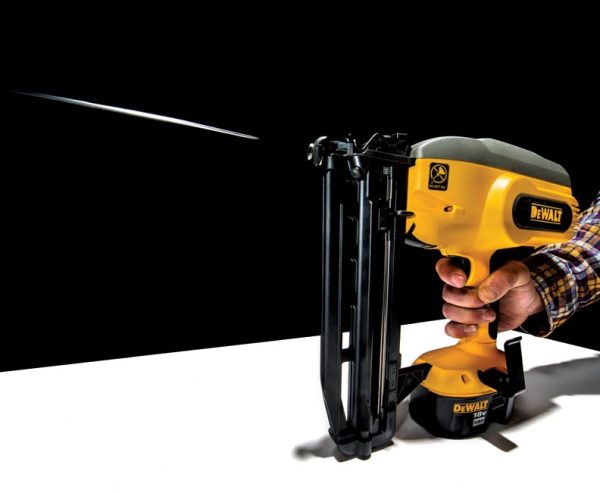
DeWalt DC616
The DeWalt nailer won praise for its intuitively designed mechanism, depth-of-drive adjustment, and switch between sequential and bump modes: “I didn’t need to look at the manual at all to use this tool,” said DIYer Jude Herr. Other testers lauded its good sight lines and responsive trigger. At 8½ pounds, weight was this nailer’s main drawback, but testers noted that the extra bulk did help cushion recoil. Like other nailers in this test, the DeWalt struggled with hardwoods.
Bostitch GFN1664
The lightest-weight tool in the bunch, the Bostitch “felt the most like a traditional air-powered gun,” said DIYer Juan Aviles. Its comfortable grip and ability to set nails in all but the hardest woods won raves, but its dual-fuel design (which relies on a supplementary gas cartridge) was divisive—some felt that the smell and hassle of the gas cartridge outweighed the tool’s positive attributes, while others considered it a minor inconvenience.
Bosch FNH180-16
Our testers liked the Bosch nailer for its accuracy and easy-to-use jam-clearing mechanism. It made easy work of softwoods, but “lacks to fully set nails with regularity in hardwoods,” Campbell said. The trigger’s lengthy delay turned off some testers, and others found that the mechanism made it awkward to switch between nail sizes. But with a well-balanced design, angled magazine, and extra features like a no-mar tip, this nailer earned fairly high marks across our testing group.
Pro Tip
Treat a finish nailer as if it were a loaded gun—that’s essentially what it is. Keep your free hand as far away from the tip of the nailer as practical. Never point the nailer in the direction of other people, and don’t walk with your finger on the trigger. Always wear safety glasses, and remove the battery before clearing a jammed nail.
–Brian Campbell, Carpenter
How To Use It
As a safety precaution, always remove the battery before loading nails. After nails are loaded in the back of the magazine, the spring-loaded “pusher” is pulled back and engages with the back of the clip to feed nails to the firing head.
The depth of drive setting (usually a dial on the nose or top of the tool) allows you to control the countersink of the nails. You may need to experiment to get this just right: If the nails aren’t going deep enough, you can increase the setting, but too much drive depth can cause the nail to go right through a molding.
The proper way to use a finish nailer varies based on the gauge of the tool and fasteners. When using a 16-gauge nailer, you want to hold it perpendicular to the trim you’re installing. This will ensure that the cutters filed on the tips of the nails cut through the wood fibers rather than splitting them apart.
Installing trim often requires holding the nailer overhead for a prolonged period of time, which can get uncomfortable (or require the use of both hands) if the tool is too heavy. Especially with battery-powered nailers, where the battery adds a lot of bulk, test the weight of the tool before you buy.


