

You’ve been painting since you were a toddler, you say? You might nevertheless be surprised that many of the formulations (and some of the techniques) you’ve relied on no longer apply. Most areas have all but phased out oil-based paints, and even the reliable alkyds—a synthetic-resin type with some of the characteristics of oil paint—are getting hard to find. The good news is that many modern paints, primers, prepping solutions, and additives are well suited to century-old clapboards and plaster walls. Environmental concerns have produced a mini boom in earth-friendly linseed-oil and other “natural paints” that perform well.
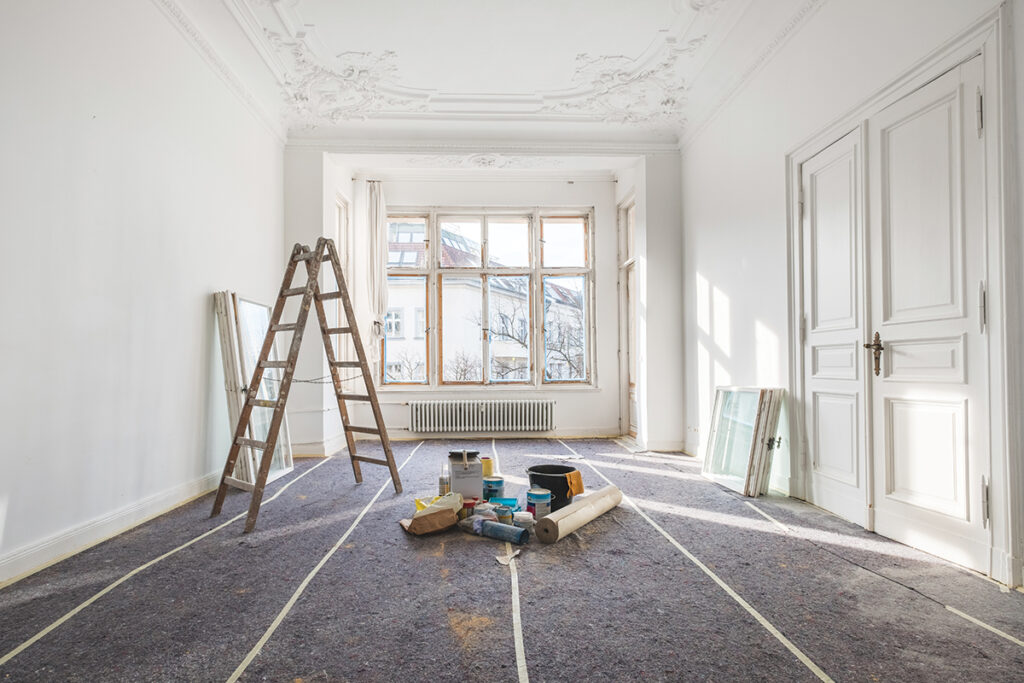
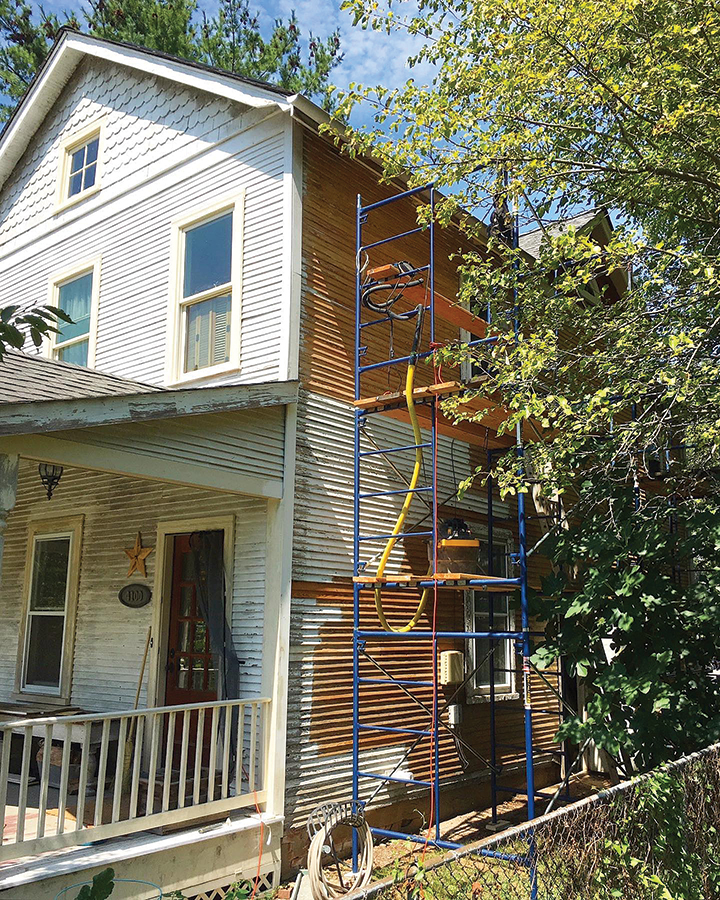
Anyone can paint, the saying goes, but it takes skill and knowledge to make the job a success, which begins and ends with preparation. That goes for interior walls as well as more challenging exterior jobs. Even a relatively intact room may have wall imperfections that should be corrected before the first coat goes on. For a wood-sided exterior, prepping is easily two-thirds of the work that goes into a high-quality paint job.
Choosing The Right House Paint
Once you’ve selected colors, choose the right kind of paint for the application. While modern latex paints are usually fine for interior walls in newer houses, lime-based plaster might benefit from a breathable, clay-based paint, such as those from Earthborn Paints.
When possible, choose an alkyd or oil-based primer, even if the finish coats will be latex. Waterborne primers are available, but an oil- or resin-based primer helps create a bond with the wood or previous finish, before the water-based paint goes on. If using linseed-oil paint, be sure to mix the primer very well and apply it in thin, even coats.
On the exterior, treat dry or bare, moisture-starved wood with an oil-based restorative containing boiled linseed oil, or use a linseed-oil paint such as those made by Ottosson or Allback. These breathable, petrochemical-free paints won’t trap moisture under the paint’s skin. It’s also essential to lay down a primer coat once the wood is fully prepped and dry. Use a true primer formulation, not just thinned paint. Again, even if the finish coats will be latex, choose an alkyd or oil-based primer, if it’s available.
Getting Started
You’ll need an array of tools for prepping surfaces and for different paint jobs and types of paint. Begin with high-quality brushes. Good ones have excellent balance, a smooth handle, and strong, firmly attached bristles (either natural or synthetic, depending on the paint type chosen). Bristles should taper slightly from the ferrule to fine tips at the end. Properly cared for, a good brush will last through years of paint jobs. Other essentials include drop cloths (heavy canvas is more protective and forgiving than plastic), quart-sized paint buckets—preferably with a handle—and paint trays with or without liners, roller frames with woven nap covers, and 4″ and 8″ extension poles for use inside and out.
There is no one right way to paint interior walls, but pros and avid restorers rely on methods that maximize efficiency while producing superior results in the shortest amount of time. Serial-house DIYer Alex Santantonio, of OldTownHome.com, takes a top-down approach, starting with the ceiling, then moving on to crown moulding and door and window casings—all before painting the walls. After cutting-in around trim with a 2 ½” angle sash brush (see p. 40), he finishes the walls with a paint roller with a nap of suitable thickness (¼” to 3/8″ for smooth surfaces). Last, he paints the baseboard trim. This approach offers two advantages: any paint drips or splatters will not hit finished work, and the entire room maybe painted without relying on painter’s tape to mask.
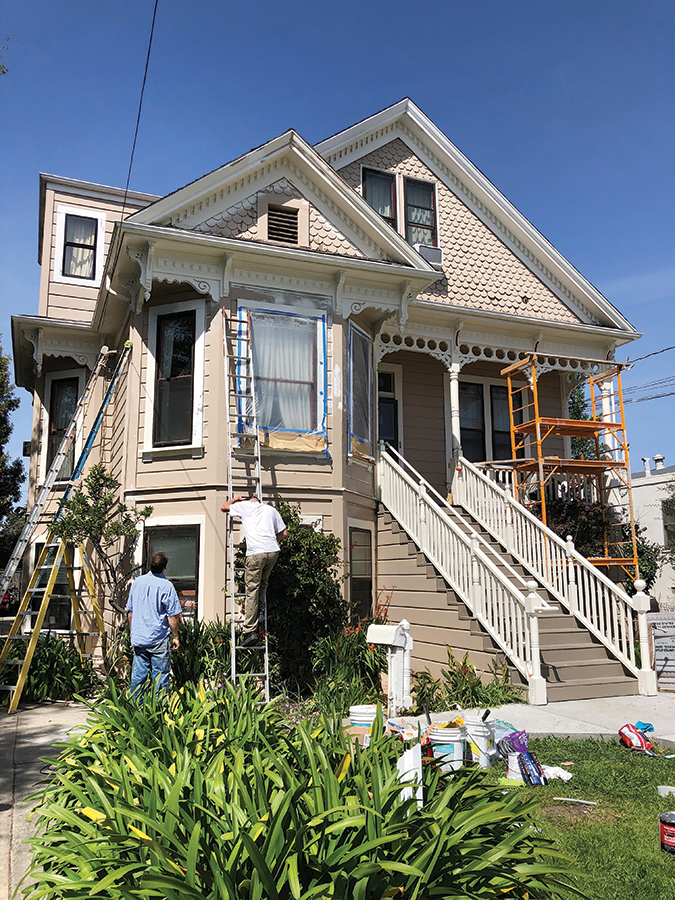
For exterior painting, most pros start with the siding before progressing to trim. Many pros spray-paint siding to save time, although brushing or rolling paint on the exterior may yield better results, especially if you are doing the work yourself. Paint on a dry, low-humidity day when temperatures are between 60 and 85 degrees F. Do not paint in direct sun (move around the house for shade). Select a slightly larger brush than you’d use for interior work—3″ or 4″, says Scott Rutledge, vice president of marketing for Wooster Brush. If you’re using oil-based or alkyd paint, a natural hog-bristle brush is a good option, because the natural oils in the brush allow it to flow oil paint on more smoothly. (When used with water-based paints, natural bristles tend to swell
and get floppy, making paint application harder to control.)
Use a brush to paint clapboards, trim, windows, and doors, and to cut-in around corners or adjacent surfaces. Rollers are optimal for broad, flat areas such as stucco or masonry, but may work well on wood or brick, as well. Mini rollers in 4″ and 6″ sizes may save labor on clapboards. Use a long-nap roller to get full coverage and to reach into crevices. The rougher your surface, the deeper the nap needs to be.
Allow a several hours or a full day between coats. Alkyd and oil-based paints take longer to dry, especially in humid climates. Once all of the siding is primed and painted, use brushes and mini rollers for the trim. For best results, trim, too, should be primed and given at least two top coats of paint.
Prepping Before You Paint
Washing is your first step, even outside. Remove dirt, loose paint, and mildew, all the while checking for other paint problems, rot, and damage to be repaired before painting. Follow with hand-scraping and sanding, taking measures to avoid inhalation of lead paint. Caulk before painting.
How to Prep for Exterior Painting
The walls and trim have to be clean in order for paint to adhere. While many painters will suggest power-washing the surface to remove dirt and loose paint, you should avoid this, especially at a high PSI. Water may penetrate to the interior, damaging insulation and plaster. Soaking exterior wood can set up the entire paint job for rapid failure.
Clean dirty surfaces with a stiff bristle brush and a bucket of warm water to which is added a phosphate-free TSP substitute. Once the surface is completely dry, remove all flaking, loose, blistered, or alligatored paint with hand scrapers and putty knives. If there’s any chance of lead paint, wear a respirator, preferably a NIOSH-approved one with the highest filter rating.
For exterior paint that’s thick and resists scraping, consider investing in an EPA-compliant infrared paint remover, like those from Eco-Strip or Silent Paint Remover. Infrared heat opens wood pores and warms the paint only to the point where it can be easily scraped off. Pry out loose or dried-out caulk and replace it with high-quality exterior caulk. Once the popping paint has been removed, lightly sand any scraped or roughed-up areas to help the primer adhere.

How to Prep for Interior Painting
Remove the furniture from the room, or push large pieces to the center and cover them with drop cloths. Then prep the walls by sanding rough spots. Cast a hand-held light (such as a work light) across the surface at an acute angle and circle any bumps or rough spots with a pencil. Sand and fill with spackle or wood filler as needed. Large gaps around trim may be filled in with flexible, paintable caulk. Let dry, sand, and vacuum up all resulting dust before you begin priming.
Cutting In

step two: Advance slightly and repeat over the prior area, filing in towards the line.
step three : Continue to fill in a few inches at a time.
Cutting-in is a painting skill that practice makes perfect—and getting good at is is worth it, because it saves time:
- Find a comfortable grip on an angle paintbrush, with the longer side of bristles in line with your pointer finger.
- Dip the brush in paint—no more than 2/3 of the bristle length into paint—and briskly slap off the excess.
- Lean the short end of the brush onto the work surface an inch or so away from your desired line.
- Lean your hand away from the paint line while moving the ends of the bristles toward the line. Don’t rush. As you pull the brush along, a bead of paint will form and then disappear as the paint load diminishes.
- Now advance slightly and repeat the process over the prior area, extending the line a few more inches.
- Repeat, refilling the brush as needed.
How to Paint Muntins
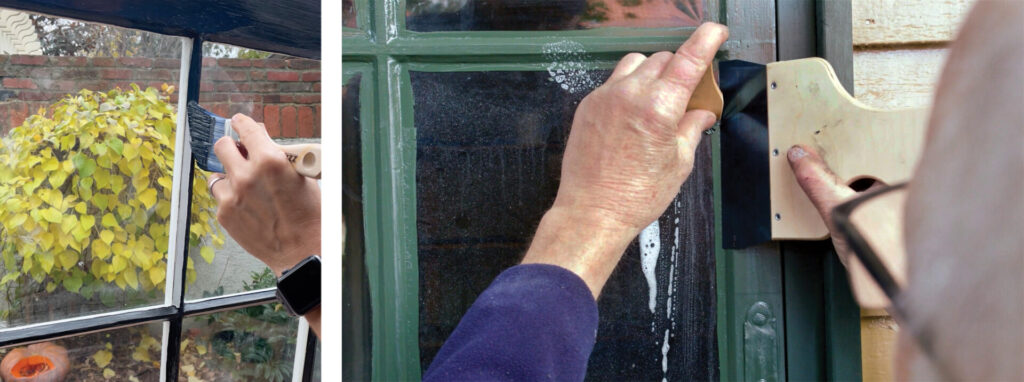
RIGHT: After overlapping paint onto the window glass, use a razor, straight- edge, and a little soap to cleanly remove any excess paint.
Window muntins (the narrow wood frames that hold the glass panes) are tricky to paint. Pros and skilled DIYers typically paint them quickly with a 1 ½” or 2″ inch angle sash brush, with nary a drip. As a novice, consider two methods: Mask the windowpanes with low-stick, removable painter’s tape before painting. Or slightly overpaint muntins so that a bead of paint overlaps the glass. Overpainting is the better choice for a protective paint job, especially if the window glass was freshly replaced or reglazed. The paint creates a seal over the putty. Once the paint is dry, you can apply a wet, soapy sponge to the area, then remove any excess using a window-scraper (razor) and a straightedge.
Cleaning up: 1-2-3
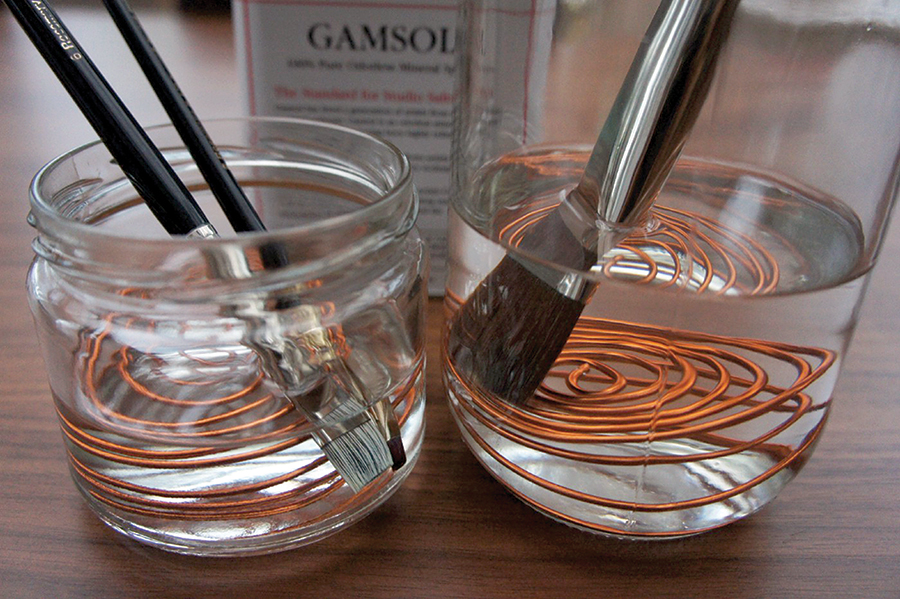
The cleanup after painting with oil- or alkyd-based paints doesn’t have to be nasty. (Note: Linseed-oil paints clean up with linseed-oil soap!) For paints requiring solvents: Set up three tall, sealable glass containers with just enough denatured alcohol, mineral spirits, or turpentine to cover the paint-heavy parts of a brush without its touching the bottom. To create clearance between the bristles and the bottom of the jar, lay a twist of malleable wire at the bottom for the bristle tips to rest on. The coiled wire should be ½” to ¾” high — tall enough to keep the brush ends out of the paint residue that will settle at the bottom. Now:
1. Place a used brush into the first jar and agitate it to work the solvent into the bristles. Let it sit for at least five minutes and up to a few hours.
2. Remove the brush, blot it on paper towels, then repeat the process in the second jar.
3. Repeat again in the third jar, and the brush should be ready to reuse.
Maintaining Your Brushes
If you’re working on an all-day paint project, dried paint tends to collect near the brush ferrule, which can ruin the brush. Make a habit of washing the brush every hour or so with warm water and a brush comb.
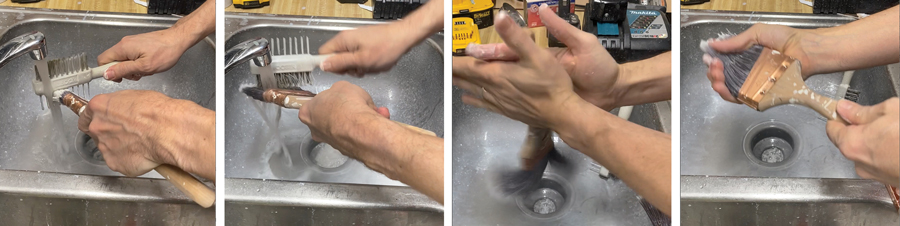
STEP 1: Run warm water over the brush while scraping out paint with the brush cleaner’s stainless-steel pins.
STEP 2: When most of the paint is gone, scrub the brush, still under the flow of water, with the bristle side of the tool.
STEP 3: When it’s clean, spin the brush back and forth between your palms to release excess water.
STEP 4: Squeeze out remaining water, and the brush is ready for painting or storage (either hanging from the handle or back in its original paper packaging).
Can You Reuse Paint Thinner?
To reuse paint thinner, allow the dirty solvent to sit long enough for the paint sludge to settle to the bottom of the jar. Slowly pour the clear thinner from the top into a second, clean jar and save it for the next use. Seal the jar that has the sludge, but keep adding to it as you work. When it’s full, take it to a hazardous-waste disposal site. Some towns have a hazardous waste-disposal day once or twice a year. Never pour solvents down a sink drain.
Painting Your Home With Linseed-Oil Paints
Linseed-oil paints and primers are ideal for both old and new wood, but require methods different from those used with modern paints.
- To prime new, sawn, or planed wood, mix 30 percent linseed-oil paint with 70 percent linseed oil and mix well. (Use raw linseed oil on exteriors; boiled on interior walls.) Let the primer soak into the wood and dry thoroughly before painting.
- For new wood, follow priming with two thin coats of undiluted paint using a stiff bristle brush. Let dry between coats.
- For old or previous painted wood, remove as much of the previous coatings as possible, scraping away paint chips and sweeping up dust. Then scrub the surface with linseed-oil soap and a stainless-steel scrub pad as needed.
- Follow by two coats of linseed oil paint, again using a stiff bristle brush. On some surfaces, no primer will be needed.
Resources
paints & finishes
Benjamin Moore
benjaminmoore.com
Alkyd & waterborne int./ext. paints; one-coat int. paint
California Paints
californiapaints.com
Alkyd & latex int./ext. paints
C2 Paint/The Coatings Alliance
c2paint.com
Low-VOC acrylic & water-based alkyd paints
Curator
curatorpaints.com
Colors of Ireland in five finishes
Farrow & Ball
farrow-ball.com
All water-based finishes; Liberty curated color line
Fine Paints of Europe
finepaintsofeurope.com
Premium house paint plus waterborne, acrylic latex & high-gloss oil-based paints
Pratt & Lambert
prattandlambert.com
Acrylic & oil-based exterior paints
Sherwin-Williams
sherwin-williams.com
Int./ext. paints; historical paint color collection
Valspar
valspar.com
Int./ext. paints
specialty finishes
AFM Safecoat
safecoatpaint.com
Plant-based oil paints
Bioshield
bioshieldpaint.com
Clay and solvent-free paints & pigments
The Color People
colorpeople.com
Custom color schemes for every style/era, nationwide
Earthborn
earthbornpaints.co.uk
Safe paints with historical inspiration
Earth+Flax Paints
earthandflax.com
Ottosson, Viking, Allback linseed-oil paints & products
Epifanes
epifanes.com
Marine primers, paints, finishes for wood
Homestead House
homesteadhouse.ca
VOC-free acrylic int./ext; milk paint
Old-Fashioned Milk Paint Co.
milkpaint.com
Organic milk paint; specialty finishes (crackle, beeswax)
Old Village Paint Colors
old-village.com
Milk, oil-based, latex in authentic period colors
Olde Century Colors
oldecenturycolors.com
Latex & simulated milk paint in historical colors
Real Milk Paint Co.
realmilkpaint.com
Mixable non-toxic milk paints; additive for ext. surfaces
Sage Restoration
sagerestoration.com
Allback linseed-oil paints; natural cleaners
Solvent Free Paint
solventfreepaint.com
Organic linseed-oil paint
strippers & tools
American International Tool
paintshaver.com
Paintshaver paint-removal tools & orbital sanders
Eco-Strip
eco-strip.com
Speedheater infrared paint remover & tools
Franmar Chemical
franmar.com
Eco-friendly paint strippers
Hyde
hydetools.com
Full line of prep tools, scrapers, power washers
Purdy
purdy.com
Professional brushes & paint tools
Silent Paint Remover
silentpaintremover.com
Infrared-heat paint removal
Wagner
wagnerspraytech.com
FLEXiO paint sprayers & pro systems
Stinger Brush
stingerbrush.com
Original multifilament brush for edging & general/pro painting
Wooster Brush Co.
woosterbrush.com
Full line of painting supplies


