

Epoxy glue helped restore this Palladian window. Deteriorated wood was removed, and new pieces were spliced in to support the upper window panes. Ray Tschoepe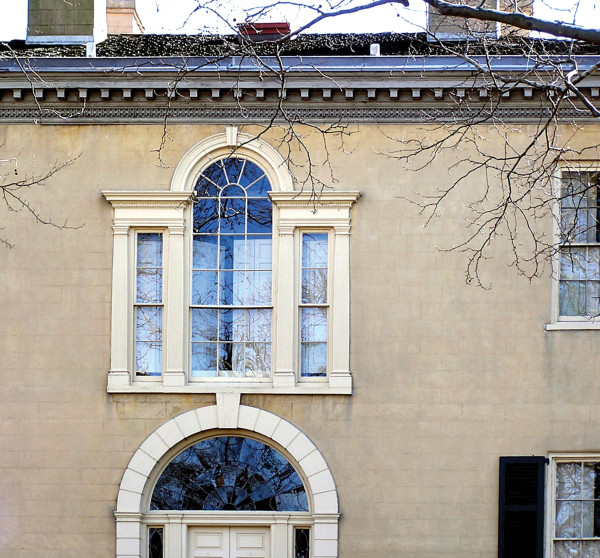
When it comes to adhesives, most homeowners shy away from epoxies in favor of more familiar glues because they find them intimidating. Sure, it takes a little work to mix epoxies properly, but they have plenty of advantages that make the extra effort worth it. Epoxies are waterproof and extremely strong, and they resist most solvents. But most important in terms of restoration work, epoxy glues don’t need clamp pressure to set. Understanding how epoxy glues work, and when to use them, can save you time on restoration projects by allowing in-place repairs of layered architectural elements. With a little practice, epoxies could become common materials in your toolbox.
One Hot Compound
Epoxies are basically two-part polymers or plastics. Many of us have had some experience with the epoxy glues available in the popular double-barreled syringe at hardware stores. While these are convenient, they are more costly and less versatile than epoxies you mix yourself. Most epoxy adhesives can be formulated to work well with traditional materials such as stone and metal. (Other epoxies can also be used as fillers and as consolidants, to build up deteriorated wood surfaces.)
It’s important to mix resin and hardener carefully, following the manufacturer’s recommendations. Using a scale helps.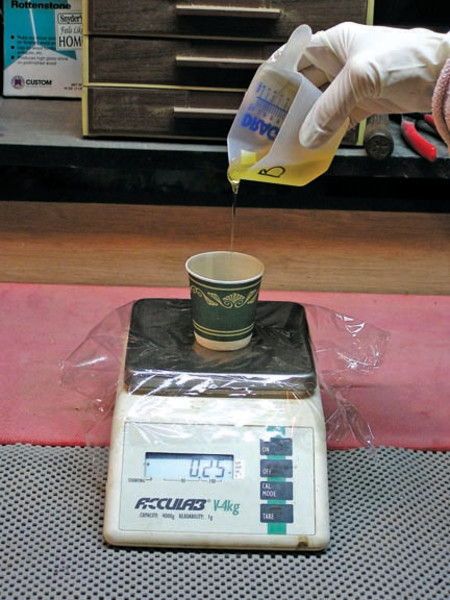
Generally speaking, epoxies consist of a resin and a hardener. The exact chemical composition of each isn’t critical to understanding and using this material, but there are a few aspects worth noting. Cured epoxies are generally classified as polyamines. Chemically, they’re different from polyesters, which make up the bulk of automobile body patches and fillers. While these have been promoted for restoration work, they do not perform as well as polyamines in exterior applications on wood.
All epoxies that we buy are derived from families of these two components, resins and hardeners. Manufacturers can control various properties such as curing rate, hardness, strength, and flexibility depending on the combination used. Because the hardener becomes part of the product, it is important that both components be mixed as closely as possible to the manufacturer’s recommended proportions. To understand why, it helps to visualize how the two components work together. Imagine the resin as a jar of marble-sized ball bearings, and the hardener as small magnetic discs the size of watch batteries. When you mix both together and stir, they become a tangled mass of intertwined ball bearings. If you add too many ball bearings or too many magnets, there will be weak spots.
Mix only as much epoxy as you need, both to avoid over-applying and because any extra will end up in the trash can. This is easier said than done; it takes practice to figure out the exact amount needed per project. If you have to err, do it on the side of mixing a little too much so you aren’t stuck trying to combine more at a critical repair moment.
Epoxies are exothermic, meaning they generate heat as they cure. This heat accelerates the curing rate until all of the material has cross-linked. Curing times for epoxies are usually given at 70° F. Since curing is so temperature-dependent, a good rule of thumb is to assume that for every 18° F (10° C) change in temperature, the curing speed will either double or halve. So, if the outside air temperature is between 50° and 55° F, an epoxy designed to cure in 6 hours will need 12. The same epoxy will cure in about 3 hours on an 85° or 90° day. To slow (or accelerate) curing time, select epoxies formulated for warm or cool weather. In the summertime, work in shaded areas and transfer mixed material into wide, shallow containers so heat dissipates more rapidly.
The new wood added to this Palladian window, attached with epoxy, is clearly visible. Ray Tschoepe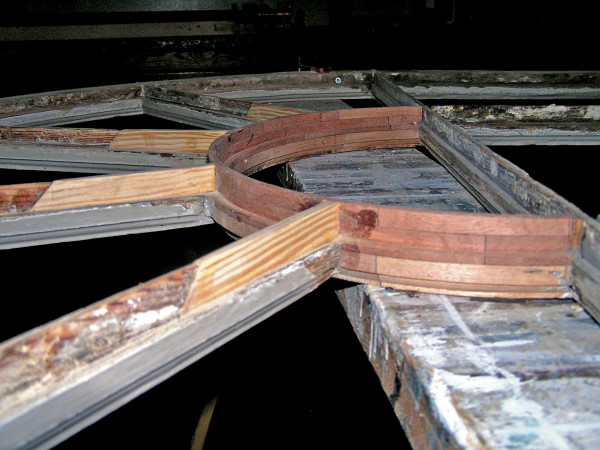
To Use, or Not to Use
Epoxies bond so strongly that they are difficult to reverse, so they should always be considered permanent. This makes epoxies great for repairs like inserting Dutchman patches into flooring, or securing gingerbread trim or other fragile architectural components that need bonding. But it also means you should consider the entire assembly before reaching for the mixing bowl. Historic windows, for example, typically need maintenance that requires disassembling one or more joints, so you should only use epoxy on non-jointed window elements.
After combining the resin and hardener in a disposable container, like a paper cup, I find it works best to mix thoroughly for a full 3 minutes before applying. Use a disposable brush, and always apply the epoxy to a completely dry surface. You can assure the proper alignment of parts with something as simple as masking tape, but if the pieces want to slide apart, you can use light clamp pressure to stabilize them until the epoxy has cured. Since epoxy is somewhat gap-filling, small inconsistencies in the joint surfaces are easily bridged. When the epoxy has cured, sand or plane away any excess. If the repair is on an exterior element, it must be protected from sunlight, which will break down epoxy polymers, so brush with an oil-based primer before finish coating. To keep epoxy from oozing onto surfaces outside of the glue joint (like the clamp itself), use strips of plastic wrap or waxed paper as a separator. (Epoxy won’t stick to either one.) To protect the epoxy from rain while it cures, loosely cover the repair with plastic sheeting.


