

When old-house woodwork meanders around curves—like the crown molding, chair rail, and baseboard on this wall—specialized carpentry skills can help with repairs. (Photo: Andy Olenick)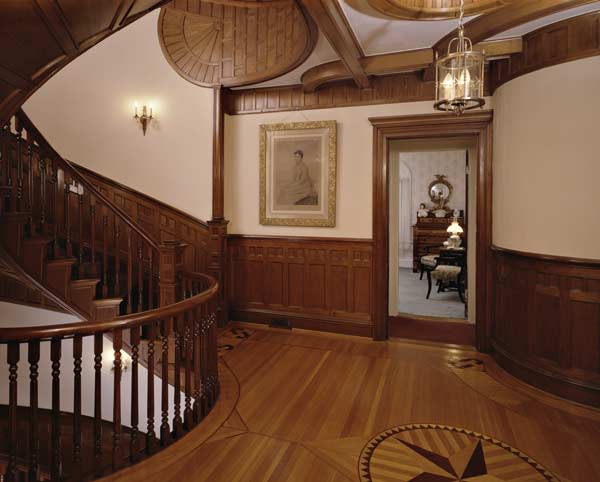
Old-house woodwork comes in many shapes and sizes, from turned spindles and planed moldings to whole wainscots, mantels, and gingerbread. Be it plain or ornate, we mostly picture woodwork laid out in straight lines and turning at right angles, but some old houses can throw a finish carpenter curves along walls, stairs, coves, and even turrets. Making wood bend around a radius is a unique branch of joinery that draws on a specialized family of techniques, such as steaming (softening wood with steam), laminating (building up a curved surface with thin strips), or kerfing (a process of making multiple small cuts along a board to allow it to follow a curve). Kerfing can be found anywhere there are curved moldings, from vernacular farmhouses to refined high-style Queen Anne and Richardsonian Romanesque mansions. To learn how it’s done, OHJ visited The Village at Grand Traverse Commons, an adaptive reuse project on an enormous, historic 19th century Italianate building in Traverse City, Michigan.
Ray Minervini, who heads the restoration team for the Village project, confided that his craftsmen faced some learning curves when they started to recreate the 1883 building’s curved moldings, also known as radius trim. “It took some practice to get the geometry of the cuts right,” says Minervini. “If your kerfs aren’t deep enough you can’t bend the board, and if they’re too close together, instead of bending the board just snaps in two.” After some initial trial and error that resulted in broken boards, the team perfected a system for restoring the scores of baseboard moldings that are 7½” wide, ¾” thick and curve on an 8″ radius.
Making the Cut
A table saw with a very thin blade cuts uniform kerfs along the width of a board’s backside. (Guard removed for clarity). (Photo: Meg Lombardi)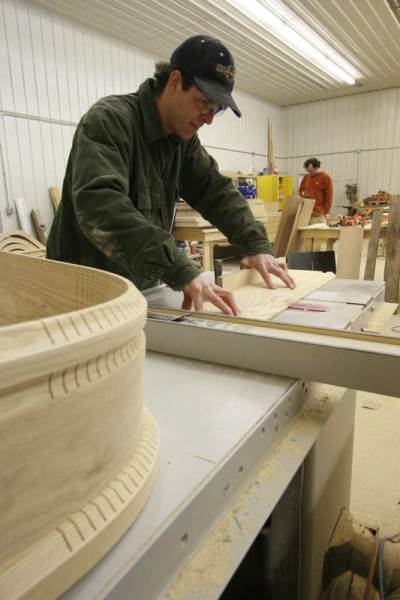
First, the team selects prime boards of ash—dense hardwood not often made to bend into submission—with very straight grain and clear of knots or checks. Any defects in the wood make it prone to splitting. To match the molding profile on the originals, they had a local mill cut a special blade to the specifications of the 1883 profile, something most millworks are equipped to do these days.
Next, they measure and mark the backside of the board where the kerfs will be cut. Minervini’s team mimicked the spacing of the kerfs on the original baseboards—which all turned on an identical radius—but the spacing needed for a specific curve can be calculated using a simple, century-old formula. From the center point, or apex, of the kerfed portion, the team lays out 3/32″-thick kerfs 3/8″ apart for a total span of 8″—4″ on either side of the apex. This spacing allows for maximum flexibility and stress relief right in the middle of the bend. After that, the spacing of the kerfs widens to ½” apart over another 4″ per side.
To cut the kerfs, the team uses an 8″ table saw with a 3/32″, carbide–tipped thin-kerf blade (they prefer those made by Freud). The team chose a table saw over a radial arm saw because it was more stable. The cuts run the width of the board and are deep, extending nearly three-quarters of the way through its thickness to leave only 3/16″ of wood beneath them. It is important to make the cuts uniform in size and depth. Irregular cuts can hamper the uniformity of the bend, telegraph through the wood, or stress the board and even cause it to break. Uniform cuts are also more visually appealing, and help the board bend easily.
Getting the Bends
At installation, boards are spread with glue, pinned into place using a pneumatic nail gun, and bolstered with a pressure block until the glue sets up. (Photo: Meg Lombardi)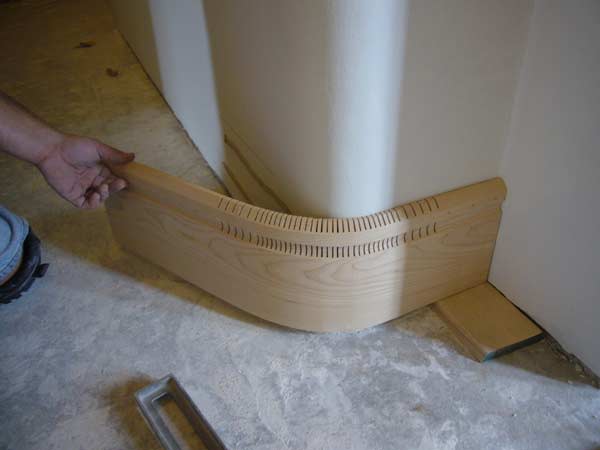
Once all the kerfs are cut, the team begins attaching the baseboards to the curved walls. First, they dry-fit each board into place, measuring and marking where to place the 22-degree lap cut that will cleanly meld it to adjoining trim, the square cut that will butt it against a door frame, or the 45-degree-angle that will fit it into a corner. Next, they use a level to mark the wall where the top of the trim should sit so that it aligns with any adjoining baseboard. The team then applies a good polyurethane glue to both the board and the wall (polyurethane glue minimizes any shrinkage; using it on the wall, too, maximizes adherence) smoothing the glue out with a putty knife to increase the surface contact. Starting at the end, or straight portion, of the board, they press it onto the wall along the level marks and immediately pin it to the wood furring strips that grounded the original plaster using a pneumatic trim gun with 1¾” nails. It’s important to secure the board into place before beginning to attach the curved section. The team continues to press the board into place around the bend and secure it with nails spaced 4″ apart vertically, and 10″ apart horizontally, being careful to avoid nailing into the kerfed portion. Once the board is fully attached and nailed, it is braced with pressure blocks to help tightly set the glue. The blocks remain in place overnight, until the glue has completely dried.
After the blocks are removed, the team uses a putty knife to force color-toned wood putty into the kerfs that are visible from the front, much in the way a crack is filled in drywall. The putty is left to dry overnight, then sanded smooth. For the final step, they stain the entire board to match the original color. “We pretty much replicated what craftsmen had done here 125 years ago,” says Minervini. “And the resulting radius trim is a seamless fit.”


