

After an in-depth repair project, the leaded glass door fronting the author’s built-in 1906 china cabinet looks good as new.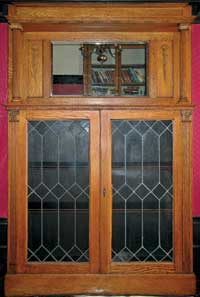
Looking at the missing panes and broken cames of the leaded glass doors fronting our 1906 built-in china cabinet, my husband, Todd, and I wondered how hard it would be to fix them ourselves.
“Can novices repair leaded glass windows?” we asked each other. Like most old-house owners, we like the challenge of repairing our home’s broken pieces—and our brick row house in Brooklyn, New York, has had plenty of parts in need of fixing. So I decided to look into the logistics of leaded glass.
After much research and some project trial and error, I found that repairing leaded glass is possible, but it’s not easy. It’s a daunting task that requires a high level of skill. You need to be comfortable working with both glass and some toxic materials—it’s more than just the lead that’s harmful—and it also helps if you have some soldering experience. In other words, repairing leaded glass is not for the faint of heart—but it can be done.
Step 3, part A. Removing nails.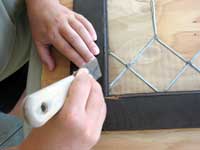
Step 1: Assess the Damage
Take stock of what you have to work with. Simpler patterns are easier to repair, while more complex designs—windows with a curved pattern, for example—require more dexterity.
Step 3, part B.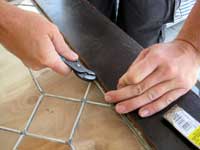
The leaded glass door on our cabinet had myriad problems: cracked glass, missing panes, broken lead came, and broken, bowing solder joints that were causing the remaining intact glass to loosen. We knew the damaged glass and came had to be completely replaced, but we tried to save as much of the old came (which has a lifespan of about 100 years) as we could.
Step 2: Prepare the Work Area and Materials
For the work surface, we laid a piece of 3/4 ” plywood on a worktable and attached two furring strips (1 1./4 ” x 2″) at a 45-degree angle to help hold the window in place while we worked. Check that everything is squared before attaching the strips with screws. For glass-cutting, we kept a 2′ section of low-pile carpet handy to work on to help prevent cracking the glass.
Next, you need to stretch the lead came to make it rigid enough for use. Put one end of the lead came into a vise attached to the worktable and grab the other with pliers or lead stretchers. (Tip: Cut the 6′ lead strip in half so it’s a manageable size.) Keep the came straight, and pull the lead so that it stretches about 1″ to 1 1/2 “. Because lead came is soft and bends easily, support it with two hands when moving it. If the nubs are closed up, use a putty knife or a fid to open them. (Alternatively, you can buy stretched lead from a local supplier, as we did.)
Step 3, part C.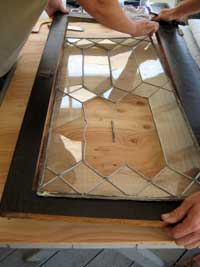
Step 3: Liberate the Glass
Glass needs to be worked on a flat surface, so we removed the door from the china cabinet and took the window out of its frame. Working from the back side of the door, we gently pried the trim from the window with putty knives. Slip the putty knife between the trim and the frame, and use a gentle rocking motion to pry the trim loose [A]. Next, pull out any remaining finish nails [B].
We used the putty knives to loosen the window from the frame, then slid it out onto the work surface [C], laying it front side down. When working on a leaded glass repair, it’s best to work on the front first because lead can slip through the joints when soldering, leaving unattractive solder joints on the back of the piece. But our piece was so fragile that we decided to work on the back first and clean up any unsightly joints on the front after the window was stable enough to turn.
Step 4, part D. Capture details.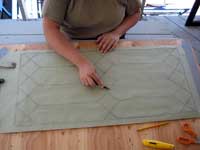
Step 4: Make a Template
If you have a missing pane of glass, a template can help create a replacement piece, or it can be laid underneath the window on the worktable as a guide. To make the template, take a piece of paper large enough to cover your window and secure it atop the window with tape. Using a pencil, make a rubbing of the window’s design [D]. Be sure to capture all the details before removing the template from the window. You can trace over the lines with a marker to make them clearer. For intricate windows, number and mark each piece on the template to keep track of its correct location. Measure the length and the width of the window and record them on the template.
Step 5, part E. Cut along edge.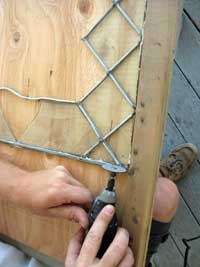
Step 5: Begin Repairs
Wearing safety glasses, we used a rotary tool with a 1″ circular blade attachment to cut the lead joints along the left edge to access damaged areas [E]. Cut only halfway through the joints, and be careful not to cut adjacent glass. After completing one side, flip the window to do the other side. Because our window was so brittle, we slid it slightly off the edge of the worktable, keeping the glass supported while hanging just the edge over the side, and made the cuts from underneath. (If you try this method, make sure you have a helper.) Another option is to cut a piece of plywood to fit over the window and plywood base, creating a “sandwich” that can be turned over.
Step 6, part F. Score inside of black lines.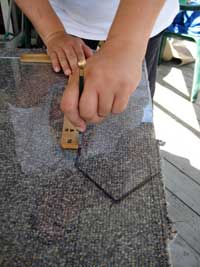
We began assembling the bowed areas—where joints were cracking and the glass was loosening from the cames—trying to save the old leadwork where we could. We cleaned out the cames with putty knives and box cutters, then tried fitting the loose glass back in the cames. Next, we gently tapped the old lead came and glass back into place using the hammer and the wood handle of the putty knife or a small piece of scrap lead (hitting directly with a hammer can cause the glass to crack) and secured it with German glazing nails. The glazing nails should be lightly tapped into place so you can still move them easily.
Step 6, part G.Slide scored portion.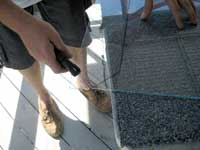
Step 6: Cut the Glass
When cutting replacement panes, we were lucky enough to have an intact original pane to use as a template. (If you don’t have an intact piece, you can use the paper template as a guide.) Using a black marker, outline the template on the glass, then remove it. Next, score the glass with the glass cutter [F]. Make sure to score inside the black lines; otherwise, your replacement will be too big.
Step 7, part H. Leave room for soldering.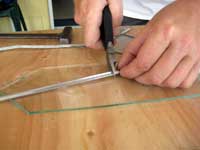
Hold the glass cutter between your middle and index finger, fitting it snugly against the joint between the two, and grasp the bottom with your index finger and thumb. Keep glass-cutter oil ready in a shallow bowl, and dip the cutter each time you score the glass. For straight scoring, butt the glass cutter against a ruler. Keep the cutter upright, and press firmly but not too hard, moving in a steady motion down the entire sheet. Practice on scrap glass first to perfect your technique.
Step 7, part I. Place glazing nails.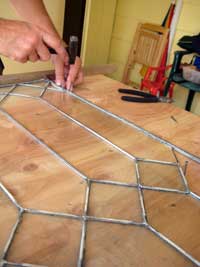
There are two ways to break scored glass. The first is to use breaker pliers, which I found easier as a beginner. Line the white line on the pliers up on your scored line and press down to snap the glass in a straight line [G]. You also can slide the scored portion off the worktable’s edge and use the rounded head of the glass cutter to tap along the scored line, then grasp the edge with your free hand and press down until the glass snaps in a straight line. Once you’ve created replacement panes, check the fit in the window by either comparing the panes against the template or against the remaining lead panes.
Step 7, part J. Expose fresh lead.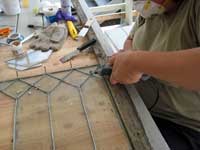
Step 7: Cut and Solder the Lead
Next, cut the lead came to fit. As beginners, lead nippers were our tool of choice (professionals use a lead knife). The flat side of the nippers makes a straight cut; the concave side a mitered one. Place a length of came where you need a new section. With the nippers, nick the spot [H] where you want to make a cut—it should be slightly beyond the end of the glass to leave room for soldering—then tap the lead into place with glazing nails [I].
Step 7, part K. Place solder near joint.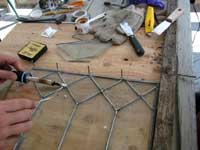
To effectively solder old lead joints, you must expose fresh lead, either by scraping the joints with a box cutter or by using the rotary tool with a wire brush [J], which tends to go much faster. Whatever the method, always wear a face mask for this work, as it creates a lot of dust and scraps. Clean up afterward with a shop vacuum.
Next, brush flux on all joints to be soldered (flux helps solder flow freely and adhere) and on the tip of the hot soldering iron, then clean the tip on a wet sponge (you should see water when you press on it). Glass cutter cleaners—sponges in a hard plastic case—aren’t very expensive, but you also can substitute an ordinary sponge in an appropriate container.
Place the solder near the joint and melt it with the iron [K]. Don’t use too much solder, and don’t extend it past the joint. In a circular motion, move the iron across the joint, smoothing the solder into and across the joint. Don’t leave the iron on the joint for more than two or three seconds, or you risk melting the came. You may get solder drips on the glass, but they should easily slide or scrape off or with light scraping.
Check the joint—if you’re unhappy with the soldering, let it cool and then work on it again, bearing in mind that the came can melt. When you’re done, wipe down the window with paper towels and glass cleaner, then turn the window over and repeat the soldering process.
Step 8, part L. Secure with glazing nails.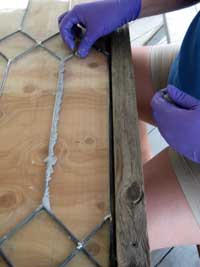
Step 8: Cement the Window
The last step is cementing the panes in place with putty and whiting. Glazing putty has a shelf life—it should be moist with some oil showing on top. If your putty gets too hard, add a touch of linseed oil to soften it up, but don’t overdo it—putty should be firm, not runny.
Wearing latex gloves, take a ball-size portion of the putty and knead it for a minute or two. The putty will soften as you work it—some lumps are normal, but most smooth out. You can add a light sprinkling of whiting to the putty for strengthening, but we preferred the putty alone because too much whiting can dry out the putty.
Step 8. part M. Spread whiting.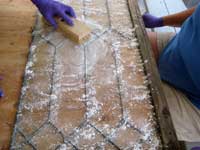
Secure the panel with glazing nails, then take some putty and press it into the cames to fill spaces between the glass and the lead came [L]. Don’t put too much pressure on the window—you don’t want to crack the glass. Some putty may leak through to the other side. Once you’ve completed the panel, clean around the seams with an awl or a fid, and remove excess putty with a little roll of the putty itself or a natural-bristle brush.
Step 8. part N. Return windoww back to frame.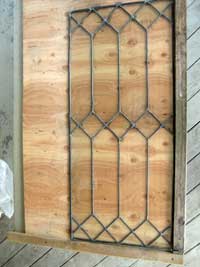
Whether or not you used whiting during kneading, you’ll need to sprinkle some over the window at this point. Wear a face mask and sprinkle the whiting gently; try not to create a cloud of whiting dust. Next, gently spread the whiting around by moving a natural-bristle brush in a circular motion along the cames [M]. The linseed oil should start drying up, and the lead will start to oxidize (turn darker), which is your cue to vacuum up the whiting. If there is residual oil, repeat the process with a second coating of whiting.
Take your natural-bristle brush and sweep the lead to create a dark patina. Doing this by hand can be tedious and labor-intensive, but we liked the results. A faster method mounts a bristle brush attachment on a drill. It’s a good idea to break the brush in on the edge of the worktable first so bristles polish the lead instead of scratching it.
With the patina ready [N], we returned the window back its door frame and reattached the trim, giving our 1906 china cabinet a new lease on life.


