

Surrounded by half-completed projects and lighting parts, a craftsman in the restoration workshop at Appleton Antique Lighting threads wiring into the crystals of an antique fixture.
Like hemlines and film stars, lighting fixtures tend to go in and out of fashion. Count yourself lucky if any of the pendants, chandeliers, ceiling lights, or sconces hung and mounted soon after your house was built are still in place, even if a shade is cracked or the metalwork is black with nicotine. You’ve really scored if you find an original fixture stashed away like a broken toy in the back of a closet. No matter what its apparent condition, rehanging or restoring an original fixture is a way to honor the architecture of the house.
First Step: Safety
It’s natural to want to give a good cleaning to a chandelier coated with an amalgam of grease and dust. Before touching an antique lighting fixture, however, assess its condition. Does it still have the original wiring? If so, it should be professionally rewired before any other steps are taken.
“If you rewire an old light fixture yourself, you’d better have a good idea what you’re doing,” says Nigel Barnes, manager of Antique and Vintage at Rejuvenation, which restores and sells antique lighting fixtures. “If you do it wrong, you could get shocked or blow an electrical circuit. At worst, it could burn your house down.”
Chris Jones of Historic Houseparts, a dealer in architectural salvage and reproductions, concurs: “For anything more than a single wire and socket, I would recommend sending it to a professional.”
That’s because it’s impossible to tell whether a fixture you’ve rewired yourself is safe; checking it requires testing equipment only a pro shop will have. A good shop can safely clean an old fixture and make repairs with sensitivity to its original character. They’ll know, for instance, whether arms that are bent can be reshaped, where wiring can or cannot safely go, and sources for missing components. They’ll offer expertise in matching or replicating finishes.
These vintage shades have been converted to pendant lights with the addition of new sockets and vintage-look, cloth-covered wire from Sundial Wire.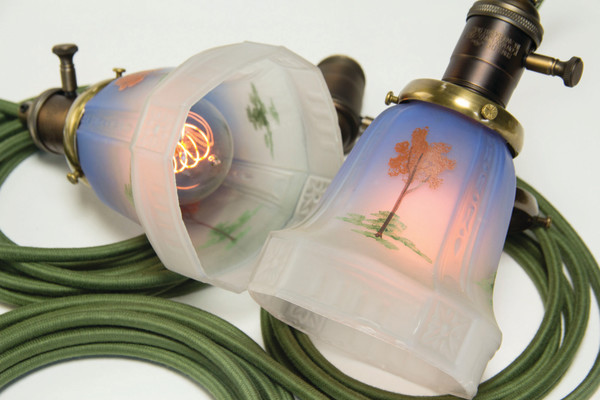
Evaluation and Cleaning
Sometimes a fixture only needs a light cleaning to remove superficial dirt, leaving the original lacquered finish intact. “If we know what the metal is, we know what cleaning approach to use,” says Jane Deimezis, owner of Appleton Antique Lighting. “If we don’t know, we take baby steps. Then it’s a matter of trial and error.”
Many early 20th-century lighting fixtures were made of brass, typically finished with a coat of lacquer. A surface cleaning for a brass light may be followed by a hand polishing, with or without a protective coating of wax that helps protect the existing patina.
In cases where the cleaned finish is uneven, the customer may opt for a more in-depth cleaning, taking the metal down to bare brass, with the option of re-lacquering. At the same time, it may be possible to add a patina to darken the metal slightly and give it a more consistent appearance or an aged look. “Every piece is different,” continues Deimezis. “You have to respect what the piece is and not make it worse than it was.”
Ultimately, most important decisions are referred to the client, who may have a desired look in mind or budgetary constraints to consider. Keep in mind that even a straightforward cleaning and rewiring usually requires taking the fixture completely apart. A good shop will document the process with photographs. “Sometimes there are multiple ways a fixture can be assembled,” says Jones. “You have to have that record of how it was put together.”
A little cleaning goes a long way: A vintage chandelier before and after being cleaned by Appleton Antique Lighting. Courtesy Appleton Antique Lighting
Learn More About Antique Lighting:
- How to Choose Lighting for Period Homes
- Lighting for Romantic Revival Homes
- Gaslight Era Lighting Fixtures
- 100 Years of Lighting Design
- Old House Directory: Architectural Salvage & Antique Dealers
Replacing Missing Parts
It’s a rare vintage lighting fixture that comes to the repair shop with all pieces intact. “There are many parts that you just never have enough of,” says Barnes. “A really common one would be the canopy, the part that goes on the ceiling. I don’t know why it is, but people tend to save fixtures but not the canopy.”
Since many of the tubes, bodies, arms, shade holders, and sockets in lighting made between about 1880 and 1940 haven’t changed much, Rejuvenation started making its own reproduction parts long ago as part of its transition from architectural salvage dealer to reproduction lighting company. Even so, “we always prefer to use antique parts whenever possible. We rarely use replacement glass—we go to great lengths to find antique shades that fit the old fixtures.”
Restoring older lighting often means reversing poor repairs. “A fixture may have been Frankensteined together out of parts from more than one fixture,” Barnes says. Someone may have removed part of the light and discarded it, or turned arms meant to be upright upside down. “Our job is to assess whether we can fix it and make it whole again.”
Restoring Special Finishes
The range of finishes that can restored is as varied as vintage lighting itself, from clear lacquer to enameling and gilding. With the exception of replating, which is subject to stringent environmental controls, most can be handled in-house by a reputable restoration shop. While some vintage finishes are forgiving, others are more fragile and require practiced hands.
Many Depression-era fixtures, for example, have delicate polychrome finishes that are easily damaged and hard to restore. “The reason they’re like that is that they were made from lower-cost materials, like pot metal, which were then painted in multiple colors,” says Barnes.
One example would be a pot-metal fixture with a gilt base, over-painted with jewel tones—cheap to make, but deluxe in appearance. “In some cases, these were exceptional, hand-applied finishes.”
In his 15 years at Rejuvenation’s shop, Barnes has worked with craftspeople who were really good at replicating these finishes. “Sometimes they’re so good that even I can’t tell whether the finish is original or restored.”
A few years ago, Barnes discovered that one of Rejuvenation’s suppliers had been making lacquer for lighting companies since the 1870s. The company still carried some of the historic lines. Rejuvenation now buys those historic colors direct from the source.
While many of the polychromed finishes from the 1920s and ’30s were hand rubbed, painted finishes popular just after World War II and into the 1950s were applied using the latest air-brushing technology. One of the artisans in the shop began to experiment with air brushing, with excellent results. “The fixtures look exactly like the originals,” Barnes says. “Same technique, same paint.”
Patinas, however, can be much more difficult to replicate. One recent project involved re-creating a large, stepped finial missing from a verde green (copper) fixture that was part of an otherwise intact set. Noting that techniques to create patina for statuary and bronze range from applications of baking soda and vinegar to burying the part in the ground for a week, the shop finally hit on a solution after a period of experimentation. “I think it took a month of different attempts to make that new, shiny copper turn verde green and look natural.”
Bring Lights Back to Life
In its unrestored state, the ‘Petite French’ bronze chandelier was a mess of twisted arms, missing crystals, and a dull finish. The restoration team at Appleton Lighting removed all of the crystals and glass stem pieces, plus old wiring and sockets. “All of the arms, bobeches, and candle cups are original,” says Emilia Deimezis, who co-owns the shop with her mother. “Any replacement pieces, such as the canopy, we chemically patinated to match.”
The finish was revived through a gentle cleaning followed by a wax polish, retaining the original patina. “The miracle is not in the chemicals, but in the careful and practiced application of old-fashioned elbow grease,” she says.
Case Study: Sconce Response
The folks at Historic Houseparts brushed up a pair of early 20th-century sconces by stripping away a layer of gold paint with a gentle cleaner that left the original lacquer finish intact. In addition to a complete rewiring, the lights received period-appropriate flat key sockets and new art glass panels to replace the missing glass:
Historic Houseparts restored these antique sconces. 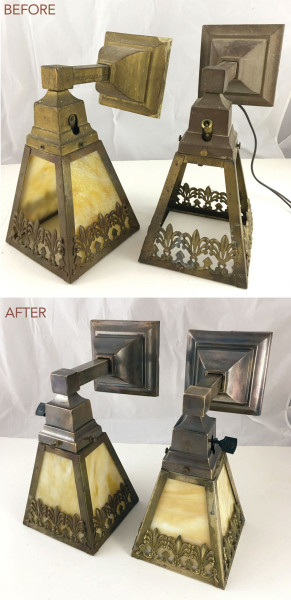
Where to Find Antique Lighting Fixtures
Like anything else considered rare and valuable, vintage and antique fixtures that can be returned to use and beauty are getting harder to find. “Antique lighting is really art,” says Nigel Barnes of Rejuvenation. In its early days, Rejuvenation bought most of the antique fixtures it restored from locals, who brought them in because they were “too neat to throw away,” he says.
Now most of the shop’s inventory comes from eBay and other online sources, and from the mega antiques markets held a few times a year, such as Brimfield in Massachusetts, Round Top in Texas, and Mount Dora in Florida.
Go Local
If you’re in the market, shop first in local vintage shops, and then consider a pilgrimage to a large show near you. Wear good walking shoes, bring water, and arrive early. Then search selectively. “Start with something beautiful, of quality, or desirable,” says Jane Deimezis of Appleton Antique Lighting. “It’s not about the age of the fixture, it’s about the quality and the uniqueness.”
Like the pros, try to make sure any vintage piece has all, or almost all, of the working parts. A few flaws may be OK, too. “As long as it’s intact after 100 years, be willing to consider an imperfect patina,” says Barnes. “It’s totally a matter of taste.”
Cleaning The Metal
Most early 20th-century lighting fixtures are made of lacquer-coated brass, which can be safely cleaned with a mild soap and water.
Go slow, advises Jane Deimezis of Appleton Lighting. “Start with a soft cloth, then a damp cloth, and then use a mild cleaner you would use to wash dishes with, like Ivory Liquid.”
Some tips for cleaning metal on antique lighting fixtures:
- Wipe the cleaned parts with a soft, nonabrasive cloth such as an old T-shirt, suggests Chris Jones of Historic Houseparts. Avoid using paper towels, which can burnish surfaces.
- Once dry, protect exposed surfaces and even out the finish with paste wax or a metallic wax, such as Rub ’n Buff.
- If the fixture is steel, copper, or cast-iron, however, do not use the soaking method to clean it, Jones says. Since cast iron rusts easily when exposed to water, wax it or apply tung oil after cleaning. Many cast-iron fixtures were painted, so finishing with a coat of metallic paint is also an option.
- Additionally, fixtures with painted or polychromed finishes are difficult to clean safely. “Anything you touch with a cleaner can dissolve the paint,” says Jones. Use Q-tips or cotton balls dipped into a dilute solution of cleaner to remove nicotine and other grime.
Cleaning The Glass
Just like fine crystal, shades made of clear, frosted, opal, etched, wheel-cut or even art glass can be washed in warm soapy water. If the glass is polychromed or decorated with paint or decals, however, do not soak it. Even a brief immersion may dissolve the decoration, experts note. Clean around the applied decoration with cotton balls or Q-tips dipped into a dilute solution of warm soapy water.
Case Study: Restoring the Princess
Buyers from Rejuvenation recently discovered and bought a spectacular, Empire-style filigreed gas chandelier that had been electrified in the early 20th century. Known around the shop as The Princess, the long, pierced, spool-shaped body supports 12 delicately cast ornamental arm backs with ornate mounts that conceal sockets for electric bulbs. All sockets were carefully rewired and each light tested. Brass ormolus were hand polished and each arm was antiqued for contrast. One of the few parts missing on the entire fixture was a small but highly visible gas key. The shop was able to have the small part re-cast—expensive, but certainly worth it for a fixture with a retail value of $12,000.
Cleaning and polishing restored beauty to an old fixture, with no need to replate. Courtesy Appleton Antique Lighting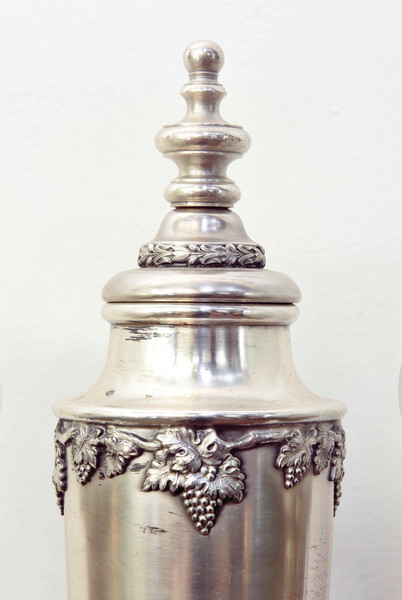
Should You Replate?
Fixtures with plated finishes such as nickel or silver can be brought back to life through a recoating process known as electroplating. The fixture should be pretty far gone before you take this step: replating requires stripping the original finish away, and the process is toxic enough that it’s environmentally regulated in most states.
In replating, the new finish is deposited electrochemically. The fixture or part to be revived is dipped into a chemical bath that contains the desired metal. A mild electrical charge attracts the metal in the solution to the surface, depositing a very thin, uniform layer. The thickness and nature of the application can be manipulated by the length
of time the part is left in the tank, and through other techniques.
Do You Know UNO?
Whether they are glass or fabric, shades must have a fitter to connect to a lamp or light fixture. The standard fitter is an UNO, a threaded ring that screws into a socket with matching threaded rings. When making minor repairs to a lamp with a socket that lacks the necessary threading, you can add an adapter with UNO threading to fasten it to the shade.


